Universal Laptop USB Docking Station with VGA Audio Ethernet USBVGADOCK2 DE: Bedienungsanleitung - de.startech.com FR: Guide de l'utilisateur - fr.startech.com ES: Guía del usuario - es.startech.com IT: Guida per l'uso - it.startech.com NL: Gebruiksaanwijzing - nl.startech.com PT: Guia do usuário - pt.startech.com For the most up-to-date information, please visit: www.startech.
FCC Compliance Statement This equipment has been tested and found to comply with the limits for a Class B digital device, pursuant to part 15 of the FCC Rules. These limits are designed to provide reasonable protection against harmful interference in a residential installation. This equipment generates, uses and can radiate radio frequency energy and, if not installed and used in accordance with the instructions, may cause harmful interference to radio communications.
Table of Contents Introduction.........................................................................................................................................................1 Packaging Contents.................................................................................................................................1 System Requirements.............................................................................................................................1 Rear View.......................
Introduction This USB to VGA adapter and docking station offers combined functionality of a 4-in-1 docking station by converting a single USB 2.0 port into multiple connection ports, including a VGA Port, 10/100Mbps RJ45 network port, dual (3.5mm mini-jack) audio ports and four additional USB 2.0 ports.
Rear View RJ45 Ethernet connector USB 2.0 connector USB Link LED VGA connector Side Views 3.
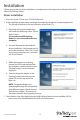
Installation * Please ensure that the driver installation is complete prior to the physical installation of the USB 2.0 to VGA Docking Station Driver Installation 1. Insert the Driver CD into your CD/DVD-ROM drive. 2. If the installation program does not begin automatically, locate the Setup.exe application. This file will be located in the root directory of the Driver CD. 3. Executing the Setup.exe application will launch the following screen.
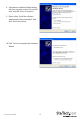
8. A Hardware Installation Wizard dialog will show up, please select “No, not this time” and click “Next” to continue. 9. Please select “Install the software automatically (Recommended)”. And click ”Next” to continue. 10. Click “Finish” to complete the Hardware Wizard.
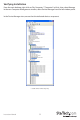
Verifying Installation From the main desktop, right-click on “My Computer” (“Computer” in Vista), then select Manage. In the new Computer Management window, select Device Manager from the left window panel. In the Device Manager view, ensure that the indicated devices are present.
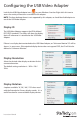
Configuring the USB Video Adapter Look for the USB Video Adapter icon ( ) on your Windows Start bar. Right-click this icon to access the variety of functions associated to the adapter. NOTE: The Aero desktop theme is not supported by this adapter, so should be disabled prior to use of the USB Video Adapter. Display ID The USB Video Adapter supports the VESA defined DDC/EDID standard. The utility will show the display device ID whenever it is attached to the USB Video Adapter.
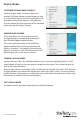
Display Modes “EXTENDED” DISPLAY MODE (DEFAULT) A default display mode; this feature allows the attached USB Video Adapter enabled display to work as an “Extended” display to the on-board display. The extended working space improves work efficiency. You may change the relative position of this extended display through the Display Settings. “MIRROR” DISPLAY MODE This feature allows the same content from the on-board display to be duplicated (mirroring) to the USB Video Adapter enabled display.
Identify Monitors Easy display identification via an overlay will be shown in the upper right corner of all attached display devices. Multi-Display Control Panel A unique feature to allow quicker and simpler management of a multi-display environment. A series of hotkeys to quickly move the active window or mouse cursor to the desired display (either on-board or each USB Video Adapter). The default setting of the hotkeys can be found in the Hotkey List of “Multi-Display Control Panel”.
Supported Video Resolutions Resolution Color Depth Refresh Rate 800x600 16/32-bit 60/75Hz 1024x768 16/32-bit 60/75Hz 1152x864 16/32-bit 60Hz 1280x768 16/32-bit 60Hz 1280x800 16/32-bit 60Hz 1280x960 16/32-bit 60Hz 1280x1024 16/32-bit 60Hz 1400x1050 16/32-bit 60Hz 1440x900 16/32-bit 60Hz 1680x1050 16/32-bit 60Hz 1600x1200 16/32-bit 60Hz Instruction Manual 9
Specifications Bus Interface USB 2.0 Video Signal VGA (RGBHV) LAN: SMSC LAN9500 Chipset ID Video: Trigger UV-185CB-128 1 x USB type mini-B 1 x DE-15 VGA female Connectors 4 x USB type A 1 x RJ45 2 x 3.5mm mini-jack audio Maximum Video Resolution 1600x1200@32-bit LAN Link Speed 10/100 Mbps Maximum Data Transfer Rate USB 2.0: 480 Mbps Power Adapter 5VDC, 3A, center positive Dimensions 203.0mm x 69.8mm x 19.
Technical Support StarTech.com’s lifetime technical support is an integral part of our commit-ment to provide industryleading solutions. If you ever need help with your product, visit www.startech.com/support and access our comprehensive selection of online tools, documentation, and downloads. Warranty Information This product is backed by a one year warranty. In addition, StarTech.
Hard-to-find made easy. At StarTech.com, that isn’t a slogan. It’s a promise. StarTech.com is your one-stop source for every connectivity part you need. From the latest technology to legacy products — and all the parts that bridge the old and new — we can help you find the parts that connect your solutions. We make it easy to locate the parts, and we quickly deliver them wherever they need to go. Just talk to one of our tech advisors or visit our website.