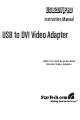
USB2DVIPRO Instruction Manual USB to DVI Video Adapter USB 2.
FCC Compliance Statement This equipment has been tested and found to comply with the limits for a Class B digital device, pursuant to part 15 of the FCC Rules. These limits are designed to provide reasonable protection against harmful interference in a residential installation. This equipment generates, uses and can radiate radio frequency energy and, if not installed and used in accordance with the instructions, may cause harmful interference to radio communications.
Table of Contents Introduction...................................................................... 1 Packaging Contents.....................................................................1 System Requirements..................................................................1 Installation........................................................................ 2 Windows 2000/XP/Vista/7............................................................2 Mac OS X (10.4.11/10.5.6)...................................
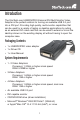
Introduction The StarTech.com USB2DVIPRO External DVI Multi Monitor Video Adapter is the perfect solution for turning an available USB 2.0 port into a DVI port. Providing high quality, multi-monitor capabilities that can be used for a variety of laptop or desktop applications by acting as an external DVI video card that can be used to extend or mirror the desktop shown on the existing display, all without having to open the computer case.
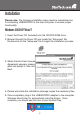
Installation Please note: The following installation steps must be completed prior to connecting USB2DVIPRO to the host computer, to ensure proper functionality. Windows 2000/XP/Vista/7 1. Insert the Driver CD (included) into the CD/DVD-ROM drive. 2. Browse through the Driver CD and locate the “Setup.exe” file. Double-click on the “Setup.exe” file to begin the installation process: 3. When the End User License Agreement appears, please read and accept it, then click Next. 4.
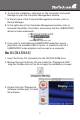
. To verify the installation, right-click on “My Computer” and select Manage to open the Computer Management window. 7. In the left pane of the Computer Management window, click on Device Manager. 8. In the right pane of the Computer Management window, click on Universal Serial Bus Controllers, and ensure that the USB2DVIPRO device is listed underneath. *actual device name may vary 9. If you wish to add additional USB2DVIPRO adapters, simply plug them into available USB 2.0 ports.
4. Once the installation is complete, click the “Restart” button. The computer will automatically reboot, so make sure to close/ save any files you have opened, before pressing this button. 5. After the computer has restarted, plug in the USB2DVIPRO adapter to an available USB 2.0 port. The adapter should now be ready to use. 6. If you wish to add additional USB2DVIPRO adapters, simply plug them into available USB 2.0 ports. A maximum total of 4 USB2DVIPRO video adapters can be used on a computer.
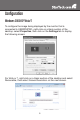
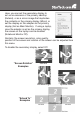
Configuration Windows 2000/XP/Vista/7 To configure the image being displayed by the monitor that is connected to USB2DVIPRO, right-click on a blank section of the desktop, select Properties, then click on the Settings tab to display the following screen: For Vista or 7, right-click on a blank section of the desktop and select Personalize, then select Screen Resolution on the next screen.
Configure the secondary display by selecting it from the dropdown menu, then adjusting the desired settings: Using the Second Display in Extended Mode In Extended Mode, the monitor that is connected to USB2DVIPRO creates an extension of the Windows Desktop displayed on the primary monitor.
Here, you can set the secondary display to act as an extension of the primary desktop (Extend), or as a mirror image that duplicates the contents on the primary display (Mirror) or set the display on the adapter as the primary display (Set as Main Monitor). If using a laptop, once the adapter is set as the primary display, the screen on the laptop can be disabled (Notebook Monitor Off).
Media Playback Please note that while operating in Extended Mode, USB2DVIPRO can display media files and DVDs using a broad variety of media players, however in Clone Mode, limited support is available for video playback. Mac OS X (10.4.11/10.5.6) To configure the display settings and monitor positions, bring up the Displays Preferences from the System Preferences menu: The Display settings for each display will appear on the individual monitors themselves.
mirroring then in the “Arrangement” page press and hold the ‘cmd’ and ‘alt’ keys and drag and drop the display you wish to mirror over the primary display (shown with the white bar). Repeat this with each display you wish to mirror, all others will act as an extended display. Changing the Primary Display You can change which display is the primary display by moving the Menu Bar between displays. Changing the primary display affects where new windows appear and the position of the Dock.
Configuring Displays from the Menu Bar If you have checked the “Show displays in menu bar” in the Display Preferences window, then you can configure displays by clicking the display icon in the menu bar. This will show a menu similar to the following: Media Playback Please note that while operating in Extended Mode, USB2DVIPRO can display media files and DVDs using a broad variety of media players, however in Clone Mode, limited support is available for video playback.
Supported Video Resolutions Resolution Colour Depth 640x480 16, 32 800x600 16, 32 1024x768 16, 32 1280x1024 16, 32 1366x768 16, 32 1440x900 16, 32 1600x1200 16, 32 1680x1050 16, 32 1920x1200 16, 32 11
Specifications Bus Interface USB 2.0 1x USB type A Connectors 1 x DVI-I female Video Signal DVI-D (digital) DVI-A (analog) Cable Length 35cm (13.8”) USB cable Built in Memory 16MB 4 (Windows) Maximum Number of Adapters 4 (Mac OS) Dimensions 90.0mm x 48.0mm x 23.5mm Weight 73g Supported Operating Systems Windows 2000/XP/Vista/7 (32/64-bit), Mac OS 10.4.11/10.5.6 (Intel), Linux* * visit www.displaylink.
Technical Support StarTech.com’s lifetime technical support is an integral part of our commitment to provide industry-leading solutions. If you ever need help with your product, visit www.startech.com/support and access our comprehensive selection of online tools, documentation, and downloads. Warranty Information This product is backed by a one year warranty. In addition, StarTech.
StarTech.com has been making “hard-to-find easy” since 1985, providing high quality solutions to a diverse IT and A/V customer base that spans many channels, including government, education and industrial facilities to name just a few. We offer an unmatched selection of computer parts, cables, A/V products, KVM and Server Management solutions, serving a worldwide market through our locations in the United States, Canada, the United Kingdom and Taiwan. Visit www.startech.