USB2VGA2 Instruction Manual USB to VGA Adapter USB 2.
FCC Compliance Statement This equipment has been tested and found to comply with the limits for a Class B digital device, pursuant to part 15 of the FCC Rules. These limits are designed to provide reasonable protection against harmful interference in a residential installation. This equipment generates, uses and can radiate radio frequency energy and, if not installed and used in accordance with the instructions, may cause harmful interference to radio communications.
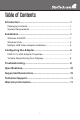
Table of Contents Introduction...................................................................... 1 Packaging Contents.....................................................................1 System Requirements..................................................................1 Installation........................................................................ 1 Windows 2000/XP........................................................................1 Windows Vista...........................................
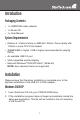
Introduction Packaging Contents • 1 x USB2VGA2 video adapter • 1 x Driver CD • 1 x User Manual System Requirements • Pentium 4 / Celeron family or AMD K6 / Athlon / Duron family with 1.5GHz or more CPU Clock Speed • 256MB RAM or higher (1GB or higher recommended for playing DVDs) • An available USB 2.
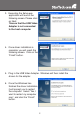
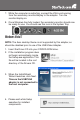
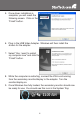
3. Executing the Setup.exe application will launch the following screen. Please click on Next: *Ensure that the USB Video Adapter is not connected to the host computer. 4. Once driver installation is complete, you will reach the following screen. Click on the “Finish” button. 5. Plug in the USB Video Adapter. Windows will then install the drivers for the adapter. 6. Once the Windows has finished the driver installation, it will prompt you to restart the computer.
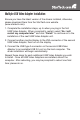
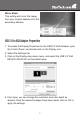
7. While the computer is restarting, connect the VGA cord running from the secondary monitor/display to the adapter. Turn the monitor/display on. 8. Once Windows has fully loaded, the secondary monitor should now be ready for use. You should see this icon in the System Tray: Windows Vista/7 NOTE: The Aero desktop theme is not supported by this adapter, so should be disabled prior to use of the USB Video Adapter. 1. Insert the Driver CD into your CD/DVD-ROM drive. 2.
5. Once driver installation is complete, you will reach the following screen. Click on the “Finish” button. 6. Plug in the USB Video Adapter. Windows will then install the drivers for the adapter. 7. Select “Yes, I want to restart my computer now” and click the “Finish” button. 8. While the computer is restarting, connect the VGA cord running from the secondary monitor/display to the adapter. Turn the monitor/display on. 9. Once Windows has fully loaded, the secondary monitor should now be ready for use.
Multiple USB Video Adapter Installation Ensure you have the latest version of the drivers installed, otherwise, please download them from the StarTech.com website (www.startech.com). 1. Complete the installation steps, up to when you plug in the first USB Video Adapter. When prompted to restart, select “No, I will restart my computer later” and click “Finish” to continue on to the installation of the next USB Video Adapter unit. 2.
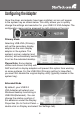
Configuring the Adapter Once the driver and adapter have been installed, an icon will appear in the system tray as shown below. This utility allows you to quickly change the settings and resolution for your USB 2.0 VGA Adapter. The configuration menu can be accessed by right-clicking on the icon: Primary Mode Selecting USB-VGA (Primary), will set the secondary display adapter as the main display adapter in the system.
Mirror Mode This setting will mirror the image from your original desktop onto the secondary desktop. USB 2.0 to VGA Adapter Properties 1. To access the Display Properties for the USB 2.0 VGA Adapter, open the Control Panel, and double-click on the Display icon. 2. Select the Settings tab. 3. Click on the Display drop-down menu, and select the USB 2.0 VGA DEVICE (DISPLAY) as illustrated below: 4. From here, you can change the resolution and color depth as desired.
Virtually Repositioning Your Displays Click and drag the appropriate monitor icon (labelled 1 or 2) to the desired position. For example, the secondary display can be dragged to the left of the primary display, allowing it to be positioned virtually on the left. Click OK or Apply to save the changes. Troubleshooting The USB 2.
I am unable to use applications that require Direct3D on the USB 2.0 VGA adapter Currently, the drivers that support the USB 2.0 VGA adapter do not support Direct3D. Please check for driver updates in the future, for added support. If your application requires Direct3D, please use the main display adapter. The following troubleshooting tips may help if you are experiencing any issues. • Check to make sure that all connectors are plugged in correctly.
Specifications Bus Interface USB 2.
Technical Support StarTech.com’s lifetime technical support is an integral part of our commit-ment to provide industry-leading solutions. If you ever need help with your product, visit www.startech.com/support and access our comprehensive selection of online tools, documentation, and downloads. Warranty Information This product is backed by a one year warranty. In addition, StarTech.
StarTech.com has been making “hard-to-find easy” since 1985, providing high quality solutions to a diverse IT and A/V customer base that spans many channels, including government, education and industrial facilities to name just a few. We offer an unmatched selection of computer parts, cables, A/V products, KVM and Server Management solutions, serving a worldwide market through our locations in the United States, Canada, the United Kingdom and Taiwan. Visit www.startech.