USB 2.0 to 2.5in/3.5in SATA and IDE HDD Docking Station UNIDOCK2U DE: Bedienungsanleitung - de.startech.com FR: Guide de l'utilisateur - fr.startech.com ES: Guía del usuario - es.startech.com IT: Guida per l'uso - it.startech.com NL: Gebruiksaanwijzing - nl.startech.com PT: Guia do usuário - pt.startech.com For the most up-to-date information, please visit: www.startech.
FCC Compliance Statement This equipment has been tested and found to comply with the limits for a Class B digital device, pursuant to part 15 of the FCC Rules. These limits are designed to provide reasonable protection against harmful interference in a residential installation. This equipment generates, uses and can radiate radio frequency energy and, if not installed and used in accordance with the instructions, may cause harmful interference to radio communications.
Table of Contents Introduction.........................................................................................................................................................1 Packaging Contents.................................................................................................................................1 System Requirements.............................................................................................................................1 Installation....................
Introduction This external SATA and IDE hard drive docking station provides full and instant access to any 2.5in or 3.5in IDE and SATA (SATA 1.5Gb/s or 3.0Gb/s) hard drive up to 2 TB without having to mount the hard drive inside a computer or enclosure.
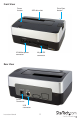
Front View Power button SATA drive slot LP4 Molex power connector 40-pin IDE connector Rear View Power Connector USB connector Instruction Manual 2 Drive Eject button
Hardware Installation 1. Plug the power and USB cable from the rear side of the hard drive dock to a power outlet and the USB port on the computer respectively. 2. If connecting a SATA hard drive, simply insert the drive, into the top loading slot on the hard drive dock. Make sure the connectors on the hard drive face the same corner as the cut-out in the drive slot door. 3. If connecting a 3.
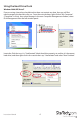
Using the Hard Drive Dock Windows 2000/XP/Vista/7 If you are using a brand new hard drive that does not contain any data, then you will first need to prepare the hard drive for use. From the main desktop, right-click on “My Computer” (“Computer” in Vista), then select Manage. In the new Computer Management window, select Disk Management from the left window panel.
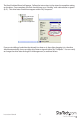
The New Partition Wizard will appear. Follow the instructions in the wizard to complete setting up the drive. Once complete, the Disk should show up as “Healthy” with a drive letter assigned (ie. E:). This drive letter should now appear within “My Computer”. If you are installing a hard drive that already has data on it, then after plugging it in, the drive should automatically show up with a drive letter assigned within “My Computer”.
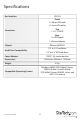
Specifications Bus Interface USB 2.0 Front 1 x 40-pin IDE male 1 x 4-pin LP4 molex Top 1 x 7+15 SATA Connectors Rear 1 x USB type B 1 x Power Adapter Chipset JMicron JM20337 2.5” or 3.5” hard drive Hard Drive Compatibility 2.5” or 3.5” IDE hard drive Power Adapter 12VDC, 3A, center positive Dimensions 145.0mm x 93.0mm x 145.
Technical Support StarTech.com’s lifetime technical support is an integral part of our commit-ment to provide industry-leading solutions. If you ever need help with your product, visit www.startech.com/ support and access our comprehensive selection of online tools, documentation, and downloads. Warranty Information This product is backed by a two year warranty. In addition, StarTech.
Hard-to-find made easy. At StarTech.com, that isn’t a slogan. It’s a promise. StarTech.com is your one-stop source for every connectivity part you need. From the latest technology to legacy products — and all the parts that bridge the old and new — we can help you find the parts that connect your solutions. We make it easy to locate the parts, and we quickly deliver them wherever they need to go. Just talk to one of our tech advisors or visit our website.