Port RS-232/422/485 Serial over IP Ethernet Device Server NETRS2321E NETRS2321EEU NETRS2321EGB *actual product may vary from photos DE: Bedienungsanleitung - de.startech.com FR: Guide de l'utilisateur - fr.startech.com ES: Guía del usuario - es.startech.com IT: Guida per l'uso - it.startech.com NL: Gebruiksaanwijzing - nl.startech.com PT: Guia do usuário - pt.startech.com For the most up-to-date information, please visit: www.startech.
FCC Compliance Statement This equipment has been tested and found to comply with the limits for a Class B digital device, pursuant to part 15 of the FCC Rules. These limits are designed to provide reasonable protection against harmful interference in a residential installation. This equipment generates, uses and can radiate radio frequency energy and, if not installed and used in accordance with the instructions, may cause harmful interference to radio communications.
Table of Contents Introduction.............................................................................................1 Packaging Contents.................................................................................................................................. 1 System Requirements............................................................................................................................... 1 Top View...............................................................................
Introduction The NETRS2321E 1 Port RS-232/422/485 Serial over IP Ethernet Device Server is the ideal solution for remotely controlling serial devices over your LAN/WAN or even the internet. Featuring user-friendly browser-based configuration of network settings, serial port line settings, UART transmit/receive buffer trigger levels and serial port flow control.
Top View Left Side View Right Side View *actual product may vary from photos Instruction Manual 2
LED Indicators • PWR (Green) - Power indicator • Data (Red) - Data sent and received indicator • 10/100 (Green) - Network signal indicator. When illuminated, network connection is present. • LED (Red) - Device status indicator. When operating under normal status, this LED will blink once per second.
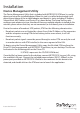
Installation Device Management Utility The Device Management Utility that is included with NETRS2321E (ETM.exe) is used to detect and setup the installed adapter. When this tool is installed and activated, it will detect the existence of the installed adapter, and depict its status including IP Address, Subnet Mask, MAC Address and Device ID as shown below.
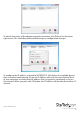
To refresh the status of the adapter network connection, click ‘Refresh’ on the lower right corner. This shold be performed following any configuration changes. To configure the IP address assigned to NETRS2321E, left click on the available device, then a window would pop up. Assign an IP Address with with the same Subnet Mask of your computer, ensuring that the address that is assigned is not already in use on the network. When you press the OK button, the IP Address will be refreshed within 2-3 seconds.
NOTE: Because the Device Management Utility uses broadcast UDP packets, configuration is only allowed when the device’s password is left empty. Web Console Configuration In addition to basic IP Address and subnet mask, specific device settings can be set using an Internet browser, such as Internet Explorer or Netscape etc. If the IP Address of the adapter is already known (default is 192.168.0.10), enter it into the browser address line to launch the Login Page.
The Setup Page Once the correct password has been entered in the Setup Login password field, click on Login to enter the Setup Page, which offers advanced configurability. The elements that can be configured are as follows: IP Address Allows you to modify the assigned IP Address of the adapter. Do not enter a value that is already in use on the connected network. If DHCP client mode is enabled, and there is a DHCP server on the network, this field will automatically be assigned.
Network link speed This field indicates the Ethernet physical link speed. “Auto” indicates that the speed has automatically been assigned by the NETRS2321E adapter. You can also specify 10Mbps or 100Mbps, depending on the speed of the hub to which the adapter is connected. DHCP client This field will indicate either enabled or disabled status. Enable DHCP if there is a DHCP server on your network, otherwise, leave this value as disabled.
• Serial I/O Interface: RS-232: TxD, RxD for data stream, no flow control RS-232 (RTS/CTS): TxD, RxD for data stream, RTS/CTS for flow control RS-232 (RTS/CTS, DTR/DSR): TxD, RxD for data stream, RTS/CTS for flow control. DTR for socket status, DSR for socket open/close control RS-485 (Half duplex): Half duplex RS-485 interface RS-422 (Full duplex): Full duplex RS-422 interface • Packet mode of serial input: Packet mode could be in enabled/disabled mode.
Controller Update Once you have entered the necessary parameters, press the Update button. NETRS2321E will save all parameters in internal non-volatile memory and then reboot. It will take roughly 5 or 10 seconds to complete the whole process following which a new login page will be presented, indicating that the Controller has been updated and that NETRS2321E is restarting. You can re-login and check if all parameters have been correctly saved. Once you have confirmed accuracy, you can close the browser.
3. Right-click on the blank window and select the option to “Add Port”. 4. In the “Add Port” window, simply click the OK button. You choose to manually select a COM port number or have Windows manage it. Further configuration will occur later. 5. Windows may prompt you for permission to install of the virtual serial port drivers. 6.
port should also be visible in the Windows Device Manager. 7. Right-click on the COM port in the virtual COM software and select “Add Net”.
8. The “Add Net” window will allow you to configure the COM port to the settings used by the NETRS2321E unit you wish to associate with. Select the proper operating mode, network settings used to configure the NETRS2321E unit previously (see Web Console Configuration).
Self-Testing Hyper Terminal for TCP/IP WinSock After completing the wiring and parameter settings, it is advisable to confirm that all settings are correct. To use a single computer to test if NETRS2321E is performing properly: 1. Initiate a Hyper Terminal from the Start Menu in Windows. This can be done by clicking on the Start button, selecting All Programs, then Accessories, Communications and finally Hyper Terminal. 2. Provide a terminal name and click on OK. 3.
Once the necessary settings have been made, click on OK. The Hyper Terminal window will appear - if all settings are correct, the time clock at the lower left corner of the terminal window will indicate “connected” and the hh:mm:ss timer will begin counting. Hyper Terminal for COM Port Initiate another Hyper Terminal connection as a COM Port Terminal.
Specifications 1 x DB9 male 1 x 4-wire Terminal Block Connectors 1 x RJ45 Ethernet female 1 x DC Power LEDs Power, Data, LAN Link, System Supported Serial Protocol RS232/422/485 Ethernet Link Speed 10/100 Mbps Maximum Data Transfer Rate 115.2 Kbps Power Adapter 9VDC, 500mA, type M plug Operating Temperature 0°C ~ 60°C (32°F ~ 140°F) Storage Temperature -10°C ~ 70°C (14°F ~ 158°F) Humidity 0 ~ 80% RH Dimensions 90.0mm x 90.0mm x 26.
Technical Support StarTech.com’s lifetime technical support is an integral part of our commitment to provide industry-leading solutions. If you ever need help with your product, visit www.startech.com/support and access our comprehensive selection of online tools, documentation, and downloads. For the latest drivers/software, please visit www.startech.com/downloads Warranty Information This product is backed by a two year warranty. In addition, StarTech.
Hard-to-find made easy. At StarTech.com, that isn’t a slogan. It’s a promise. StarTech.com is your one-stop source for every connectivity part you need. From the latest technology to legacy products — and all the parts that bridge the old and new — we can help you find the parts that connect your solutions. We make it easy to locate the parts, and we quickly deliver them wherever they need to go. Just talk to one of our tech advisors or visit our website.