2 Port Professional USB DisplayPort KVM Switch SV231DPU DE: Bedienungsanleitung - de.startech.com FR: Guide de l'utilisateur - fr.startech.com ES: Guía del usuario - es.startech.com IT: Guida per l'uso - it.startech.com NL: Gebruiksaanwijzing - nl.startech.com PT: Guia do usuário - pt.startech.com For the most up-to-date information, please visit: www.startech.
FCC Compliance Statement This equipment has been tested and found to comply with the limits for a Class B digital device, pursuant to part 15 of the FCC Rules. These limits are designed to provide reasonable protection against harmful interference in a residential installation. This equipment generates, uses and can radiate radio frequency energy and, if not installed and used in accordance with the instructions, may cause harmful interference to radio communications.
Table of Contents Introduction .......................................................................................................................................................1 Package Contents......................................................................................................................................1 System Requirements.............................................................................................................................1 Installation..................
Introduction Packaging Contents • SV231DPU KVM Switch • Power Adapter • Rubber Feet • Instruction Manual System Requirements • DisplayPort enabled computer system • USB enabled computer system • Standard 104-key wired USB keyboard • Standard 3-button wired USB mouse Installation NOTE: Prior to the installation, please power off all devices that will be connected to this system. Ensure that all devices you will connect are properly grounded.
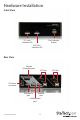
Hardware Installation Front View PC1 Link / Selection LED Port Selection Button PC2 Link / Selection LED Rear View Console DisplayPort port PC2 Port DC Power connector USB Mouse port USB Hub port USB Keyboard port Instruction Manual 2 PC1 Port
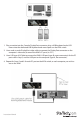
1. Plug a monitor into the Console DisplayPort connector; plug a USB keyboard and a USB mouse into the dedicated USB keyboard and mouse ports on the KVM switch. 2. Use a male-to-male DisplayPort video cable to connect the DisplayPort connector on the computer’s video card, to one of the KVM’s PC ports (ie. PC1) 3. Use a USB type A-B Cable to connect the KVM’s USB port (type B, square connector) for the PC port used in Step 2, and the USB port on the computer (type A, flat connector). 4.
5. OPTIONAL: Connect any other USB peripherals you wish to share between the connected computers/devices to the extra USB Hub port on the Console side. 6. Connect the external power adapter from a wall outlet to the power connector on the rear panel of the KVM switch. 7. Power up the first computer/device and wait for it to fully boot and test keyboard/mouse functionality. 8. Once operation has been successfully confirmed, switch to the next port and power up that computer/device and confirm. 9.
HotKey Control A Hotkey command is a short keyboard sequence for selecting a computer, activating computer scan, etc. A hotkey sequence starts with two left keystrokes ( successively within 0.2 seconds ) followed by one or two more keystrokes. A built-in buzzer generates a high-pitch beep for correct hotkey command; otherwise, one low-pitch beep is generated for errors and the bad key sequence will not be forwarded to the selected computer.
Scan Time Four options are available for users to set the Scan Time duration, it Includes 3, 8, 15 and 30 seconds. Note: Scan Time is set to 3 seconds by default. To adjust Scan Rate, set the scan time of duration before switching to the next computer: Left + Left + F3 The KVM Switch generates 1 to 4 beeps indicating a scan time duration for 3, 8, 15 or 30 seconds respectively. USB-Port Rule There are two settings for USB-Port Rule: ON or OFF.
Alternative Hotkey Commands In addition to the Left + Left hotkeys, there are two alternative hotkey sequences available. 1. For the following operations, users may press twice instead of pressing left twice. To select a computer: + + 1 (Example: Select the computer at port 1.) + + 2 (Example: Select the computer at port 2.) NOTE: Do not use the keypad at the right of the keyboard. 2.
Specifications Number of Ports 2 Computer connectors 1 x DisplayPort 1x USB type B Console Connectors 1 x DisplayPort 3 x USB type A Maximum Video Resolution 2560x1600 @ 60Hz (higer resolutions may be supported at lower refresh rates) DDC2B Support Yes Audio Yes (over DisplayPort) On Screen Display No Cascadable No Switching Modes Front Panel Button, Hotkey Power Adapter 5VDC, 2A, centre positive, type N plug Enclosure Material Steel Dimensions 65mm x 126mm x 40mm Weight 0.
Technical Support StarTech.com’s lifetime technical support is an integral part of our commit-ment to provide industry-leading solutions. If you ever need help with your product, visit www.startech.com/ support and access our comprehensive selection of online tools, documentation, and downloads. Warranty Information This product is backed by a three year warranty. In addition, StarTech.
Hard-to-find made easy. At StarTech.com, that isn’t a slogan. It’s a promise. StarTech.com is your one-stop source for every connectivity part you need. From the latest technology to legacy products — and all the parts that bridge the old and new — we can help you find the parts that connect your solutions. We make it easy to locate the parts, and we quickly deliver them wherever they need to go. Just talk to one of our tech advisors or visit our website.