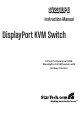
SV231DPU Instruction Manual DisplayPort KVM Switch 2-Port Professional USB, DisplayPort KVM Switch with Hotkey Control
FCC Compliance Statement This equipment has been tested and found to comply with the limits for a Class B digital device, pursuant to part 15 of the FCC Rules. These limits are designed to provide reasonable protection against harmful interference in a residential installation. This equipment generates, uses and can radiate radio frequency energy and, if not installed and used in accordance with the instructions, may cause harmful interference to radio communications.
Table of Contents Introduction...................................................................... 1 Packaging Contents.....................................................................1 System Requirements..................................................................1 Installation........................................................................ 1 Hardware Installation....................................................................2 Driver Installation...................................
Introduction Packaging Contents • 1 x SV231DPU KVM switch • 1 x Power Adapter • 1 x Rubber Feet • 1 x Instruction Manual System Requirements • DisplayPort enabled computer system • USB enabled computer system • Standard 104-key USB keyboard • Standard 3-button USB mouse Installation NOTE: Prior to the installation, please power off all devices that will be connected to this system. Ensure that all devices you will connect are properly grounded.
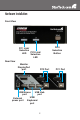
Hardware Installation Front View PC1 Link/ Selection PC2 Link/ LED Selection LED Port Selection Button Rear View Monitor DisplayPort port PC2 Port USB Mouse USB Hub port port USB External Keyboard power port port 2 PC1 Port
*installation pictures are representations only 1. Plug a monitor into the Console’s DisplayPort connector; plug a USB keyboard and a USB mouse into the dedicated USB keyboard and mouse ports on the KVM switch. 2. Use a male-to-male DisplayPort video cable to connect the DisplayPort connector on the computer’s video card, to one of the KVM’s PC ports (ie. PC1) 3.
Driver Installation No driver installation is required for the KVM switch, as the keyboard and mouse uses native USB keyboard/mouse drivers that are already installed on all operating system that fully support USB. Operation Front Panel PC Link/Selection LED The LED turns green when the connected computer is powered-on. The corresponding LED will also illuminate red when that PC port is currently selected.
To select a computer: Left Ctrl + Left Ctrl + 1 (Example: Selects the computer at port 1.) Left Ctrl + Left Ctrl + 2 (Example: Selects the computer at port 2.) NOTE: Do not use the keypad on the right-side of the keyboard. Auto Scan The KVM automatically scans through the powered-on computers in sequence on a fixed time interval (see Scan Time below). Note: The keyboard and mouse are not operable during Auto Scan.
Scan Time Four options are available for users to set the Scan Time duration, it Includes 3, 8, 15 and 30 seconds. Note: Scan Time is set to 3 seconds by default. To adjust Scan Rate, set the scan time of duration before switching to the next computer: Left Ctrl + Left Ctrl + F3 The KVM Switch generates 1 to 4 beeps indicating a scan time duration for 3, 8, 15 or 30 seconds respectively. USB-Port Rule There are two settings for USB-Port Rule: ON or OFF.
Alternative Hotkey Commands In addition to the Left Ctrl + Left Ctrl hotkeys, there are two alternative hotkey sequences available. 1. For the following operations, users may press Scroll Lock twice instead of pressing Left Ctrl twice. To select a computer: Scroll Lock + Scroll Lock + 1 (Example: Select the computer at port 1.) Scroll Lock + Scroll Lock + 2 (Example: Select the computer at port 2.) NOTE: Do not use the keypad at the right of the keyboard. 2.
Specifications Number of Ports 2 Computer Connectors (per port) 1 x USB type B 1 x DisplayPort 1 x DisplayPort Console Connectors 3 x USB type A 2560x1600@60Hz (higher resolutions may be supported at lower refresh rates) Maximum Video Resolution DDC2B Support Yes Audio Yes (over DisplayPort) OSD No Cascadable No Switching Modes Front Panel Button, Hotkey Power Adapter 5VDC, 2A, center positive, type N plug Enclosure Material Steel Dimensions 65.0mm x 126.0mm x 40.0mm Weight 0.
Technical Support StarTech.com’s lifetime technical support is an integral part of our commitment to provide industry-leading solutions. If you ever need help with your product, visit www.startech.com/support and access our comprehensive selection of online tools, documentation, and downloads. Warranty Information This product is backed by a three year warranty. In addition, StarTech.
StarTech.com has been making “hard-to-find easy” since 1985, providing high quality solutions to a diverse IT and A/V customer base that spans many channels, including government, education and industrial facilities to name just a few. We offer an unmatched selection of computer parts, cables, A/V products, KVM and Server Management solutions, serving a worldwide market through our locations in the United States, Canada, the United Kingdom and Taiwan. Visit www.startech.