4 Port DVI USB KVM Switch with Audio and USB 2.0 Hub SV431DVIUA *actual product may vary from photos DE: Bedienungsanleitung - de.startech.com FR: Guide de l'utilisateur - fr.startech.com ES: Guía del usuario - es.startech.com IT: Guida per l'uso - it.startech.com NL: Gebruiksaanwijzing - nl.startech.com PT: Guia do usuário - pt.startech.com For the most up-to-date information, please visit: www.startech.
FCC Compliance Statement This equipment has been tested and found to comply with the limits for a Class B digital device, pursuant to part 15 of the FCC Rules. These limits are designed to provide reasonable protection against harmful interference in a residential installation. This equipment generates, uses and can radiate radio frequency energy and, if not installed and used in accordance with the instructions, may cause harmful interference to radio communications.
Table of Contents Introduction ............................................................................................1 Features......................................................................................................................................................... 1 Before You Begin........................................................................................................................................ 1 Package Contents....................................................
Introduction Thank you for purchasing a StarTech.com 4 Port StarView DVI USB KVM Switch. This product offers a cost-effective way to operate up to four computers or servers from a single keyboard, monitor and mouse peripheral set, while saving valuable deskspace. Featuring USB peripheral sharing, audio switching and astounding video resolutions of up to 1920 x 1200 (@60/70Hz), this is the perfect combination of computer control and multimedia quality.
Installation PC BIOS Notice: The following BIOS setup changes are necessary for PC users but are not required for Mac users: 1. In STANDARD CMOS, set HALT ON ERROR to ALL BUT KEYBOARD. 2. In PNP AND PCI SETUP, set PNP OS INSTALLED to YES and set the USB IRQ to ENABLED. Console Connections Before installation, please ensure that all devices and computers to be connected to the KVM Switch have been turned off. 1.
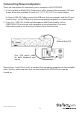
Connecting Slave Computers There are two options for connecting slave computers to SV431DVIUA: 1. a) Using a Male to Male DVI-D (Single Link) cable, connect the computer’s DVI port to one of the four available PC ports (PC 1, PC 2, PC 3, PC 4) as shown below. b) Using a USB A-B Cable, connect the USB port that corresponds with the PC port used in step 1, to the USB port on the corresponding computer, as shown below. 2.
Operation Please note: SV431DVIUA can be used with a VGA connection to controlled (slave) computers, however an adapter must be used to make the connection (please see Accessory Products from StarTech.com - DVIVGAMF). Also note: Analog and digital connections cannot be used concurrently. To successfully connect SV431DVIUA to the slave computers, all connections must be either digital or analog. 1 2 1.
“FUNC” Button To adjust the optimal video signal strength corresponding to the length or quality of DVI cable being used, use the FUNC button in combination with the other front panel pushbuttons. 1. Press the FUNC button three times. The POWER LED will flash once per second. 2. To adjust equalization of the selected port input video strength, press button 1 once or twice; SV431DVIUA will beep once (normal) or twice (enhanced) respectively.
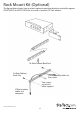
Rack Mount Kit (Optional) The figure below shows how to attach optional mounting brackets and cable support (SV431RACK) to SV431DVIUA for use with a standard 19” rack cabinet: To Rack Cabinet Back Post To Rack Cabinet Back Post USB to monitor cables to the switch Two screws secure the cable support USB or monitor cables to a computer Instruction Manual 6
Troubleshooting Symptom Causes Solution Keyboard or mouse does not work In Auto Scan mode, the keyboard and mouse are not operable. Press any front panel button to select a computer, then use the keyboard and mouse. Re-install device driver. Improper device driver Newly installed USB device does not work Device consumes too much power. Improper device initialization The device should be self-powered; add a power adapter to the device.
Specifications No. of computer supported 4 Front Panel Push Button 5 Hot Plug-and-Play support Yes Automatic Scan Interval 3, 8, 15, 30 seconds Cable Length (Max) 4.6m(15’) for USB Computer ON-LINE LED 4 Computer selected LED 4 Monitor Type DVI Computer peripheral connector Monitor USB Type B x 4 DVI female x 4 USB Type A x 4 Console peripheral connector Monitor DVI female x 1 900g Weight (g) (oz.) 31.74oz. 44 x 220 x 130mm Dimensions Instruction Manual 1.7 x 8.
Technical Support StarTech.com’s lifetime technical support is an integral part of our commitment to provide industry-leading solutions. If you ever need help with your product, visit www.startech.com/support and access our comprehensive selection of online tools, documentation, and downloads. For the latest drivers/software, please visit www.startech.com/downloads Warranty Information This product is backed by a three year warranty. In addition, StarTech.
Hard-to-find made easy. At StarTech.com, that isn’t a slogan. It’s a promise. StarTech.com is your one-stop source for every connectivity part you need. From the latest technology to legacy products — and all the parts that bridge the old and new — we can help you find the parts that connect your solutions. We make it easy to locate the parts, and we quickly deliver them wherever they need to go. Just talk to one of our tech advisors or visit our website.