to 3 Standalone Hard Drive Duplicator and Eraser SATDUP13 *actual product may vary from photos DE: Bedienungsanleitung - de.startech.com FR: Guide de l'utilisateur - fr.startech.com ES: Guía del usuario - es.startech.com IT: Guida per l'uso - it.startech.com NL: Gebruiksaanwijzing - nl.startech.com PT: Guia do usuário - pt.startech.com For the most up-to-date information, please visit: www.startech.
FCC Compliance Statement This equipment has been tested and found to comply with the limits for a Class B digital device, pursuant to part 15 of the FCC Rules. These limits are designed to provide reasonable protection against harmful interference in a residential installation. This equipment generates, uses and can radiate radio frequency energy and, if not installed and used in accordance with the instructions, may cause harmful interference to radio communications.
Table of Contents Product Diagram.....................................................................................1 Front View..................................................................................................................................................... 1 Rear View....................................................................................................................................................... 1 Introduction......................................................
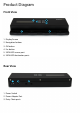
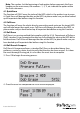
Product Diagram Front View 1 1. Display Screen 2. Navigation buttons 3. OK button 4. Esc button 5. SATA HDD source port 6. SATA HDD destination ports Rear View 1 1. Power Switch 2. Power Adapter Port 3.
Introduction Packaging Contents • 1 x 1 to 3 HDD Duplicator/Eraser • 4 x SATA Cables • 1 x Power Adapter • 3 x Power Cords (NA, UK, EU) • 1 x Instruction Manual WARNING! Hard drives and storage enclosures require careful handling, especially when being transported. If you are not careful with your hard disk, lost data may result. Always handle your hard drive and storage device with caution.
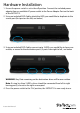
Hardware Installation 1. Ensure the power switch is set in the off position. Connect the included power adapter from an available AC power outlet to the Power Adapter Port on the back of the SATDUP13. 2. Using an included SATA Cable, attach the HDD you would like to duplicate to the source port (first port on the left, see below) 3. Using an included SATA Cable, connect up to 3 HDDs you would like to have over written, or erased to the destination ports.
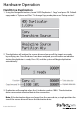
Hardware Operation Hard Drive Duplication 1. Using the Navigation buttons, locate “HDD Duplicator 1. Copy” and press OK. Default copy mode is “System and Files”. To change Copy mode please see “Setup section”. 2. The duplicator will analyze the source drive and ensure all the targets are ready, by verifying size. Once the drives have been analyzed you will receive an indicator stating the duplicator is ready. Press OK, and the system will begin duplication automatically. 3.
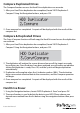
Compare Duplicated Drives The Compare function ensures the Hard Drive duplication was accurate. 1. After your Hard Drive duplication has completed, locate “HDD Duplicator 2. Compare” Using the Navigation buttons, and press OK. 2. Once compare has completed. A report will be displayed with the results of the compare test. Compare & Duplicated Drives The Copy+Compare function will both copy the Hard Drive and ensure the duplication was accurate. 1.
Note: The number 4 at the beginning of each option below represents the Erase heading on the main menu, the numbers: .1, .2, .3, etc. indicate the option within the Erase sub menu. 4.1 Quick Erase The function will ONLY erase the index of the HDD, which is the quickest way to erase it. Quick Erase will damage the data on the HDD, so please make sure you have backed up all important data before using this function. 4.
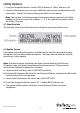
Utility Options 1. Using the Navigation buttons, locate “HDD Duplicator 5. Utility” and press OK. 2. From the Utility options you can access different administrative configurations and information. See the list below outlining the details of each option. Note: The number 5 at the beginning of each option below represents the Utility heading on the main menu, the numbers: .1, .2, .3, etc. indicate the option within the Utility sub menu. 5.
Advanced Configuration Using Setup 1. Using the Navigation buttons, locate “6. Set up” and press OK. 2. From the Setup option you can access different advanced configurations. See the list below outlining the details of each option. Note: The number 6 at the beginning of each option below represents the Utility heading on the main menu, the numbers: .1, .2, .3, etc. indicate the option within the Utility sub menu. 6.1 Copy Area Using Copy Area you to adjust the mode in which the hard drives are copied. 1.
6.3 Erase Master This function is used to set if erasing the source HDD or not. Please make sure this setting before you execute erase function. 6.4 Unknown Format This function allows you to set how the device manages unknown HDD area. 6.5 Transfer Rate This function allows you to select the best transfer rate from UDMA 2 to UDMA 4 for your HDD duplication progress. If you are not confident on the HDD quality or you find a high failure rate on copy or compare. It is recommended to slow down the UDMA mode.
Technical Support StarTech.com’s lifetime technical support is an integral part of our commitment to provide industry-leading solutions. If you ever need help with your product, visit www.startech.com/support and access our comprehensive selection of online tools, documentation, and downloads. For the latest drivers/software, please visit www.startech.com/downloads Warranty Information This product is backed by a two year warranty. In addition, StarTech.
Hard-to-find made easy. At StarTech.com, that isn’t a slogan. It’s a promise. StarTech.com is your one-stop source for every connectivity part you need. From the latest technology to legacy products — and all the parts that bridge the old and new — we can help you find the parts that connect your solutions. We make it easy to locate the parts, and we quickly deliver them wherever they need to go. Just talk to one of our tech advisors or visit our website.