
Instruction manual
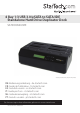


Instruction Manual
4
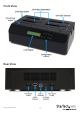
Hardware Installation (Duplicator)
1. Connect the external power adapter from the hard drive docking station to an AC
power outlet.
2. Insert 2.5” or 3.5” hard drive(s) into the top loading drive bay(s). The drive containing
the data to copy (Source) needs to be inserted into the “Source” bay (HDD4). Make
sure that the SATA connectors on the hard drives are facing the same corner of the
drive bay that has the 2.5in cutout in the door. The label on the hard drive should
face the front of the SATA docking station.
3. Press the power buttons on the top of the hard drive docking station for each of the
bays that contain a hard drive. The Power LED around the power buttons should
light up. The LCD display will also light up and display”PC Mode”.
4. Press the “ENT” button on the front panel of the unit. A message will appear
advising that this will change the unit to Duplicator Mode.
5. Press the “ENT” button again and a conrmation message will appear. Press the
“ENT” button again to switch to Duplicator Mode. Pressing “ESC” will cancel this
action.
6. The LCD display will now show Duplication mode.
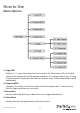
7. Press the “ENT” or Up/Down buttons to access the menu options.
Driver Installation
No driver installation is required for the supported operating systems, as this hard
drive dock is natively supported, so the drivers are already installed.