
Instruction manual


Instruction Manual
6
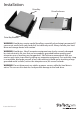
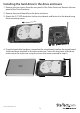
Connecting the Drive Enclosure - Standalone
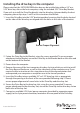
To connect the Drive Enclosure to the host computer, for use as standalone storage:
1. Insert the small connector (USB Mini-B) into the USB Mini-B port located on the rear
panel of the Drive Enclosure. Insert the remaining end (USB type A) connector into
an available USB port on the host computer.
2. Insert the cylindrical connector provided by the power adapter into the power port
on the rear panel of the Drive Enclosure. Connect the remaining end of the power
adapter to an available power outlet.
3. Once the Drive Enclosure is connected via USB and powered, the drive will be
accessible to the host computer. If you are using a Windows operating system,
please wait a few moments, to allow the operating system to automatically install
the necessary les; once the les have successfully installed, the drive will be
available in My Computer, designated (typically) with a drive letter subsequent to
those assigned to stationary (permanent) hard drives.
Removing the Drive Enclosure - Standalone
When connected to the host computer as standalone storage, you will not need to
power down the computer in order to remove the drive enclosure. Please note that
removing the drive while in operation may cause data loss or damage to the drive. To
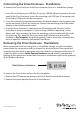
avoid this, please use the Safely Remove Hardware wizard, which is prompted by
clicking on the wizard icon located near the clock in the bottom right corner (typically)
of the Windows desktop.
To remove the Drive Enclosure from the host computer:
1. Remove the USB connection between the Drive Enclosure and the computer.
2. Remove the power adapter from the Drive Enclosure.
Safely Remove Hardware