
Instruction manual


Instruction Manual
4
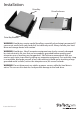
Installing the drive bay in the computer
Please note that the SAT2510U2REM drive bay can be installed into either a 3.5” or a
5.25” drive bay slot on the host computer, using the included 5.25” Drive Bay Bracket.
If you wish to install the Drive Bay directly into the drive bay slot provided by the host
computer, please skip steps 1 and 2 in the instructions that follow:
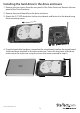
1. Insert the Drive Bay into the 5.25” bracket provided, ensuring that the holes located
on the sides of the drive bay are aligned with the holes in the sides of the bracket.
2. Fasten the Drive Bay to the Bracket, using the screws provided. To ensure proper
attachment to the Bracket, secure the Drive Bay to the Bracket both on the sides and
on the bottom of the Bracket.
3. Power down the computer.
4. Remove the cover of the host computer drive bay slot into which you wish to install
the Drive Bay and Enclosure, as well as the side panels of the computer case. If you
require further instruction on this step, please consult the documentation that
accompanied your computer or computer case at the time of purchase.
5. Insert the Drive Bay into an available 3.5” or 5.25” drive bay slot as appropriate,
through the opening at the front of the case provided following step 3. Please
ensure proper alignment of screw holes in the Drive Bay and drive bay slot.
6. Secure the Drive Bay to the drive bay slot, using the screws provided. To ensure
proper attachment to the drive bay slot, secure the Drive Bay to the drive bay slot on
both sides of the bay slot.
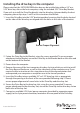
7. Connect an available LP4 (4 pin) power connector (provided by computer power
supply) to the 4 pin power connector, located on the rear panel of the Drive Bay.
Ensure Proper Alignment