USB 3.0/eSATA Dual 3.5” SATA HDD Trayless Enclosure with UASP S352BU33RER *actual product may vary from photos DE: Bedienungsanleitung - de.startech.com FR: Guide de l'utilisateur - fr.startech.com ES: Guía del usuario - es.startech.com IT: Guida per l'uso - it.startech.com NL: Gebruiksaanwijzing - nl.startech.com PT: Guia do usuário - pt.startech.com For the most up-to-date information, please visit: www.startech.
FCC Compliance Statement This equipment has been tested and found to comply with the limits for a Class B digital device, pursuant to part 15 of the FCC Rules. These limits are designed to provide reasonable protection against harmful interference in a residential installation. This equipment generates, uses and can radiate radio frequency energy and, if not installed and used in accordance with the instructions, may cause harmful interference to radio communications.
Table of Contents Product Diagram.....................................................................................1 Front View..................................................................................................................................................... 1 Rear View....................................................................................................................................................... 1 Introduction......................................................
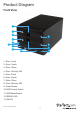
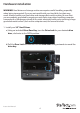
Product Diagram Front View 3 1 4 2 5 13 8 6 9 12 7 10 11 1. Drive 1 Lock 2. Drive 1 Latch 3. Drive 1 Door 4. Drive 1 Activity LED 5. Drive 2 Lock 6. Drive 2 Latch 7. Drive 2 Door 8. Drive 2 Activity LED 9. Power Button 10. RAID Control Switch 11. RAID Mode Button 12. REBUILD LED 13.
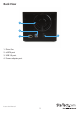
Back View 1 3 4 2 1. Drive Fan 2. eSATA port 3. USB 3.0 port 4.
Introduction Packaging Contents • 1x USB 3.0/eSATA Hard Drive Enclosure (S352BU33RER) • 1x eSATA Cable • 1x USB 3.0 Cable • 2x Drive Door Keys • 1x Universal Power Adapter (NA/UK/EU) • 1x Instruction Manual System Requirements • 1x Computer system with available USB 3.0 (5 Gbit/s) port/USB 2.0 port (480Mbps) or eSATA port Microsoft® Windows® 2000/XP/Server 2003/Vista/Server 2008 R2/7/8 (32/64-bit), Apple® Mac® OS 9.x/10 Linux® Google Chrome OS™ • Up to 2x 3.
Hardware Installation WARNING! Hard drives and storage enclosures require careful handling, especially when being transported. If you are not careful with your hard disk, lost data may result. Always handle your hard drive and storage device with caution. Be sure that you are properly grounded by wearing an anti-static strap when handling computer components or discharge yourself of any static electricity build-up by touching a large grounded metal surface (such as the computer case) for several seconds. 1.
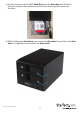
c) Gentley slide your desired 3.5” Hard Drive into the drive bay with the label facing up until you feel resistence, and the drive door begins to close over the drive. d) While holding the drive latch open, swing the drive door closed. Once the drive door is completely closed, release the drive latch.
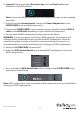
e) (optional) Using an included Drive Door Key, turn the Drive Lock counter clockwise to the LOCK position. Note: If you are installing more than one drive repeat these steps on the remaining drive door. 2. Using the included power adapter, connect the Power Adapter Port on the S352BU33RER to an available power outlet. 3. Connect the S352BU33RER to your computer system using the included USB 3.0 cable or the eSATA cable depending on your desired host connection. 4.
Available RAID Configurations The S352BU33RER enclosure supports 4 different RAID configurations. RAID is a storage technology that combines multiple hard drives into a single unit for secure data redundancy, increased volume size and/or improved performance. Descriptions and benefits for each available RAID configuration are listed below: Normal - JBOD In JBOD, no RAID configuration is set and both drives appear as individual disks.
Disconnecting the Hard Drive Windows 1. Select the “Safely remove Hardware and Eject Media” icon, located in the task bar. 2. Select the Mass Storage Device from the list that appears. 3. Wait for the message indicating that it is now safe to remove the device. Note: Removing the connected drive prior to receiving notification that it is safe to do so, could result in losing or corrupting data stored on the drive.
2. A dialog window should automatically appear, asking you to initialize the drive. Depending on the version of Windows, it will give you the option of either creating an “MBR” or “GPT” disk. GPT (GUID partition) is required for drives larger than 2TB but is not compatible with some older operating systems, while MBR is supported by newer and older operating systems. 3.
Technical Support StarTech.com’s lifetime technical support is an integral part of our commitment to provide industry-leading solutions. If you ever need help with your product, visit www.startech.com/support and access our comprehensive selection of online tools, documentation, and downloads. For the latest drivers/software, please visit www.startech.com/downloads Warranty Information This product is backed by a two year warranty. In addition, StarTech.
Hard-to-find made easy. At StarTech.com, that isn’t a slogan. It’s a promise. StarTech.com is your one-stop source for every connectivity part you need. From the latest technology to legacy products — and all the parts that bridge the old and new — we can help you find the parts that connect your solutions. We make it easy to locate the parts, and we quickly deliver them wherever they need to go. Just talk to one of our tech advisors or visit our website.