
Installation guide


5
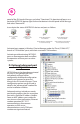
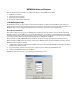
Choose the setting you wish to change.
In the configuration screen that appears,
and enter the network settings you wish
for that NETRS232 device. Once the new
values are entered and accepted, the
NETRS232 will reboot to implement the
new network settings.
Changes made using a web browser will
be updated to the NETRS232 but not to
the local PC.
Changing the network settings of
a NETRS232 device may make that device
unavailable to other stations that have activated a connection to that device using
older network settings.
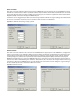
To set a NETRS232's network settings
using a Telnet client, open a Telnet
session to the IP address of the link
whose settings you want to change.
Details on Telnet connection can be
found in the“telnet.pdf”file on the
Installation diskette.
on the port where it is displayed in the right
Configuring NETRS232 network settings
using a Telnet client
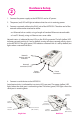
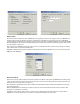
C. Activating & Deactivating NETRS232 ports
NOTE:
NETRS232 ports that have been detected
as existing on the network are not
initially activated for your PC.To access a
NETRS232 port it must be activated.You
may wish to activate on a given
computer some, all, or none of the
NETRS232 ports that are available on the
network.To activate a particular port,
right click on the port where it is displayed in the right panel of the
, and select "Activate".To activate all ports on a particular NETRS232 device,
right click on that device in the left panel of the and select “Activate All”.
Before activation, NETRS232 ports only appear under the "My IP-Extender Network"
branch of the IP-Extender Desktop.Once they have been activated for a local system,
they will also appear under "My Computer" in the .
To deactivate ports individually, right-click
Manager
IP-Extender
Manager
IP-Extender Manager