
Installation guide


4
Configuring NETRS232 network settings using the
Configuring NETRS232 network settings using a web browser
IP-Extender Manager
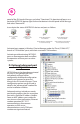
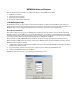
To set a NETRS232's network settings using the
, right-click on it in the IP-Extender
tree and select “Properties”. If the NETRS232 is
accessible on the network, a dialog will open that
allows you to give it a new name, IP address, subnet
mask, and gateway address.If your network assigns
IP addresses using a DHCP server, DHCP detection
can also be enabled.
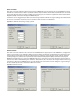
Changes made using the will
be updated to both the local PC and to the
NETRS232.
Changing the network settings of a NETRS232 device may make that device
unavailable to other stations that have activated a connection to that device using
older network settings.
The is the recommended method of changing all
NETRS232 settings.
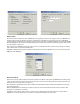
To set a NETRS232's network settings using a web browser, open the browser and
enter the IP address of the NETRS232 into the browser's location bar.The embedded
web server running on the NETRS232 will display the opening screen of the NETRS232
configuration menu.
IP-
Extender Manager
IP-Extender Manager
IP-Extender Manager
NOTE:
NOTE:
Before Proceeding:The NETRS232 is factory preset with an IP address
of 192.168.0.35. If this IP address cannot be used on the network (it
may already in use, for instance), do not initially connect the
NETRS232 to the network. Instead, either:
1) connect the NETRS232 to a network segment that is not already
using the NETRS232 default IP address for another device or,
2) connect the NETRS232 directly to a host PC using an Ethernet
crossover cable.
Follow the procedure described in the "Configuring network settings"
section of this manual to set the IP address to a usable address for the
network onto which the NETRS232 will be installed.