U 17in 1080p LCD Rack Console with Front USB Hub RACKCONS17HD RKCONS17HDxx *actual product may vary from photos DE: Bedienungsanleitung - de.startech.com FR: Guide de l'utilisateur - fr.startech.com ES: Guía del usuario - es.startech.com IT: Guida per l'uso - it.startech.com NL: Gebruiksaanwijzing - nl.startech.com PT: Guia do usuário - pt.startech.com For the most up-to-date information, please visit: www.startech.
FCC Compliance Statement This equipment has been tested and found to comply with the limits for a Class B digital device, pursuant to part 15 of the FCC Rules. These limits are designed to provide reasonable protection against harmful interference in a residential installation. This equipment generates, uses and can radiate radio frequency energy and, if not installed and used in accordance with the instructions, may cause harmful interference to radio communications.
Table of Contents Product Overview...................................................................................1 Front View..................................................................................................................................................... 1 Rear View....................................................................................................................................................... 1 Introduction.......................................................
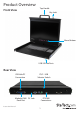
Product Overview Front View Top Handle Key Lock Menu Buttons USB 2.
Introduction Packaging Contents • 1 x 1U Rack Console • 1 x Set, Mounting Rails • 2 x Extended Brackets • 2 x Short Brackets • 2 x Short Bracket Attachments • 2 x Keys • 1 x 6ft (1.8m) PS/2 VGA KVM Cable • 1 x 6ft (1.
Front Panel Controls The OSD (On-screen display) offers many different video, positioning and language options. Use the table below to navigate through the menus and change settings as needed. Controls Description Soft power on/off button. Adjacent LED is lit when on. Auto Auto-synchronize and scale down display to any valid factory preset timings. Up Press to scroll the function you want to adjust. Down Press to scroll the function you want to adjust. Menu To access the main menu.
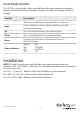
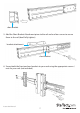
Rail Installation A 1. Slide the rail outward until two screws appear. rail two screws 2. Loosen (not remove) the seven screws shown and adjust the rail to fit your rack. 3. Secure both the front and rear brackets to your rack using the appropriate screws / nuts for your rack (not included).
4. Tighten the seven screws loosened in Step 2. 5. Repeat the above steps for the other side. Rail Installation B 1. Slide the rail outward until two screws appear. rail two screws 2. Remove the seven screws shown.
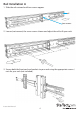
3. Remove the two original brackets from the rail. original bracket original bracket 4. Install the Short Bracket to the rail as shown.
short bracket 5. Add the Short Bracket Attachment piece to the rail and use four screws to secure them to the rail (don’t fully tighten). bracket attachment short bracket 6. Secure both the front and rear brackets to your rack using the appropriate screws / nuts for your rack (not included).
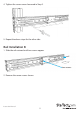
7. Tighten the four screws installed in Step 5. 8. Repeat the above steps on the other side. Rail Installation C 1. Slide the rail outward until two screws appear. rail two screws 2. Loosen (not remove) the seven screws shown.
3. Remove the six screws holding the rear bracket. 4. Remove the rear bracket from the rail. original bracket 5. Add the Extended bracket to the rail, then adjust the Extended Bracket to fit your cabinet. Install three of the included M4x5 Screws (don’t fully tighten) to secure the bracket in place.
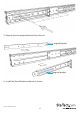
extended bracket 6. Secure both the front and rear brackets to your rack using the appropriate screws / nuts for your rack (not included). 7. Tighten the seven screws loosened in step 2, and the three installed in Step 5.
8. Repeat the above steps on the other side.
Console Installation Once the rails have been installed into your rack using one of the above procedures and all loosened screws have been tightened, use the following instructions to install the console into the rack. 1. Push console into rails. 2. Unlock the console lid, then pull the rail-lock switches on both sides to allow the console to slide all the way into the rack.
3. Install three of the included #6-32x6 Flat Screws into the rear of the console on both sides. Completed installation: PC / Server Connection 1. Turn off the PC / Server you are connecting to the console. 2. Using one of the included cable sets, connect the appropriate video (VGA / DVI) connector to the video output of your PC / Server. Then connect either the PS/2 keyboard/mouse connectors, or use the USB interface. 3. Connect the other end of the cables to the rear of the console.
4. Connect the USB Hub connector using one of the included USB A-A cables to the USB connector on your server / KVM switch to enable the front USB hub ports and fingerprint reader (optional). 5. Connect the AC to DC power adapter to the power inlet on the console and then to a power outlet. Connecting to a KVM Switch When cascading with a KVM switch, KVM Module can be used to control additional computers from the console.
Specifications Display Size 17.3” Panel Type Active Matrix TFT LED Maximum Screen Resolution 1920x1080 (Full HD) Supported Platforms USB or PS/2 Server / KVM Video Type DVI or VGA Response Time 2ms Contrast Ratio 650:1 Brightness 300cd/m² Viewing Angle 140° (H), 120° (V) Pixel Pitch 0.198 x 0.
Technical Support StarTech.com’s lifetime technical support is an integral part of our commitment to provide industry-leading solutions. If you ever need help with your product, visit www.startech.com/support and access our comprehensive selection of online tools, documentation, and downloads. For the latest drivers/software, please visit www.startech.com/downloads Warranty Information This product is backed by a two year warranty. In addition, StarTech.
Hard-to-find made easy. At StarTech.com, that isn’t a slogan. It’s a promise. StarTech.com is your one-stop source for every connectivity part you need. From the latest technology to legacy products — and all the parts that bridge the old and new — we can help you find the parts that connect your solutions. We make it easy to locate the parts, and we quickly deliver them wherever they need to go. Just talk to one of our tech advisors or visit our website.