RACKCONS2001 Instruction Manual Folding Rackmount Console 1U 20.
FCC Compliance Statement This equipment has been tested and found to comply with the limits for a Class B digital device, pursuant to part 15 of the FCC Rules. These limits are designed to provide reasonable protection against harmful interference in a residential installation. This equipment generates, uses and can radiate radio frequency energy and, if not installed and used in accordance with the instructions, may cause harmful interference to radio communications.
Table of Contents Introduction...................................................................... 1 Packaging Contents..................................................................... 1 Installation........................................................................ 1 Hardware Installation.................................................................... 1 How to Use....................................................................... 4 Connecting the Console................................
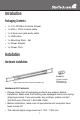
Introduction Packaging Contents • 1 x 1U LCD Rack Console Drawer • 1 x VGA + PS/2 console cable • 1 x 3.5mm mini-jack audio cable • 1 x USB cable • 1 x Mounting Rails - Set • 1 x Power Adapter • 1 x Power Cord Installation Hardware Installation Screw kit Side Rails with front and rear brackets (2) (Used to attach Rail Mount to Console body) Hardware Kit Contents • Please check that all packaging contents are present before installation.
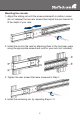
Mounting the console 1. Adjust the sliding rail until the screw underneath is visible. Loosen (do not release) the two rear screws then adjust the rear bracket to fit the depth of your rack: 2. Install the rail into the rack by attaching them to the front/rear posts using the appropriate screws and nuts for your rack (not included): 3. Tighten the rear screws that were loosened in Step 1: 4. Install the remaining rail, by repeating Steps 1-3.
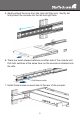
5. Gently extend the arms from the rails until they lock. Gently, but firmly insert the console into the left and right rails: 6. There are small release switches on either side of the console unit. Pull both switches at the same time, as the console is installed onto the rails. Rail-Release switch 7.
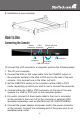
8. Installation is now complete. How to Use Connecting the Console 3.5mm mini-jack Power PS/2 Audio In connector connector VGA connector USB connector USB-PS/2 switch DVI connector To connect the LCD console to a computer, perform the following steps: 1. Turn off your computer. 2. Connect the VGA or DVI video cable from the VGA/DVI output on the computer system to the VGA or DVI port on the rear of the rack console. Only connect one or the other, not both. 3.
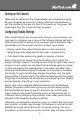
Turning on the Console Make sure all cables and the power adapter are connected properly. Be sure to tighten all connector screws. Grab the front handle and pull the console all the way out then lift the panel up. The power LED underneath the LCD monitor will light up green. Configuring Display Settings After connecting the rack console and turning on your computer, you may need to configure one or more of the following display settings to allow the computer to display at the console’s native resolution.
and OSD functions. For more information on configuring the display settings, please refer to the manual that accompanied your video card. Testing the Console To test that the console is working properly, perform the following steps: 1. Power up the rack console, and then turn on your computer. 2. Make sure the video image is centered within the screen area. Use the OSD controls to adjust the image (see Panel controls and OSD functions) or press the Auto button on the right hand side of the monitor.
Auto tune Press the “Auto tune” button. The panel will adjust the display size automatically and also tune the panel to its optimized state. Brightness 1. Press the Menu button. 2. Use the Down and Up buttons to scroll to Brightness. 3. Press the Menu button to enter. 4. Use the Down and Up buttons to adjust the brightness of the display. 5. Press the Menu button to save your selection. Contrast 1. Press the Menu button. 2. Use the Down and Up buttons to scroll to Contrast. 3.
4. Use the Down and Up buttons to adjust the contrast of the display. 5. Press the Menu button to save your selection. Position 1. Press the Menu button. 2. Use the Down and Up buttons to scroll. 3. Highlight Position and press the Menu button to enter, which will launch the following screen: Icon Description Image Pos To adjust the position of the image OSD Pos To adjust the position of the OSD Return To exit and return to the previous page 4. Use the Down and Up buttons to scroll. 5.
Recall 1. Press the Menu button. 2. Use the Down and Up buttons to scroll to Recall. Press the Menu button to enter, where you will be able to select Yes/No using the Down and Up buttons. Once you have done so, press the Menu button. Note: selecting Yes will return your settings to the factory default state. Select No if you do not wish to make this change. Exit To exit the menu, scroll to Exit and press the Menu button.
Specifications RACKCONS2001 Display Size 20.1” Panel Type Active Matrix TFT LCD Resolution Capabilities 1600x1200 @ 60Hz (max.) Back Light six lamps Supported Colors 16.7M Colors (8-bit with FRC) Contrast Ratio 1000:1 Rising Time: 15ms Response Time Decay Time: 7ms Pixel Pitch 0.255mm x 0.
RACKCONS2001 Dimensions 11
Technical Support StarTech.com’s lifetime technical support is an integral part of our commit-ment to provide industry-leading solutions. If you ever need help with your product, visit www.startech.com/ support and access our comprehensive selection of online tools, documentation, and downloads. Warranty Information This product is backed by a one year warranty. In addition, StarTech.
StarTech.com has been making “hard-to-find easy” since 1985, providing high quality solutions to a diverse IT and A/V customer base that spans many channels, including government, education and industrial facilities to name just a few. We offer an unmatched selection of computer parts, cables, A/V products, KVM and Server Management solutions, serving a worldwide market through our locations in the United States, Canada, the United Kingdom and Taiwan. Visit www.startech.