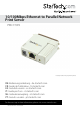
0/100Mbps Ethernet to Parallel Network Print Server PM1115P2 *actual product may vary from photos DE: Bedienungsanleitung - de.startech.com FR: Guide de l'utilisateur - fr.startech.com ES: Guía del usuario - es.startech.com IT: Guida per l'uso - it.startech.com NL: Gebruiksaanwijzing - nl.startech.com PT: Guia do usuário - pt.startech.com For the most up-to-date information, please visit: www.startech.
FCC Compliance Statement This equipment has been tested and found to comply with the limits for a Class B digital device, pursuant to part 15 of the FCC Rules. These limits are designed to provide reasonable protection against harmful interference in a residential installation. This equipment generates, uses and can radiate radio frequency energy and, if not installed and used in accordance with the instructions, may cause harmful interference to radio communications.
Table of Contents Introduction.............................................................................................2 Packaging Contents.................................................................................................................................. 2 System Requirements............................................................................................................................... 2 Product Overview......................................................................
Introduction Packaging Contents • 1x Parallel Print Server • 1x Power Adapter • 1x Software CD • 1x Quick Start Guide System Requirements • Windows® 8 (32/64bit), 7 (32/64), Vista(32/64), XP(32/64), 2000, Windows® Server 2008 R2, 2003(32/64), Mac OS 10.x, 9.
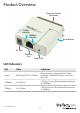
Product Overview Centronics Printer Connector 10Mbps Indicator 100Mbps Indicator Reset Button DC Jack Ethernet Port Status LED LED Indicators LED State Indication Status Blinking for POST (Yellow) When power is connected, the Status indicator will flash five times, and then go solid. 100Mbps On (Green) LAN Port has a valid network connection at 100Mbps. 10Mbps On (Yellow) LAN Port has a valid network connection at 10Mbps.
Reset Button Reboot the Print Server: 1. Verify the power of print server is turned on. 2. Press the reset button once, and then release it. Note: This will restart the print server and stop all on-going and pending print jobs. Reset to Factory Defaults: 1. Disconnect the power adapter from the print server. 2. Hold down the reset button. 3. Reconnect the power adapter while continuing to hold the reset button for about 5 seconds. 4. Release the reset button. 5. The print server will restart.
Software Installation Windows 1. To enable network communication with print server, your computer must have a proper IP address, e.g. 192.168.0.100 (the print server’s default IP is 192.168.0.10) 2. Insert the setup CD into your CD/DVD drive. 3. Select Setup Wizard from the Autoplay menu. If Autoplay is disabled on your system, browse to your CD/DVD drive and run the application. Note: The setup CD will install the print server driver, PSAdmin and Setup Wizard into your computer.
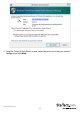
5. From the “Select A Print Sever” screen, select the print server that you want to configure and click Next.
6. Click “Yes, I want to change settings”, then click Next to configure the IP settings of the print server to match your network. Note: The IP address of print server must be within the same subnet as your network adapter.
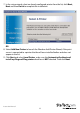
7. In the setup wizard, select an already configured printer from the list, click Next, Next and then Finish to complete the installation. OR 8. Select Add New Printer to launch the Windows Add Printer Wizard, if the print server is connected to a printer that hasn’t been installed before and does not appear in the list. 9. Click Next and select Local Printer, make sure the Automatically detect and install my Plug and Play printer check box is NOT checked. Then click Next.
10. Make sure the Use the following port radio-button is clicked and select LPT1: (recommended Printer Port) from the pull-down list. Then click Next.
11. Select Manufacturer and Printer from the lists of printer drivers. Then click Next. 12. If you already have the printer’s driver installed, you will be asked whether to keep it or to replace it. Click Next. Supply a name for the printer and choose whether you want to make it your default printer. Then click Next. 13. Then, choose whether you want to share the printer with other network user, print a test page (please select No.), etc. Select the appropriate radio-button and click Next and Finish. 14.
15. Click Start -> Devices and Printers and highlight your newly installed printer.
16. Right-click, select Printer Properties, then the Ports tab and verify that the print server’s port appears.
17. Select the General tab and click Print Test Page to verify the configuration. Note: If you want to install more print servers, start the setup wizard from your Windows Start menu: Start -> All Programs -> Network Print Server -> PSWizard and repeat the installation procedure.
Mac OS To use the print server in Mac OS (10.2 and up), no software installation is required. The necessary configuration can be done through the Web Console. 1. Open your browser and enter the IP address of the print server in the address bar of your web browser (Default: 192.168.0.10), then press Enter. 2. Enter your user ID and password (Default: admin / no password). 3. Click the Setup section, then the TCP / IP tab. 4.
7. Click the plus sign (+) at the bottom of the Print & Scan window, then Add Printer or Scanner. 8. The print server should automatically display in the default list. Select it, then click the “Use” drop-down and click Select Printer Software, to specify the model of the printer that is connected to the print server.
9. Click OK once you’ve selected your printer make / model, then click Add to complete the installation.
Print servers discovered on the LAN will be displayed along the top portion of the window, with their respective Device Name, MAC Address, Print Server Name, Firmware Version, and Status. These terms are defined as follows: Device Name: The name of the print server used for identification purposes. MAC Address: The Ethernet address of the print server. Print server Name: The name of the print server on the NetWare server. Version: The firmware version of the print server.
Setup Wizard The Setup Wizard is a configuration program that can assist you in setting up the necessary parameters for your print server device for either TCP/IP or NetWare. TCP/IP 1. Click the Wizard button from the PSAdmin tool bar. 2. Select TCP/IP Wizard from the window that opens and then click Next. 3. Choose either “Obtain an IP address from DHCP server” if there is a DHCP server on your network. Or “Specify an IP address” to manually enter your desired IP settings for the device.
NetWare 1. Log into your NetWare file server as a Supervisor (Admin) or equivalent and run PSAdmin. 2. Click the Wizard button from the PSAdmin tool bar. 3. Select NetWare Wizard from the window that opens and then click Next. 4. Select the NetWare File Server to which the print server device will be attached. 5. Type in a Print Queue name(s). Note: Each print queue corresponds to each print port of the print server. 6. Click Ok. 7.
Advanced Setup (Device Properties) The device properties screen offers several tabs with advanced configuration options. 1. Select the print server that you wish to configure and click the Properties button from the PSAdmin toolbar. General Tab Device Name: How the device will be identified on the network. Password: Secures the device to avoid unauthorized changes.
TCP / IP Tab Choose either “Obtain an IP address from DHCP server” if there is a DHCP server on your network. Or “Specify an IP address” to manually enter your desired IP settings for the device.
NetWare Tab Print Server Name: Type in the Print server that was created using PCONSOLE. Bindery Settings (Optional): Select NetWare file server(s) using Bindery mode. NDS Settings (Optional): Select the NetWare file server(s) (NetWare 4.x or later) using NDS mode. Encrypt Password: Enter the password the print server requires to logon to the NetWare server. 1. From your NetWare client computer, create a printer that is connected (redirected) to one of the NetWare print queues serviced by the print server.
Multiple Print Queues Configuration To configure the print server to service multiple print queues, please follow the instructions listed below: 1. Log into your NetWare file server as a Supervisor (Admin.) or equivalent. 2. Run the PSAdmin from your Windows. 3. Select the print server and to be configured. 4. Click the Wizard icon in the tool bar. 5. Type in a Print server and a Print Queue Name (For more detailed information about Wizard, please refer to the “Wizard” section in this chapter). 6.
Firmware Upgrade Upgrade allows you to upgrade the print server device, in the event that a new firmware becomes available. Note: Make sure that the upgrade file is located in the same directory as PSAdmin. 1. Select the print server that you wish to upgrade and click the Upgrade button from the PSAdmin toolbar. 2. Select General Upgrade and then click Next. Make sure that the upgrade file is located in the same directory as PSAdmin.
To access the web console: 1. Open your browser and enter the IP address of the print server in the address bar of your web browser (Default: 192.168.0.10), then press Enter. 2. Enter your user ID and password (Default: admin / no password). Note: Use the arrow button on the right side of the toolbar to expand / collapse available settings tabs. Status Section The Status section displays the current configuration for the print server in a read-only report format.
System Tab Allows you to configure basic system settings. Click the Save & Restart button to apply any changes made. Email Alert: Enable/Disable Email Alert support. SMTP Server IP Address: Input the IP address of your SMTP server. Administrator E-mail Address: Input the email address that you want to receive notifications to. Print Server Name: Input your desired device name for the print server. System Contact: Input the contact name for the print server.
Printer Tab Allows you to configure settings related to the connected printer. Click the Save & Restart button to apply any changes made. Printer Port: Select the bi-directional port operation mode. Options include Disable or Auto Detect. Print Speed: Select the print speed.
TCP/IP Tab Allows you to configure TCP/IP and Rendezvous (Bonjour) settings for the print server. Click the Save & Restart button to apply any changes made. TCP/IP Settings: Choose either “Obtain TCP/IP settings automatically (use DHCP/ BOOTP)” if there is a DHCP server on your network. Or “Use the following TCP/IP settings” to manually enter your desired IP settings for the device.
NetWare Tab Allows you to configure NetWare related settings for the print server. Click the Save & Restart button to apply any changes made. Print Server Name: Input the print server name configured by the PSAdmin utility or PCOMSOLE program. Polling Time: Enter the time interval in seconds, which the print server will poll the file server for servicing print queues. Logon Password: Input the password to your NetWare server - encrypted (administrator set password for the selected print server).
AppleTalk Tab Allows you to configure AppleTalk related settings for the print server, to accept jobs from Mac workstations using this protocol. Click the Save & Restart button to apply any changes made. Zone Name: Enter an AppleTalk Zone name that you want the print server to belong to, or leave it in default (This enables the print server to automatically search and link itself to the default zone that is set on the AppleTalk router, if found).
SNMP Tab Allows you to configure Simple Network Management Protocol (SNMP) related settings for the print server. A host on the network running Network Management System (NMS) software can access the print server device by reading and writing the MIB objects stored in the device. Click the Save & Restart button to apply any changes made. SNMP Community: The print server supports up to two community names. The default community name is public (case-sensitive), with Read Only access rights by default.
When an unusual condition or activity occurs, the SNMP agent alerts the SNMP manager through SNMP traps. The following list summarizes the SNMP trap messages that the print server will send out: Activities/SNMP Trap Messages Link Up or Link Down Description When the network interface on the print server fails, a link down trap message is generated if the network interface comes back to life, a link up trap message is sent.
SMB Tab Allows you to configure Server Message Block (SMB) printing. Click the Save & Restart button to apply any changes made. Workgroup Name: Assign a workgroup name to print server to identify the print server on the Network. Shared Name: Assign a name to print server’s port. Misc. Section The Misc. Section allows you to reset the unit to factory defaults (as opposed to the physical reset button), or perform a firmware upgrade.
Factory Default To reset the unit to factory default settings, click the OK button on this screen and confirm your choice. Firmware Upgrade Allows you to upgrade the firmware on the print server. 1. Click the Choose File button. 2. Navigate to the location where you have stored the updated file. 3. Click Firmware Upgrade and confirm.
Restart Section The Restart Section allows you to save all changed settings and restart the print server. Click OK to perform the restart. Troubleshooting The following chart outlines common questions / issues and possible solutions. Question / Issue Possible Solution The setup Wizard can’t find print server. A personal firewall may be blocking the connection. Temporarily disable the firewall or adjust the security level lower.
1. The Print server Name/Print Queue configuration in PCONSOLE is incorrect. Print jobs are sent to the print queue successfully, but fail to be sent to the printer 2. The Print server name specified and stored in the print server memory doesn’t match the same one set in PCONSOLE. 3. The network cable or power adapter connected to the print server is loose or disconnected. 4. The printer is off-line, jammed or out of paper.
Specifications Number of Ports 1 Interface / Bridge Parallel Industry Standards IEEE 802.3 10BASE-T, IEEE 802.3u 100BASETX 1 x RJ-45 Female Connector(s) 1 x Centronics (36 pin) Male Maximum Data Transfer Rate 100 Mbps (LAN) Remote Management Ability Yes Supported Protocols TCP/IP (LPR, IPP, RAW 9100), IPX, NetBEUI, AppleTalk, SNMP, SMB Power Adapter 3.
Technical Support StarTech.com’s lifetime technical support is an integral part of our commitment to provide industry-leading solutions. If you ever need help with your product, visit www.startech.com/support and access our comprehensive selection of online tools, documentation, and downloads. For the latest drivers/software, please visit www.startech.com/downloads Warranty Information This product is backed by a two year warranty. In addition, StarTech.
Hard-to-find made easy. At StarTech.com, that isn’t a slogan. It’s a promise. StarTech.com is your one-stop source for every connectivity part you need. From the latest technology to legacy products — and all the parts that bridge the old and new — we can help you find the parts that connect your solutions. We make it easy to locate the parts, and we quickly deliver them wherever they need to go. Just talk to one of our tech advisors or visit our website.