
Instruction manual


Instruction Manual
3
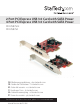
Installation
WARNING! PCI Express cards, like all computer equipment, can be severely
damaged by static electricity. Be sure that you are properly grounded before
opening your computer case or touching your PCI Express card. StarTech.com
recommends that you wear an anti-static strap when installing any computer
component. If an anti-static strap is unavailable, discharge yourself of any static
electricity build-up by touching a large grounded metal surface (such as the
computer case) for several seconds. Also be careful to handle the PCI Express
card by its edges and not the gold connectors.
Hardware Installation
1. Turn your computer o and any peripherals connected to the computer (i.e. Printers,
external hard drives, etc.). Unplug the power cable from the rear of the power supply on
the back of the computer and disconnect all peripheral devices.
2. Remove the cover from the computer case. See documentation for your computer system
for details.
3. Locate an open PCI Express slot and remove the metal cover plate on the rear of the
computer case (Refer to documentation for your computer system for details.). Note that
this card will work in PCI Express slots of additional lanes (i.e. x4, x8 or x16 slots).
4. Insert the card into the open PCI Express slot and fasten the bracket to the rear of the case.
NOTE: If installing the card into a small form factor/low prole system, replacing the
pre-installed full prole bracket with the included low prole installation bracket may be
necessary.
5. Connect a SATA power connector from the power supply to the connector on the card.
6. Place the cover back onto the computer case.
7. Insert the power cable into the socket on the power supply and reconnect all other
connectors removed in Step 1.
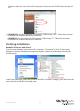
Driver Installation
Windows XP/Server 2003/Vista/7
1. Once the computer has started and the operating system is fully loaded, insert the
provided Driver CD into the computer’s CD/DVD drive.
2. Autorun should give you the option to browse the les on the CD or automatically open
the CD.