
Specifications


Instruction Manual
6
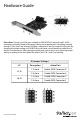
4. Position the card above the open PCI Express slot, ensuring that the card is properly aligned
with the slot. Insert the card rmly into the slot, distributing force evenly across the length
of the board. Once inserted, secure the card into the adjoining socket (previously covered
by metal bracket, on the rear panel of the computer chassis), using the correct size screw (if
necessary, please consult documentation that accompanied purchase of computer).
5. Attach PEXSATA24E to the Serial ATA drive, using a SATA (data) cable.
6. Repeat steps 4 and 5 for each remaining hard drive that will be connected (internally) to
PEXSATA24E.
7. Replace the computer cover and re-connect all power to the computer.
8. Power on the computer. Once Windows boots up, the Found New Hardware Wizard will
appear. If the connected drive(s) are running Windows XP (SP1 or earlier) or Server 2003 (SP1
or later), select No, not this time. Click Next.
9. Insert the Driver CD, and select Install the software automatically (recommended), then click
Next.
10. If the Hardware Installation window pops up, click Continue Anyway, then Finish. Please note
that this driver has been thoroughly tested for stability and compatibility.
11. Click Finish.
Verifying Successful Installation
To verify the successful installation of PEXSATA24E:
1. Right-click on My Computer and select Manage.
2. Select Device Manager.
3. Double-click on SCSI and RAID Controller, then double-click Marvell Serial ATA Gen 2 PCI
Express Adapter to display driver properties. A message should be displayed in the dialog
box, indicating that the driver has correctly been installed.