
Specifications


Instruction Manual
3
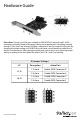
Installation
WARNING! PCI Express cards, like all computer equipment, can be severely damaged by static
electricity. Be sure that you are properly grounded before opening your computer case or
touching your card. StarTech.com recommends that you wear an anti-static strap when installing
any computer component. If an anti-static strap is unavailable, discharge yourself of any static
electricity build-up by touching a large grounded metal surface (such as the computer case) for
several seconds. Also be careful to handle the card by its edges and not the gold connectors.
Please note: The following instructions assume that the SATA drives that will be connected to
PEXSATA24E have been physically installed within the computer chassis. If this is not the case,
and you require instruction on how to install the hard drive in the computer chassis, please
consult the documentation that accompanied your purchase of the hard drive/computer.
Windows Vista™/7 Fresh Installation
Follow the instructions in this section if you are performing a new installation of Windows
VistaTM, and you wish to boot from a drive attached to PEXSATA24E:
1. Shut down all power connected to the computer, as well as all devices connected to the
computer peripherally (i.e. Printers, Monitors, Scanners etc.). As an added step to ensure safe
installation, unplug the power supply from the computer.
2. Remove the computer cover, allowing access to the motherboard and available slots. For
more detailed instruction on how to perform this step, please refer to the documentation
that was included with your computer at the time of purchase.
3. Locate an empty PCI Express slot, removing the metal bracket covering the accompanying
empty port/socket on the rear panel of the computer chassis.
4. Position the card above the open PCI Express slot, ensuring that the card is properly aligned
with the slot. Insert the card rmly into the slot, distributing force evenly across the length
of the board. Once inserted, secure the card into the adjoining socket (previously covered
by metal bracket, on the rear panel of the computer chassis), using the correct size screw (if
necessary, please consult documentation that accompanied purchase of computer).
5. Attach PEXSATA24E to the Serial ATA drive, using a SATA (data) cable.
6. Repeat steps 4 and 5 for each remaining hard drive that will be connected (internally) to
PEXSATA24E.
7. Replace the computer cover and re-connect all power to the computer.
8. Start the computer as you normally would to perform an operating system installation,
ensuring that the Windows Vista™/7 installation CD/DVD is present in the drive, and the BIOS
has been suitably adjusted to boot from the CD/DVD Drive.9. When the Windows Install
screen appears, ll in the necessary information and click Next. Follow the operating system
instructions until a page appears asking “Where do you want to install Windows?”. From here,