
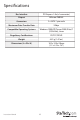
Specifications


Instruction Manual
5
3. Locate an empty PCI Express slot, removing the metal bracket
covering the accompanying empty port/socket on the rear panel of
the computer chassis.
4. Position the card above the open PCI Express slot, ensuring that the
card is properly aligned with the slot. Insert the card rmly into
the slot, distributing force evenly across the length of the board.
Once inserted, secure the card into the adjoining socket (previously
covered by metal bracket, on the rear panel of the computer
chassis), using the correct size screw (if necessary, please consult
documentation that accompanied purchase of computer).
5. If a oppy drive is available on the host system, attach PEXSATA22I
to the Serial ATA drive(s), using a SATA (data) cable. If no oppy
drive is available, please skip to the section entitled Installation
Without a Floppy Drive.
6. Repeat steps 1-5 for the remaining hard drives that will be
connected as necessary.
7. Replace the computer cover and re-connect all power to the
computer.
8. Turn on the computer. Upon rst boot, Windows will instruct you to
Press [ F6 ] for third party SCSI or driver installation. As such,
please hit [ F6 ] to continue.
9. Press [ S ] when setup asks if you want to specify an additional
device, and insert the boot diskette into your oppy drive, then press
[Enter]
Select [JMicron Serial ATA Adapter], then press [Enter].
Press [Enter] again to nish driver installation, then follow the on-
screen instructions to complete the Windows installation.
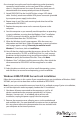
Please note: If a Security Alert warning pops up, click Yes to
proceed. Follow the setup instructions to select your choice for
partition and le system. After setup examines your disks, it will copy
les from the CD to the hard drive selected above, and restart the
system. After restart, the setup process will resume installing the
new drive(s).