
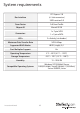
Specifications


Instruction Manual
4
Windows Vista/Server 2008 R2/7 - Fresh Install
1. Power up the computer system and insert the Windows Installation DVD.
2. Boot from the DVD and follow the installation instructions, until reaching the screen to select the
destination disk/partition.
3. Click the “Load Drivers” button and insert the Driver Installation CD and browse to the location of
the drivers on the CD.
4. Once the drivers are installed, the drive(s) connected to the controller card should now be visible.
5. Proceed with the rest of the Windows installation.
Windows XP/Server 2003
1. When the Found New Hardware wizard appears on the screen, insert the Driver CD into your CD/
DVD drive. If you are prompted to connect to Windows Update, please select the “No, not this
time” option and click Next.
2. Select the option “Install Drivers Automatically (Recommended)” and then click the Next button.
3. Windows should now start searching for the drivers. Once this has completed, click the Finish
button.
Windows Vista/Server 2008 R2/7
1. When the Found New Hardware window appears on the screen, click on the “Locate and install
drivers software (recommended)” option. If prompted to search online, select the “Don’t search
online” option.
2. When prompted to insert the disc, insert the Driver CD that came with the card, into your CD/
DVD drive and Windows will automatically proceed to search the CD.
3. If a Windows Security dialog window appears, click the “Install this driver software anyway”
option to proceed.
4. Once the driver is installed, click the Close button.