
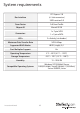
Specifications


Instruction Manual
3
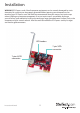
Hardware Installation
1. Turn your computer o and any peripherals connected to the computer (i.e. printers, external
hard drives, etc.). Unplug the power cable from the rear of the power supply on the back of the
computer and disconnect all peripheral devices.
2. Remove the cover from the computer case. See documentation for your computer system for
details.
3. Locate an open PCI Express slot and remove the metal cover plate on the rear of the computer
case (Refer to documentation for your computer system for details.). Note that this card will work
in PCI Express slots of additional lanes (i.e. x4, x8 or x16 slots).
4. If installing the card into a low prole system, remove the screws holding the full prole bracket
to the card and replace with the included low prole bracket.
5. Insert the card into the open PCI Express slot and fasten the bracket to the rear of the case.
OPTIONAL: This card features 2-pin headers for connecting LED indicators. Simply connect the
2-wire cable from the LED (not included with card) to the appropriate header connector on the
card.
6. If installing an internal SATA hard drive, connect the hard drive to the internal SATA port on the
card.
7. Place the cover back onto the computer case.
8. Insert the power cable into the socket on the power supply and reconnect all other connectors
removed in Step 1.
Driver Installation
Windows XP/Server 2003 - Fresh Install
NOTE: These operating systems will require a 3.5” oppy disk drive to install drivers for storage
controller cards. Make sure a oppy drive is installed in the computer system and the driver les
from the Driver Installation CD are copied onto a oppy disk.
1. Power up the computer system and insert the Windows Installation CD.
2. Boot from the CD and when prompted, press the [F6] key to install 3rd party drivers.
3. When prompted, insert the oppy disk with the drivers into the oppy drive and follow the
prompts.
4. Once the drivers are loaded, proceed with the Windows installation.