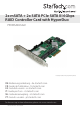
2x mSATA + 2x SATA PCIe SATA III 6Gbps RAID Controller Card with HyperDuo PEXMSATA3422 *actual product may vary from photos DE: Bedienungsanleitung - de.startech.com FR: Guide de l'utilisateur - fr.startech.com ES: Guía del usuario - es.startech.com IT: Guida per l'uso - it.startech.com NL: Gebruiksaanwijzing - nl.startech.com PT: Guia do usuário - pt.startech.com For the most up-to-date information, please visit: www.startech.
FCC Compliance Statement This equipment has been tested and found to comply with the limits for a Class B digital device, pursuant to part 15 of the FCC Rules. These limits are designed to provide reasonable protection against harmful interference in a residential installation. This equipment generates, uses and can radiate radio frequency energy and, if not installed and used in accordance with the instructions, may cause harmful interference to radio communications.
Table of Contents Introduction.............................................................................................1 Packaging Contents.................................................................................................................................. 1 System Requirements .............................................................................................................................. 1 Product Overview......................................................................
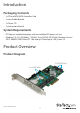
Introduction Packaging Contents • 1x PCIe mSATA/SATA Controller Card • 1x Low-Profile Bracket • 1x Driver CD • 1x Instruction Manual System Requirements • PCI Express enabled computer with an available PCI Express x4 slot • Windows® 8 / 8.1 (32/64bit), 7 (32/64), Vista (32/64), XP (32/64), Windows Server® 2012, 2008 R2, 2003, Mac OS® 10.6 and up (Tested up to 10.9), Linux 3.
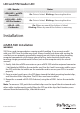
LED and PIN Header LED LED / Header Status LED0/LED1 - mSATA Green LEDs On: Drive is linked Blinking: Accessing the drive LED2/LED3 – SATA LED Pin Headers On: Drive is linked Blinking: Accessing the drive LED All – LED Pin Header On: When any one of the 4 drives is linked Blinking: When any one of the 4 drives is accessing Installation mSATA SSD Installation WARNING! SSD Drives and storage adapters require careful handling. If you are not careful with your SSD Drive, lost data may result.
Hardware Installation WARNING! PCI Express cards, like all computer equipment, can be severely damaged by static electricity. Be sure that you are properly grounded before opening your computer case or touching your PCI Express card. StarTech.com recommends that you wear an anti-static strap when installing any computer component.
3. Select the Open folder to view files option from the AutoPlay Menu, if AutoPlay is disabled on your system, or if you have downloaded the driver, browse to your DVD/ CD drive or to the downloaded driver location. 4. Run the Setup/Install “.exe” application within the Driver folder, to start the driver installation process. 5. Follow any on-screen instructions to complete the driver installation. Note: You may be prompted to restart your system once installation is complete.
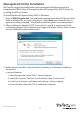
Management Utility Installation RAID and/or HyperDuo configuration can be accomplished either through the integrated card-BIOS utility, or through the Marvell Storage Utility (MSU). Details for installing the MSU are below. To install the Marvell Storage Utility (MSU) in Windows: 1. Run the MSU Setup/Install “.exe” application located within Marvell Software Utility folder and follow the on-screen instructions.
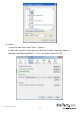
b. Firefox i. From the menu bar, select Tools > Options ii.
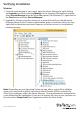
Verifying Installation Windows 1. From the main desktop or start menu, open the Device Manager by right-clicking on Computer, and then selecting Manage. In the Computer Management window, select Device Manager from the left window panel. (For Windows 8.1, right-click on the Start button and click Device Manager). 2. Expand the Storage controllers section, on a successful install you should see the following device in the list with no exclamation points or question marks.
Hard Drive Initialization If the mSATA SSD or SATA HDD is new or otherwise blank, it may need to be initialized and formatted before use. Follow the steps below in Windows to initialize the drive. 1. From the main desktop or start menu, right-click on Computer and then select Manage. 2. In the Computer Management window, select Disk Management from the left window panel. 3. A dialog window should automatically appear, asking you to initialize the drive.
Port Multiplier Port Multiplier (PM) allows for multiple SATA drives (up to 4) to be connected to a single SATA host port. PM allows for easy, cost-effective storage scalability both inside and outside the PC or server. It is commonly used to connect a multi-drive SATA/eSATA hard drive enclosure/backplane using a single cable. This greatly expands the storage capabilities of the SATA controller beyond its normal port count. Note: Only the two SATA ports on the card can use the Port Multiplier feature.
1. The “Create Virtual Disk” configuration options appear in the “Information” pane (right-side), here you are able to select the RAID level and other configuration options: a. Select 2 HDDs for RAID 0 or RAID 1 b. Select 3 HDDs for RAID 0 c. Select 4 HDDs for RAID 0 or RAID 10 2. After configuring the virtual disk, highlight “Next” and press Enter. Press Y to confirm the creation of the virtual disk. It will now be listed in the Topology Pane (left).
4. This will enable you to place a checkbox beside the disks that you would like to use as part of the RAID set. Once you have selected, click “Next” to confirm your selection. 5. You will now be presented with configuration options for your RAID set. Choose the appropriate options and select “Submit” to confirm your changes. Your virtual disk will then be visible in the left pane – the same properties can be accessed later by selecting your virtual disk from the left pane.
WARNING! Capacity mode is a data-destructive process. Please back up all data before using capacity mode. Card BIOS Method 1. When prompted on startup, press Ctrl+M to enter the card BIOS utility Press + to enter BIOS Setup or to continue_ 2. Using the arrow keys to navigate, move to “HBA0: Marvell 0” and press Enter to select 3. Press Enter again to open the Configuration Wizard 4.
8. After configuring the virtual disk, highlight “Next” and press Enter. Press Y to confirm the creation of the virtual disk. It will now be listed in the Topology Pane (left). Administration Console Method 1. From the left pane of main screen of the Marvell Storage Utility (MSU), select the adapter and hover the mouse over the “Operation” tab. 2. Select “Create HyperDuo” 3. Select either Safe mode or Capacity mode from the drop-down in the right pane.
The newly created HyperDuo drive will then appear in the left pane and begin initializing. This can take up to 30 minutes to complete, and system performance may be slow during this period. HyperDuo Management 1. From the left pane of the MSU, select “HyperDuo Service” 2. The right pane will then display available programs and folder that you can customize to one of the following optimization modes: a. Check Auto to have the MSU manage the optimization of a folder or program automatically. b.
3. Select Submit to apply your changes, then select “OK” on the pop-up that follows. 4. If the folder you would like to optimize is not available, select “Advanced” from the “HyperDuo Service” pane. 5. The “Customize Wizard” will pop-up and allow you to select the desired folders.
Specifications Ports 2x mSATA Slot, 2x SATA Ports Mini SATA Interface SATA Bus Type PCI Express Card Type Standard Profile (LP bracket incl.) Port Style Integrated on Card Serial ATA 3.0 specification Industry Standards PCI Express 2.
Technical Support StarTech.com’s lifetime technical support is an integral part of our commitment to provide industry-leading solutions. If you ever need help with your product, visit www.startech.com/support and access our comprehensive selection of online tools, documentation, and downloads. For the latest drivers/software, please visit www.startech.com/downloads Warranty Information This product is backed by a two year warranty. In addition, StarTech.
Hard-to-find made easy. At StarTech.com, that isn’t a slogan. It’s a promise. StarTech.com is your one-stop source for every connectivity part you need. From the latest technology to legacy products — and all the parts that bridge the old and new — we can help you find the parts that connect your solutions. We make it easy to locate the parts, and we quickly deliver them wherever they need to go. Just talk to one of our tech advisors or visit our website.