
Specifications
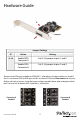

Instruction Manual
4
4. Position the card above the open PCI Express slot, ensuring that the card is properly
aligned with the slot. Insert the card rmly into the slot, distributing force evenly across
the length of the board.
Once inserted, secure the card into the adjoining socket (previously covered by a metal
bracket, on the rear panel of the computer chassis), using the correct size screw (if
necessary, please consult documentation that accompanied purchase of computer).
5. Connect the desired SATA drive to either the internal SATA port, or the external SATA
(eSATA) port (as determined by the jumper settings - see Hardware Guide for further
details) and replace the chassis/case covering.
Driver Installation - Windows XP/Server 2003
1. Following hardware installation, power up the computer. The Found New Hardware
Wizard will appear.
If you are using Windows XP (with Service Pack 1 or earlier) or Windows Server 2003 (with
Service Pack 1 or earlier), continue to step 2.
If you are using Windows XP (with Service Pack 2 or later) or Windows Server 2003 (with
Service Pack 2 or later) please select No, not this time, then click on Next.
2. Please insert the driver CD into your CD/DVD-ROM Drive, and select Install the software
automatically(Recommended), then click Next.
3. Accept the default entry, then click Next.
4. Click Finish to conclude software installation.
5. Repeat steps 1-4 a second time, then click on Yes to restart the computer.
Driver Installation - Windows 2000
1. At the Found New Hardware Wizard, click Next.
2. Select Search for a suitable driver for my device(recommended) then click Next.
3. Insert the driver CD into your CD-ROM Drive, ensure that only CD-ROM drives is selected,
then click Next, then click Next again.
4. Click Next, then Finish.
5. Repeat steps 1-4 for the remaining SATA port.
6. Click Yes to restart, to complete the installation.