Port PCI Express eSATA II Controller Card PEXESATA1 DE: Bedienungsanleitung - de.startech.com FR: Guide de l'utilisateur - fr.startech.com ES: Guía del usuario - es.startech.com IT: Guida per l'uso - it.startech.com NL: Gebruiksaanwijzing - nl.startech.com PT: Guia do usuário - pt.startech.com For the most up-to-date information, please visit: www.startech.
FCC Compliance Statement This equipment has been tested and found to comply with the limits for a Class B digital device, pursuant to part 15 of the FCC Rules. These limits are designed to provide reasonable protection against harmful interference in a residential installation. This equipment generates, uses and can radiate radio frequency energy and, if not installed and used in accordance with the instructions, may cause harmful interference to radio communications.
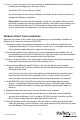
Table of Contents Introduction .......................................................................................................................................................1 Package contents.......................................................................................................................................1 System Requirements.............................................................................................................................1 Hardware Guide...............
Introduction Thank you for purchasing a StarTech.com SATA II PCI Express Adapter. This innovative card allows you to turn an available PCI Express (1x) slot into an internal or external SATA (eSATA) connection with support for full SATA data transfer rates of up to 3Gbps - an ideal solution if you need an extra SATA port or want to externalize your storage.
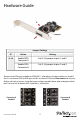
Hardware Guide B Jumpers A Jumper Settings JP Action Setting J1-J4 Enable SATA Connector A Set J1-J4 jumpers to pins 1 and 2 Enable SATA Connector B Set J1-J4 jumpers to pins 2 and 3 There are two SATA ports available on PEXESATA1 - referred to in the above picture as A and B. Port A is an external SATA (eSATA) port and B is an internal SATA port; Please note that only one of them will work at a time. Using the jumper settings provided above, please designate which port is to be used.
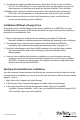
Installation WARNING! PCI Express cards, like all computer equipment, can be severely damaged by static electricity. Be sure that you are properly grounded before opening your computer case or touching your card. StarTech.com recommends that you wear an anti-static strap when installing any computer component. If an anti-static strap is unavailable, discharge yourself of any static electricity build-up by touching a large grounded metal surface (such as the computer case) for several seconds.
4. Position the card above the open PCI Express slot, ensuring that the card is properly aligned with the slot. Insert the card firmly into the slot, distributing force evenly across the length of the board. Once inserted, secure the card into the adjoining socket (previously covered by a metal bracket, on the rear panel of the computer chassis), using the correct size screw (if necessary, please consult documentation that accompanied purchase of computer). 5.
Driver Installation - Windows Vista/7 1. After powering the computer following physical installation, a window will appear indicating that new hardware has been found. Please click on Locate and Install Driver Software (recommended) 2. You will then be asked to Insert the disc that came with your Mass Storage Controller. As such, please insert the Driver CD (included), then click on Next to continue. 3. Windows will then locate and install the necessary driver files.
8. Press [ S ] when setup asks if you want to specify an additional device, and insert the boot diskette into your floppy drive, then press [Enter] Select the SiI 3531 driver, then press [Enter]. Press [Enter] again to finish driver installation, then follow the on- screen instructions to complete the Windows installation. Please note: If a Security Alert warning pops up, click Yes to proceed. Follow the setup instructions to select your choice for partition and file system.
9. You will then be asked to provide the necessary driver files. The files can be accessed by CD, DVD, or USB Flash Drive. As such, connect the drivers to the computer using one of these methods, and click Browse to specify the location of the files. Then, click Next. 10. Windows Vista™ will then install the necessary files, after which the drive connected to PEXESATA1 will be recognized as a usable drive onto which the OS can be installed. 11.
Specifications Bus Interface Chipset ID Connectors Maximum Data Transfer Rate Certifications Dimensions (L x W x H) Weight Compatible Operating Systems Instruction Manual PCI Express 1.0a (x1 slot connector) SATA revision 2.0 (3Gbps) Silicon Image SiI3531 External: 1x eSATA plug Internal: 1x SATA plug SATA: 3Gbps CE, RoHS, WEEE 102 mm x 120 mm x 20 mm (4.02 in x 4.72in x 0.79 in) 44.2 g (1.56 oz ) Windows 2000/XP/Vista™/7 (32/64-bit), Linux kernel 2.6.
Technical Support StarTech.com’s lifetime technical support is an integral part of our commit-ment to provide industry-leading solutions. If you ever need help with your product, visit www.startech.com/ support and access our comprehensive selection of online tools, documentation, and downloads. Warranty Information This product is backed by a lifetime warranty. In addition, StarTech.
Hard-to-find made easy. At StarTech.com, that isn’t a slogan. It’s a promise. StarTech.com is your one-stop source for every connectivity part you need. From the latest technology to legacy products — and all the parts that bridge the old and new — we can help you find the parts that connect your solutions. We make it easy to locate the parts, and we quickly deliver them wherever they need to go. Just talk to one of our tech advisors or visit our website.