
Instruction manual


2
Installation
WARNING! PCI Express cards, like all computer equipment, can be
severely damaged by static electricity. Be sure that you are properly
grounded before opening your computer case or touching your PCI
Express card. StarTech.com recommends that you wear an anti-static
strap when installing any computer component. If an anti-static strap is
unavailable, discharge yourself of any static electricity build-up by touching
a large grounded metal surface (such as the computer case) for several
seconds. Also be careful to handle the PCI Express card by its edges and
not the gold connectors.
Hardware Installation
1. Turn your computer off and any peripherals connected to the computer
(i.e. Printers, external hard drives, etc.). Unplug the power cable from the
rear of the power supply on the back of the computer and disconnect all
peripheral devices.
2. Remove the cover from the computer case. See documentation for your
computer system for details.
3. Locate an open PCI Express slot and remove the metal cover plate on
the rear of the computer case (Refer to documentation for your computer
system for details.). Note that this card will work in PCI Express slots of
additional lanes (i.e. x4, x8 or x16 slots).
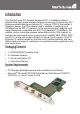
4. Insert the card into the open PCI Express slot and fasten the bracket to
the rear of the case. For ease of installation, make sure the antennas
are not attached to the card yet.
5. Place the cover back onto the computer case.
6. Attach the included external antennas to the rear bracket of the card.
7. Insert the power cable into the socket on the power supply and
reconnect all other connectors removed in Step 1.
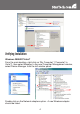
Driver Installation
Windows 2000/XP/Server 2003
1. Upon starting Windows, if the Found New Hardware wizard appears on
the screen, cancel/close the window and insert the included Driver CD
into the computer’s CD/DVD drive.