4 Port PCI SATA RAID Controller Adapter Card PCISATA4R1 *actual product may vary from photos DE: Bedienungsanleitung - de.startech.com FR: Guide de l'utilisateur - fr.startech.com ES: Guía del usuario - es.startech.com IT: Guida per l'uso - it.startech.com NL: Gebruiksaanwijzing - nl.startech.com PT: Guia do usuário - pt.startech.com For the most up-to-date information, please visit: www.startech.
FCC Compliance Statement This equipment has been tested and found to comply with the limits for a Class B digital device, pursuant to part 15 of the FCC Rules. These limits are designed to provide reasonable protection against harmful interference in a residential installation. This equipment generates, uses and can radiate radio frequency energy and, if not installed and used in accordance with the instructions, may cause harmful interference to radio communications.
Table of Contents Introduction.........................................................................................................................................................1 Packaging Contents.................................................................................................................................1 System Requirements.............................................................................................................................1 Installation....................
Introduction Make the jump to Serial ATA performance with a four-port RAID card from StarTech.com. You get four RAID-ready internal Serial ATA ports for your high performance Serial ATA hard drives. Whether you need Striping (RAID 0), Mirroring (RAID 1), or both (RAID 0+1), this card has you covered. The PCISATA4R1 also supports RAID 1+S (Mirrored-Sparing), which automatically replaces a failed hard drive and rebuilds the system if a booting hard drive fails.
Driver Installation Windows 2000/XP 1. Windows will launch the Add New Hardware Wizard. Click Next. 2. Choose the Search for a suitable driver... option and click Next. 3. Check only the CD-ROM drives option. Ensure the installation CD is inserted in the CD-ROM or other optical drive. Click Next. 4. Windows will display a message stating that “Windows has found a driver for this device”. Click Next. Choose Yes or Continue Anyway if you are warned that the driver file has not been digitally signed. 5.
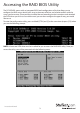
Accessing the RAID BIOS Utility The PCISATA4R1 comes with an integrated BIOS-level configuration utility that allows you to configure the RAID setup, rebuild your array in the event of failure, and resolve conflicts with the arrays you have setup. Once you have installed the card according to the instructions and attached the SATA drives you wish to use with the card, you can then configure the type of array you would like to use.
The Main Menu option allows you to carry out various tasks related to configuring and maintaining your RAID. You can navigate the menu using the arrow keys on the keyboard and select an item by pressing [Enter]. The Main Menu options are described below: Create RAID set: Create a RAID for the first time, or change the configuration of an array after deleting a previous setup. For more details and an explanation of the RAID levels available with the card, please see page 6.
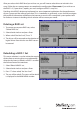
Configuring an Array When you choose Create a RAID set from the Main Menu of the RAID utility, you will be presented with the following menu: For each option/RAID level are as follows: RAID0: Also called “disk striping,” where multiple physical drives are merged to create a single logical volume.
After you select which RAID level you wish to use, you will have to select drives to include in the array. Follow the on-screen prompts to complete the configuration. Please note: If you wish to use the RAID 1+S (“spare drive”) option, you must configure a RAID 1 array first. Deciding which RAID solution to implement has some important implications for the performance of your system and the safety of your data.
Resolving Conflicts When a RAID set is created, the metadata written to the disk includes drive connection information including the channel on the host adapter to which it is connected. If after a disk failure the replacement disk was previously part of a RAID set or used in another system, it may have conflicting metadata, specifically in reference to the drive connection information. If so, this will prohibit the RAID set from being either created or rebuilt.
SATARaid GUI Overview The SATARaid GUI Installation program configures the SATARaid GUI to automatically start when Windows is started. If the SATARaid GUI does not automatically start or is closed by the user, choose the JAVA SATARaid program from the Start Menu to launch the GUI. This section explains how to use the SATARAID5 Manager graphical user interface (GUI) to create and manage RAID groups.
SATARaid Toolbar and Menu Commands 1 - RAID Management This command allows the management of the RAID sets and drives on the SATA host adapter. It is available only under Windows 2000 and XP. 2 - System View This command displays a graphical representation of the host adapter and RAID sets. Clicking on each of the components and then clicking the Details button will open a new window showing more information on the selected device.
SATARaid Configuration SATARaid configuration options include customization of the settings for Event Notification, E-mail Notification, Log File, Audio, and Popup. The first tab displayed when SATARaid configuration is opened is for Event Table configuration. This setting determines which events are displayed in the Event Table.
The Event Time tab is used to set the interval time in seconds for the program to poll the status of the host adapter and devices. Lower settings may have an impact on system performance. If the RAID sets are subject to heavy activity, the Event Time interval should be increased. The SMTP tab allows the server name to be set for all SATARaid email-related functions. These include sending of configuration files and automatic notification.
The current SATARaid configuration may be sent via e-mail. This feature is most often used when contacting the system administrator for technical support. Select the E-mail tab in the SATARaid Configuration Menu and enter the default e-mail address and subject line for the party receiving the configuration data. The default address and subject can be overridden prior to sending the email. When different types of events occur, SATARaid can send notices to assigned individual e-mail addresses.
The log file is used to store event information received from all Silicon Image RAID drivers. The log file is a text file and can be viewed with any text viewer (such as Notepad) or with the Event Property page of SATARaid. Use the Log File tab to set location and the desired filename for the log file. The Audio tab is used to select audio alerts in response to events. Each event can use a different audio alert, and each can be individually disabled.
SATARaid can be configured to notify the user of events using messages in popup windows. These alerts can occur separately or in conjunction with audio alerts and email notification.
Specifications 32-bit PCI v2.2 (3.3V/5 V) Bus Interface SATA rev 1.
Technical Support StarTech.com’s lifetime technical support is an integral part of our commitment to provide industryleading solutions. If you ever need help with your product, visit www.startech.com/support and access our comprehensive selection of online tools, documentation, and downloads. For the latest drivers/software, please visit www.startech.com/downloads Warranty Information This product is backed by a lifetime warranty. In addition, StarTech.
Hard-to-find made easy. At StarTech.com, that isn’t a slogan. It’s a promise. StarTech.com is your one-stop source for every connectivity part you need. From the latest technology to legacy products — and all the parts that bridge the old and new — we can help you find the parts that connect your solutions. We make it easy to locate the parts, and we quickly deliver them wherever they need to go. Just talk to one of our tech advisors or visit our website.