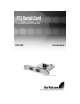
PCI Serial Card 2 Port RS-422/RS-485 PCI Serial Card PCI2S422DB9 Instruction Manual Actual product may vary from photo
FCC Compliance Statement This equipment has been tested and found to comply with the limits for a Class B digital device, pursuant to part 15 of the FCC Rules. These limits are designed to provide reasonable protection against harmful interference in a residential installation. This equipment generates, uses and can radiate radio frequency energy and, if not installed and used in accordance with the instructions, may cause harmful interference to radio communications.
Instruction Manual Table of Contents Introduction . . . . . . . . . . . . . . . . . . . . . . . . . . . . . . . . . . . . . . . . . . . . . . . . . . . . .1 Before You Begin . . . . . . . . . . . . . . . . . . . . . . . . . . . . . . . . . . . . . . . . . . . . . . . .1 System Requirements . . . . . . . . . . . . . . . . . . . . . . . . . . . . . . . . . . . . . . . . . . .1 Contents . . . . . . . . . . . . . . . . . . . . . . . . . . . . . . . . . . . . . . . . . . . . . . . . . . . . .1 Installation . .
Instruction Manual Introduction Thank you for purchasing a StarTech.com PCI serial card. This high performance add-in card adds 2 serial ports to your system. You can connect your RS-422 or RS-485 serial devices at distances of up to 4000 feet (1200 meters) at high speeds with excellent reliability. Features • Transfers data at speeds of up to 960 Kbits/sec. • Plug and Play Compatible • Eliminates IRQ conflict by sharing IRQ lines • Backed by StarTech.
Instruction Manual Installation This section will guide you through the installation of your PCI card and the related software. Please read through the instructions carefully and complete each step in the order listed. Installing the Card 1. Make sure that your system is unplugged and you are grounded. 2. Remove the cover of your system (see your computer's user manual for details, if necessary) and gently turn your computer onto its side. 3.
Instruction Manual 5. Click Yes when asked to restart your computer. To Verify Installation 1. Go to your Control Panel and double-click the System icon. 2. Click the Device Manager tab. 3. Click the plus (+) symbol next to Ports (COM & LPT). Two new serial ports (numbered COMxx) should appear without exclamation marks or other errors. Windows 2000/XP 1. Windows will detect new hardware on startup and the Add New Hardware Wizard will appear. 2. Insert the CD that came with the serial card.
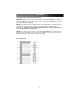
Instruction Manual Configuring Your Serial Card The PCI2S422DB9 allows you to configure each port based on your needs and the requirements of the serial devices you are connecting to each port. Consult the documentation for the device(s) you wish to connect to the card to determine the correct setting. Example: Both ports configured for Full Duplex (default) Full Duplex: Allows the port to simultaneously send and receive data between itself and a serial device (default).
Instruction Manual Connecting Your Serial Devices WARNING: Power off the computer in which the card is installed and any serial devices before attempting any connection. Failure to do so could result in damage to the card and other peripheral equipment. NOTE: The minimal amount of cable possible is preferable when connecting devices to the card. Excessive amounts of cable can cause interference and may reduce performance.
Instruction Manual Specifications Chipset Connectors SUN1889 2 x DB9 male Mode of Operation Differential Bus Transceivers Full Duplex and Half Duplex Selectable Maximum Data Rate 10 Mbits/sec (250K baud on networks >= 64 nodes) Maximum Cable Length 4000 feet (1200 meters) Max.
Instruction Manual Technical Support The following technical resources are available for this StarTech.com product: On-line help: We are constantly adding new information to the Tech Support section of our web site. To access this page, click the Tech Support link on our homepage, www.startech.com. In the tech support section there are a number of options that can provide assistance with this product.
Revised: 28 June 2005 (Rev.