2m Mobile Charge Sync Micro USB Cable - A to Micro B USBDUP15 *actual product may vary from photos DE: Bedienungsanleitung - de.startech.com FR: Guide de l'utilisateur - fr.startech.com ES: Guía del usuario - es.startech.com IT: Guida per l'uso - it.startech.com NL: Gebruiksaanwijzing - nl.startech.com PT: Guia do usuário - pt.startech.com For the most up-to-date information, please visit: www.startech.
FCC Compliance Statement This equipment has been tested and found to comply with the limits for a Class B digital device, pursuant to part 15 of the FCC Rules. These limits are designed to provide reasonable protection against harmful interference in a residential installation. This equipment generates, uses and can radiate radio frequency energy and, if not installed and used in accordance with the instructions, may cause harmful interference to radio communications.
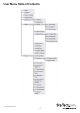
Table of Contents Product Diagram.....................................................................................1 Top View........................................................................................................................................................ 1 Back View...................................................................................................................................................... 1 Introduction......................................................
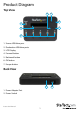
Product Diagram Top View 5 4 6 1 7 3 2 1. Source USB drive port 2. Destination USB drive ports 3. LCD Display 4. Forward button 5. Backward button 6. OK button 7. Escape button Back View 1 1. Power Adapter Port 2.
Introduction Packaging Contents • 1x 1:5 USB Flash Drive Duplicator (USBDUP15) • 1x Universal Power Adapter (NA/UK/EU) • 1x Instruction manual System Requirements • 1x Source USB drive • 1 to 5x Destination USB drive(s) • (Optional) USB multimedia card reader (1 x each drive): To use an SD/ SDHC/ Micro SD/ MMC/ Mini SD/ CF card as Source or Destination drive.
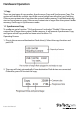
Hardware Setup Note: a) Before you begin ensure the power switch on the USBDUP15 is set to the off position. b) The source or destination drives can be replaced with any SD/ SDHC/ Micro SD/ MMC/ Mini SD/ CF media card, using USB multimedia card reader (sold separately), or Hard Drive(HDD) / Solid State Drive (SSD) through a Hard Drive docking station or USB enclosure (sold separately). 1. Insert the source USB flash drive you would like to copy into the Source USB drive port on the USBDUP15. 2.
User Menu Table of Contents Instruction Manual 4
Hardware Operation 1. Copy There are two types of copy modes, Asynchronous Copy and Synchronous Copy. The system will check the content size of the source before executing the ‘copy’ function. If the source content size is less than the system’s buffer memory, it will automatically start an Asynchronous copy. If the source content size is larger than the system’s buffer memory, it will copy in Synchronous mode. 1.1 Synchronous Copy To configure, go to function “7.6 Asynchronous” and select “Disable”.
3. When the copy has completed, the LCD display will show the total time it took to copy, the number of passes, and if there were any failures. NOTE: a) When the copy is in progress, the green LED will flash for each Flash drive that is connected. When the copy has finished, the green LED will stop flashing and remain illuminated. If an error occurs, the red LED will illuminate. b) Do NOT remove the Flash drives while the system is copying (green LED is flashing).
2. Once the copy has completed, the green LED will stop blinking. The destination Flash drive can be removed and a new Flash drive inserted, then the copy will automatically start again. The LCD display will show the accumulated quantity of the successful/failed duplications and the drive that is still copying. NOTE: a) When the copy is in progress, the green LED will flash for each Flash drive that is connected. When the copy has finished, the green LED will stop flashing and remain illuminated.
4. Capacity Check Check the exact capacity of the connected Flash drive in the destination slots. 1. Plug the Flash drive into the slot and press OK on Capacity Check. The system will quickly report the exact capacity of the connected Flash drive by reporting either a green or red LED. Use the up and down arrows to move between slots. 2. This function supports Asynchronous operation. You can continuously remove and connect multiple Flash drive types without pushing any buttons.
5.2 System Information This function will show information about the system, including model number and software version. 6. Utility 6.1 Do Format Insert a Flash drive device into one of the destination slots and press OK to begin formatting. 1. This function will automatically detect the capacity of the Flash drive and format accordingly. If the Flash drive is already FAT16 or FAT32, the original format will not be changed. 2.
6.2 Measure Speed Measure the read and write speeds of the Flash drive. 1. Plug the Flash drive into one of the slots and select function “6.2 Measure Speed”, then press OK. 2. Use the up and down arrows to see the Flash drive’s exact read and write speeds for each port. NOTE: This function may result in data loss and format the Flash drive. Only the destination ports can be measured. 6.3 Media Check Analyze the Flash drive’s quality.
6.3.4 Setup Error Limit Set the tolerance range when checking for errors on the Flash drive. Use the up and down arrows to set the percentage. 6.4 Quick Erase Erase the Flash drive’s data content. Use the up and down arrows to check each port’s status. 6.5 Full Erase This function completes a single pass overwrite to erase the Flash drive’s content and format. 6.6 DoD Erase This function completes a three pass overwrite erase which is acceptable by the U.S.
7.2.2 Whole Media Set the system to copy the entire Flash drive’s content, including empty space and file format. 7.3 Button Beep Turn audio feedback ON/OFF. ON by default. 7.4 Asyn Hold time Set the time to cancel an Asynchronous copy when you’ve temporarily finished copying and all of the Flash drive devices have been removed, but the copy job has not been manually cancelled.
7.10 Working Mode There are 5 duplication speeds: • Slowest Mode • Slower Mode • Normal Mode (default setting) • Faster Mode • Fastest Mode Change the duplication speed. Normal speed is recommended for most Flash drive types. If there is a high failure rate when duplicating, try lowering the speed. 7.11 Set HDD Mode Choose ‘Active Mode’ to duplicate to USB Hard Disk Drives (HDD/SSD). Choose ‘Inactive Mode’ to duplicate USB Flash drives. Inactive mode is set by default. 7.
Technical Support StarTech.com’s lifetime technical support is an integral part of our commitment to provide industry-leading solutions. If you ever need help with your product, visit www.startech.com/support and access our comprehensive selection of online tools, documentation, and downloads. For the latest drivers/software, please visit www.startech.com/downloads Warranty Information This product is backed by a lifetime year warranty. In addition, StarTech.
Hard-to-find made easy. At StarTech.com, that isn’t a slogan. It’s a promise. StarTech.com is your one-stop source for every connectivity part you need. From the latest technology to legacy products — and all the parts that bridge the old and new — we can help you find the parts that connect your solutions. We make it easy to locate the parts, and we quickly deliver them wherever they need to go. Just talk to one of our tech advisors or visit our website.