NETRS232 One/Two/Four Port Quick Installation Guide Rev.
1 Getting Started Congratulations on your purchase of a StarTech NETRS232. NETRS232s connect serial devices to Ethernet networks. Any serial device—POS equipment, factory machinery, monitoring hardware, or security devices, for example—can send its information to the NETRS232.The NETRS232 places the serial data in a TCP/IP wrapper and sends it out its Ethernet port. Data moving the other direction, from the Ethernet side of the NETRS232 to the serial device, undergoes the same process in reverse.
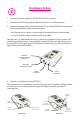
Hardware Setup 2 1. Connect the power supply to the NETRS232 and to AC power. 2. The power (red) LED will light to indicate that the unit is receiving power. 3. Connect a network cable to the Ethernet RJ-45 jack of the NETRS232.The other end of the network cable can be attached to either: • an Ethernet hub or switch, using a length of standard Ethernet network cable • a host PC directly, using an Ethernet cross-over cable. Network status is indicated by two LEDs on the RJ-45 connector.
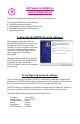
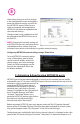
Software Installation and Configuration 3 Software installation and configuration consists of the following: A. Running the NETRS232 setup software B. Configuring network settings C. Activating and deactivating NETRS232 ports D. Optional advanced port configuration E. Upgrading software A. Running the NETRS232 setup software The installation diskette has files to install NETRS232 drivers on your PC and to detect NETRS232 devices on your network.
4 Before Proceeding: The NETRS232 is factory preset with an IP address of 192.168.0.35. If this IP address cannot be used on the network (it may already in use, for instance), do not initially connect the NETRS232 to the network. Instead, either: 1) connect the NETRS232 to a network segment that is not already using the NETRS232 default IP address for another device or, 2) connect the NETRS232 directly to a host PC using an Ethernet crossover cable.
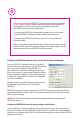
5 Choose the setting you wish to change. In the configuration screen that appears, enter the network settings you wish for that NETRS232 device. Once the new values are entered and accepted, the NETRS232 will reboot to implement the new network settings. Changes made using a web browser will be updated to the NETRS232 but not to the local PC.
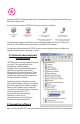
6 particular NETRS232 device, right click on that device in the left panel of the Manager and select “Remove All”.
This device complies with part 15 of the FCC Rules. Operation is subject to the following conditions: (1) This device may not cause harmful interference, and (2) this device must accept any interference received, including interference that may cause undesired operation.