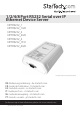
/2/4/8 Port RS232 Serial over IP Ethernet Device Server NETRS232_1 NETRS232_1GB NETRS232_2 NETRS232_2GB NETRS232_4 NETRS232_1EU NETRS232_4GB *actual product may vary from photos DE: Bedienungsanleitung - de.startech.com FR: Guide de l'utilisateur - fr.startech.com ES: Guía del usuario - es.startech.com IT: Guida per l'uso - it.startech.com NL: Gebruiksaanwijzing - nl.startech.com PT: Guia do usuário - pt.startech.com For the most up-to-date information, please visit: www.startech.
FCC Compliance Statement This equipment has been tested and found to comply with the limits for a Class B digital device, pursuant to part 15 of the FCC Rules. These limits are designed to provide reasonable protection against harmful interference in a residential installation. This equipment generates, uses and can radiate radio frequency energy and, if not installed and used in accordance with the instructions, may cause harmful interference to radio communications.
Table of Contents Introduction.............................................................................................1 Packaging Contents.................................................................................................................................. 1 System Requirements............................................................................................................................... 1 Hardware Guide........................................................................
Introduction Thank you for purchasing a StarTech.com Ethernet Remote Serial interface converter. With this one, two, or four port converter, your RS-232 serial devices can be placed anywhere on your Ethernet WAN/LAN and still perform as if they were right beside you. Even at the longest distances, control of your serial devices will be right at your fingertips: the remote serial ports appear alongside your local serial ports in your Windows device manager.
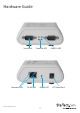
Hardware Guide Serial Port Network LEDs Instruction Manual RJ-45 Port Serial Rx LED Power LED 2 Serial Tx LED DC Power Port
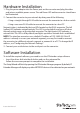
Hardware Installation 1. Plug the power adapter into the Power port on the converter and plug the other end into an available power source. The red Power LED onthe converter should now be illuminated. 2. Connect the converter to your network by doing one of the following: • Using a straight-through RJ-45 cable to connect the converter to a hub or switch • Using a crossover RJ-45 cable to connect the converter to a host PC Network status is indicated by the two LEDs located on the RJ-45 connector.
Configuring the Network Settings The IP Extender Manager software displays information in a format similar to Windows Explorer. Any NETRS232 devices on your network are displayed in the “IP Extenders Near Me” branch of the “My IP Extender Network” tree. Each NETRS232 device on your network will need a unique IP address. These can be set up using IP Extender Manager or a Telnet Client. The factory default settings for the device are: IP Address: 192.168.0.35 Subnet Mask: 255.255.255.
Configuring Network Settings Using a Web Browser The NETRS232 converter contains an embedded web server that allows you to configure your device’s network settings through your web browser. To configure an NETRS232’s network settings using a web browser, open your web browser and enter the device’s IP address in the browser’s address bar.
6. Configure the device.
Activating and Deactivating NETRS232 Ports NETRS232 ports that have been detected as existing on the network are not initially activated for your PC. To access a serial port, you must first activate it. You can activate a port on one computer, some computers, all computers, or none of the computers on your network. To activate a port, open your IP Extender Manager software: • To activate one port, right-click on the port name (in the right side of the window) and select “Activate.
There are two icons that depict the state of the NETRS232_x ports and devices: Icon: Icon with green square: Device available on the network. Under “My Computer,” this icon means the port is available. Icon with red X: Under “My IP Extender Neighborhood,” this icon means the port is activated locally. Device not available on the network. Icon with red square: Under “My Computer,” this icon means the port is not available.
Advanced Settings Ports that have been activated on your PC can generally be used without any further configuration. There are, however, additional configuration options available through the IP Extender Manager. Port Modes The interface converter converts serial port data to and from TCP/IP packets over Ethernet. Each port exchanges TCP/IP packets on its own unique TCP port (called the “Local Port” in the Properties dialog box).
Virtual port (driver) settings The virtual port allows a serial port on an NETRS232 device to be used in same manner as a local serial port when the port is configured in Windows Mode (described above). In this state, the driver for the virtual port converts local serial port accesses into TCP/ IP packets to be exchanged with NETRS232 port. Two virtual port settings are provided to support “difficult” serial devices/applications, generally those with particularly demanding serial requirements.
To prevent this difficulty, NETRS232 Links have a “discovery” mode that allows the correct NETRS232 Link port to be found even when the IP address of the associated box has changed. To use this discovery mode, a “port binding” must be created for that virtual port. A port binding is a network identification of the target NETRS232 Link that must match before a virtual port will initiate a connection. Bindings may be made to the MAC address, Name, or IP address of the associated device.
Binding to IP Address The IP address of a network device is assigned by either the system administrator or through a DHCP server. Binding a virtual port to an IP address will force that virtual port to attempt a connection to any device with that particular IP address only. Binding to an IP address provides dynamic connections. Device IP addresses can be reassigned at any time to cause client PCs to form new connections without being reconfigured.
WAN Activation Activating and accessing the virtual serial port on a NETRS232 device across a WAN can be done in two different ways, depending on how the NETRS232 device is accessible. • NETRS232 device is accessible externally – is directly accessible on the Internet. • NETRS232 device accessible internally – is located behind a gateway or router and is not directly accessible.
4. Ensure that the port(s) to use WAN activation on are configured for “Driver Mode”. 5. Record the TCP port number of the port(s) to be accessible. 6. With the IP address and TCP port number(s) of the NETRS232 device in mind, enable port forwarding on your gateway/router for each port to be made remotely accessible. This will require you to create a port forwarding association between the IP address/TCP ports on the NETRS232 device and the TCP ports on the gateway/ router (i.e.
Specifications Internet Protocols IP, HTTP, ICMP, TCP, TFTP, and UDP 1 x RJ-45 Ethernet port (female) 1 x DC Power Connectors NETRS232_1 1 x DB-9 serial port (male) NETRS232_2 2 x DB-9 serial ports (male) NETRS232_4 4 x DB-9 serial ports (male) 1 x Power LEDs 2 x Ethernet Link/Activity 1 x Serial Tx (per serial port) 1 x Serial Rx (per serial port) Serial Protocol RS232 Maximum Data Transfer Rate Ethernet: 10Mbps Power Adapter 12V DC, 200mA, Center-positive Serial: 115.
Technical Support StarTech.com’s lifetime technical support is an integral part of our commitment to provide industry-leading solutions. If you ever need help with your product, visit www.startech.com/support and access our comprehensive selection of online tools, documentation, and downloads. For the latest drivers/software, please visit www.startech.com/downloads Warranty Information This product is backed by a two year warranty. In addition, StarTech.
Hard-to-find made easy. At StarTech.com, that isn’t a slogan. It’s a promise. StarTech.com is your one-stop source for every connectivity part you need. From the latest technology to legacy products — and all the parts that bridge the old and new — we can help you find the parts that connect your solutions. We make it easy to locate the parts, and we quickly deliver them wherever they need to go. Just talk to one of our tech advisors or visit our website.