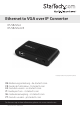
Ethernet to VGA over IP Converter IPUSB2VGA IPUSB2VGAUE *actual product may vary from photos DE: Bedienungsanleitung - de.startech.com FR: Guide de l'utilisateur - fr.startech.com ES: Guía del usuario - es.startech.com IT: Guida per l'uso - it.startech.com NL: Gebruiksaanwijzing - nl.startech.com PT: Guia do usuário - pt.startech.com For the most up-to-date information, please visit: www.startech.
FCC Compliance Statement This equipment has been tested and found to comply with the limits for a Class B digital device, pursuant to part 15 of the FCC Rules. These limits are designed to provide reasonable protection against harmful interference in a residential installation. This equipment generates, uses and can radiate radio frequency energy and, if not installed and used in accordance with the instructions, may cause harmful interference to radio communications.
Table of Contents Introduction.............................................................................................1 Packaging Contents.................................................................................................................................. 1 System Requirements............................................................................................................................... 1 Side 1 View............................................................................
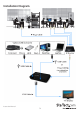
Introduction The StarTech.com IPUSB2VGA Video Adapter offers versatile performance by providing either a USB-to-VGA connection or an IP/Ethernet-to-VGA connection between a PC and VGA-capable display device. The ideal solution for computers lacking a VGA video output or PCs that require an additional display at long distances/remote locations.
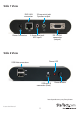
Side 1 View RJ45 LAN connector Power Connector 3.5mm mini-jack Speaker output 3.
Installation Diagram Instruction Manual 3
Installation NOTE: The following installation steps must be completed prior to connecting USB adapter to the host computer, to ensure proper functionality. Software Installation for Windows 2000/XP/Vista/7 1. Insert the Driver CD (included) into the CD/DVD-ROM drive. 2. AutoPlay should automatically launch the installer screen, or simply select the option to run “Autorun.exe”. If AutoPlay is not enabled on the computer, browse through the CD and locate the “Autorun.exe” file. 3.
Hardware Installation for USB 1. Connect the VGA display device to the Video Adapter and power on the Display Device. If using the audio features, connect external speakers and/or a microphone to the 3.5mm mini-jack connectors on the adapter. 2. Plug the power adapter into the VGA Video Adapter. The Power LED will light up steady. 3. Plug in the USB Video Adapter adapter to the computer with a standard mini USB to USB cable. Windows should automatically start to load the drivers.
4. If a DHCP server is available, the VGA Video Adapter will automatically obtain the IP address and network settings to be able to communicate with other devices on the network. If a DHCP server is not available, such as connecting directly to a computer system, the VGA Video Adapter will assume an IP of 192.168.1.50. The computer system must use an IP address of 192.168.1.x (x being a number not used by another device, i.e. the VGA Video adapter) to be able to communicate with the VGA Video Adapter. 5.
Installation for Mac OS X 1. Insert the Driver CD (included) into the CD/DVD-ROM drive. 2. Browse through the Driver CD and locate the “DisplayLink-OSX” .dmg file. Doubleclick on this file to begin the installation process: 3. Double Click the “DisplayLink Software Installer.pkg” to install the software. 4. Once the installation is complete, click the “Restart” button. The computer will automatically reboot, so make sure to close/save any files you have opened, before pressing this button. 5.
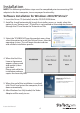
Configuration Windows 2000/XP/Vista/7 To configure the image being displayed by the monitor that is connected to the VGA Video Adapter, right-click on a blank section of the desktop, select Properties, then click on the Settings tab to display the following screen: For Vista, right-click on a blank section of the desktop and select Personalize, then select Screen Resolution on the next screen. For Windows 7, simply right-click and select Screen Resolution.
Configure the secondary display by selecting it from the “Display” drop-down menu, then adjusting the desired settings: Using the Second Display in Extended Mode In Extended Mode, the monitor that is connected to the VGA Video Adapter creates an extension of the Windows Desktop displayed on the primary monitor.
Similarly, the screen resolution, color quality, position of the screen and rotation of the screen can be adjusted from this menu. To disable the secondary display, select Off. Screen Rotation Will rotate the entire video output in 90 degree increments. Media Playback Please note that while operating in Extended Mode, the VGA Video Adapter can display media files and DVDs using a broad variety of media players, however in Clone Mode, limited support is available for video playback.
Mac OS X To configure the display settings and monitor positions, bring up the Displays Preferences from the System Preferences menu: The Display settings for each display will appear on the individual monitors themselves. To configure them all from a single location, press the “Gather Windows” button and each screen’s Displays Preferences windows will appear on that display. All supported video resolutions will appear in the list on the left side.
To use both extended and mirrored displays simultaneously, turn off mirroring then in the “Arrangement” page press and hold the ‘cmd’ and ‘alt’ keys and drag and drop the display you wish to mirror over the primary display (shown with the white bar). Repeat this with each display you wish to mirror, all others will act as an extended display. Changing the Primary Display You can change which display is the primary display by moving the Menu Bar between displays.
Specifications USB 2.0 Bus Interface TCP/IP Video Signal VGA (RGBHV) 1 x DE-15 VGA female 1 x USB mini-B female 2 x 3.5mm mini-jack female Connectors 1 x RJ45 female 2 x USB type A female 1 x DC Power 1 x Power LEDs 1 x RJ45 Link 1 x RJ45 Activity Maximum Video Resolution 1920x1080 Audio Support Yes Supported Number of Adapters (per system) USB: 4 Ethernet: 1 USB 2.
Technical Support StarTech.com’s lifetime technical support is an integral part of our commitment to provide industry-leading solutions. If you ever need help with your product, visit www.startech.com/support and access our comprehensive selection of online tools, documentation, and downloads. For the latest drivers/software, please visit www.startech.com/downloads Warranty Information This product is backed by a two year warranty. In addition, StarTech.
Hard-to-find made easy. At StarTech.com, that isn’t a slogan. It’s a promise. StarTech.com is your one-stop source for every connectivity part you need. From the latest technology to legacy products — and all the parts that bridge the old and new — we can help you find the parts that connect your solutions. We make it easy to locate the parts, and we quickly deliver them wherever they need to go. Just talk to one of our tech advisors or visit our website.