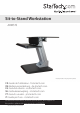
Sit-to-Stand Workstation ARMSTS *actual product may vary from photos FR: Guide de l'utilisateur - fr.startech.com DE: Bedienungsanleitung - de.startech.com ES: Guía del usuario - es.startech.com NL: Gebruiksaanwijzing - nl.startech.com PT: Guia do usuário - pt.startech.com IT: Guida per l'uso - it.startech.com For the latest information, technical specifications, and support for this product, please visit www.startech.com/ARMSTS.
Use of Trademarks, Registered Trademarks, and other Protected Names and Symbols This manual may make reference to trademarks, registered trademarks, and other protected names and/or symbols of third-party companies not related in any way to StarTech.com. Where they occur these references are for illustrative purposes only and do not represent an endorsement of a product or service by StarTech.com, or an endorsement of the product(s) to which this manual applies by the third-party company in question.
Table of Contents Product diagram.....................................................................................1 Product dimensions................................................................................2 Introduction.............................................................................................3 Packaging contents................................................................................................................................... 3 Assemble the workstation........
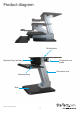
Product diagram Workstation Keyboard tray backing Pneumatic arm pedal Pneumatic arm Keyboard tray Base Instruction manual 1
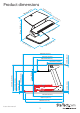
Product dimensions m 0m 40 n.) 0m .6 i (23 60 m (15 .7 i n.) 25 0m m (9. 8 in 583 mm (22.95 in.) .) m 0m n.) .8 i (26 68 50 0m m (19 19.7 m( m 500 .7 i n.) in.) 642 mm (25.3 in.) 559.9 mm (22.0 in.) 25 mm (1.0 in.) 12 mm (0.5 in.) 160 mm (6.3 in.) 18.5 mm (0.7 in.) 583 mm (22.95 in.) 441.5 mm (17.4 in.) 345.9 mm (13.6 in.) 642 mm (25.3 in.) 856 mm (33.7 in.) 800 mm (31.5 in.) Instruction manual 15 mm (0.6 in.) 856 mm (33.7 in.
Introduction You can use the ARMSTS to turn your workstation into a dual-functioning area that enables you to either sit or stand while you work. The height-adjustable feature of the ARMSTS makes it easy to quickly change from a standing to a sitting position, making it an integral element in your ergonomic work setup.
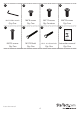
13 15 14 16 M4*55 Allen wrench M6*8 screws M6*12 screws Qty: One Qty: Two Qty: Fourteen 18 17 19 M6*25 screws Qty: Four 20 M6*35 screws M10*50 bolt #3/8 - 16 x 50 mm bolt Instruction manual Qty: Two Qty: One Qty: One Qty: One Instruction manual 4
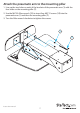
Assemble the workstation Attach the pneumatic arm to the workstation 1. Line up the two holes on each of the brackets of the pneumatic arm (1) with four of the holes on the workstation (5). 2. Use the M4*55 Allen wrench (13) to insert four M6*12 screws (15) into the two holes on each side of the bracket on the pneumatic arm (1). 3. Turn the Allen wrench clockwise to tighten the screws. 4.
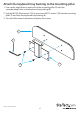
Attach the keyboard tray backing to the mounting pillar 1. Line up the single hole on each side of the mounting pillar (7) with the corresponding holes on the keyboard tray backing (4). 2. Use the M4*55 Allen wrench (13) to insert two M6*12 screws (15) into the mounting pillar (7) and then the keyboard tray backing (4). 3. Turn the Allen wrench clockwise to tighten the screws.
Attach the pneumatic arm to the mounting pillar 1. Line up the two holes on each of the brackets of the pneumatic arm (1) with the four holes on the mounting pillar (7). 2. Use the M4*55 Allen wrench (13) to insert four M6*12 screws (15) into the pneumatic arm (1) and then the mounting pillar (7). 3. Turn the Allen wrench clockwise to tighten the screws.
Attach the back plate to the keyboard tray 1. Line up the top four holes on the back plate (3) with the four holes on the keyboard tray (2) so that the bottom two holes on the back plate are hanging over the edge of the keyboard tray. Depending on your preference, you can attach the back plate centered on the keyboard tray or off-centered to the right or left. 2. Use the M4*55 Allen wrench (13) to insert four M6*12 screws (15) into the back plate (3) and then the keyboard tray (2). 3.
Attach the keyboard tray to the mounting pillar 1. Affix the small pressure pads (8) onto the reverse side of the keyboard tray (2) in the areas indicated in the diagram. 2. Use the M4*55 Allen wrench (13) to insert two M6*8 screws (14) into the top two holes on the keyboard tray (2) and then the mounting pillar (7). 3. Turn the Allen wrench clockwise to tighten the screws.
Affix the pressure pads to the base 1. Press the pneumatic arm pedal to extend the pneumatic arm. 2. Affix the circular pressure pads (9) onto the underside of the base (6) in the areas indicated in the diagram.
Attach the base 1. Turn over the assembled pneumatic arm and line up the four holes on the pneumatic arm (1) with the four holes on the base (6). 2. Use the M4*55 Allen wrench (13) to insert four M6*25 screws (16) through the holes on the pneumatic arm (1) and into the base (6). 3. Turn the Allen wrench clockwise to tighten the screws.
Convert the ARMSTS to a sitting or standing position 1. To convert the ARMSTS to a standing or sitting position, press the pedal on the pneumatic arm. 2. To adjust the tension, move the arm to 45 degrees and do one of the following: • If the weight of the monitor(s) makes it difficult to easily lift the workstation, use the M6*95 Allen wrench (12) to move the screw at the back of the pneumatic arm (1) counterclockwise.
Attach a monitor stand StarTech.com offers several optional accessories that you can use with the ARMSTS, including the ARMDUAL, ARMSLIM, or ARMPIVOT. To attach the optional accessories, complete the following steps: 1. If the accessory is configured for a desk mount, it needs to be reconfigured for a grommet mount. For detailed instructions on how to do this, see the documentation that came with your product. 2. Position the accessory over the grommet on the ARMSTS workstation (5). 3.
Weight restrictions Warning! The weight limit for the ARMSTS is a total of 26.4 pounds and the total weight of the monitors and keyboard shouldn’t exceed that weight. The weight limit of the keyboard tray is 10 pounds.
Technical support StarTech.com’s lifetime technical support is an integral part of our commitment to provide industry-leading solutions. If you ever need help with your product, visit www.startech.com/support and access our comprehensive selection of online tools, documentation, and downloads. For the latest drivers/software, please visit www.startech.com/downloads Warranty information This product is backed by a two-year warranty. StarTech.
Hard-to-find made easy. At StarTech.com, that isn’t a slogan. It’s a promise. StarTech.com is your one-stop source for every connectivity part you need. From the latest technology to legacy products — and all the parts that bridge the old and new — we can help you find the parts that connect your solutions. We make it easy to locate the parts, and we quickly deliver them wherever they need to go. Just talk to one of our tech advisors or visit our website.