Desk Mount Articulating Dual Monitor Arm with Cable Management & Height Adjust ARMDUAL *actual product may vary from photos DE: Bedienungsanleitung - de.startech.com FR: Guide de l'utilisateur - fr.startech.com ES: Guía del usuario - es.startech.com IT: Guida per l'uso - it.startech.com NL: Gebruiksaanwijzing - nl.startech.com PT: Guia do usuário - pt.startech.com For the most up-to-date information, please visit: www.startech.
VESA (Video Electronics Standards Association) Compatibility Startech.com monitor mounting products are engineered in accordance with the VESA defined Flat Display Mounting Interface (FDMI) standard, also referred to as the Mounting Interface Standard (MIS). To simplify attachment to any Startech.com monitor arm, look for VESA MIS-D (100x100 or 75x75) mounting compliance when choosing a monitor.
Table of Contents Introduction.............................................................................................1 Packaging Contents.................................................................................................................................. 1 Product Diagram.....................................................................................2 Installation...............................................................................................
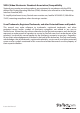
Introduction Packaging Contents Instruction Manual 1
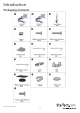
Product Diagram Instruction Manual 2
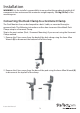
Installation WARNING! It is the installer’s responsibility to ensure that the combined weight of all components does not exceed the maximum weight capacity 13.6 kg (30 lbs) of the mounting arm. Converting the Desk Clamp to a Grommet Clamp The Dual Monitor Arm can be clamped to a desk / table, or mounted through a grommet hole. The following instructions outline how to convert the default Desk Clamp setup to a Grommet Clamp.
3. Using the 4 hex screws removed in Step 2, install the Grommet Plate (7) to the base of the pole. 7 4. Remove the screw and 2 washers shown using a Phillips screwdriver to disconnect the threaded shaft from the base of the clamp, then slide the plate back onto the shaft.
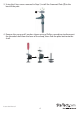
Desk / Grommet Mounting 1. Adjust the height of the Desk Clamp (3) to fit your desk surface (if applicable). 2. Place the 4 Plastic Gasket Cushions (13) as shown.
3. Desk Clamp: Place the Desk Clamp (3) opening around the edge of your desktop in your desired location and tighten by hand to secure. Ensure that the Desk Clamp is making full contact with the desk surface. Grommet Clamp: Place the base of the unit over the grommet hole and thread the clamp into the Grommet Plate until the clamp holds firmly against the bottom of the desk. 4. Loosen the collar on the support post and adjust to the desired height.
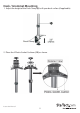
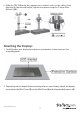
5. Slide the DEK (12) onto the support post so that it rests on the collar. Once adjusted to the desired height, tighten into place using the 2.5mm Allen Wrench (10). Attaching the Displays 1. Carefully place your display face down on a protective surface to access the mounting points. 2. Depending on the depth of the mounting holes on your display, attach the display using either the M4x12mm (5), or the M4x25mm (6) with the provided spacers (4).
3. Using a Phillips screwdriver, tighten the screws until the bracket is firmly attached to the back of the display. WARNING! Do not over-tighten the screws and stop immediately if you encounter resistance to avoid damage to your display. Ensure that all spacers and screws being used are the same length and thread type. 4. Repeat for the second LCD display.
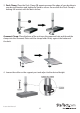
Attaching the LCD Arm Assembly 1. Slide the LCD Arm Assembly (1 or 2) down onto the DEK (12). 2. Tighten the set screw using the 2.5mm Allen Wrench (10).
3. Place the Cover (11) over the mounting post and insert 1 x M6x12mm Phillips Screw (16) with 1 x Plastic Washer (15). Tighten using a Phillips screwdriver. 4. Repeat for the other side.
Cable Management Note: When attaching cables and routing through the cable management channels, ensure that you leave enough slack to avoid stretching / pulling out the cables when moving the arm. 1. Connect your cables to your displays and position the mounting arm in its fully extended position to ensure that the cables you are using are long enough to allow for proper movement. 2. Feed the cables into the cable management channels on the underside of the arms as shown. 3.
Adjusting LCD Arm Resistance WARNING! Forced movement of the LCD Arms or Mount Brackets without loosening the screws may damage the product or the mounted displays. Always support your display from underneath when making any adjustments to the LCD Arms or Mount Brackets to avoid damage to the display. Note: For all adjustments outlined below, turning the screw clockwise will increase the resistance, while turning the screw counter-clockwise will decrease resistance.
To increase / decrease the pan / swing resistance, adjust the set screw located on the top of the Mount Bracket joint, using the 4mm Allen Wrench (9). To increase / decrease the swivel resistance on either of the elbow joints of the articulating LCD Arms, adjust the set screws indicated below, using the 2.
Specifications Weight Capacity 30 lbs (13.6 kg) Max Display Size 24” VESA Compatibility 75x75 mm and 100x100 mm Maximum Extension 18.
Technical Support StarTech.com’s lifetime technical support is an integral part of our commitment to provide industry-leading solutions. If you ever need help with your product, visit www.startech.com/support and access our comprehensive selection of online tools, documentation, and downloads. For the latest drivers/software, please visit www.startech.com/downloads Warranty Information This product is backed by a two year warranty. In addition, StarTech.
Hard-to-find made easy. At StarTech.com, that isn’t a slogan. It’s a promise. StarTech.com is your one-stop source for every connectivity part you need. From the latest technology to legacy products — and all the parts that bridge the old and new — we can help you find the parts that connect your solutions. We make it easy to locate the parts, and we quickly deliver them wherever they need to go. Just talk to one of our tech advisors or visit our website.