U 15”/17”/19” Rackmount LCD Console USB + PS/2 RACKCONS1701 RACKCONS1501 RACKCONS1901 *actual product may vary from photos DE: Bedienungsanleitung - de.startech.com FR: Guide de l'utilisateur - fr.startech.com ES: Guía del usuario - es.startech.com IT: Guida per l'uso - it.startech.com NL: Gebruiksaanwijzing - nl.startech.com PT: Guia do usuário - pt.startech.com For the most up-to-date information, please visit: www.startech.
FCC Compliance Statement This equipment has been tested and found to comply with the limits for a Class B digital device, pursuant to part 15 of the FCC Rules. These limits are designed to provide reasonable protection against harmful interference in a residential installation. This equipment generates, uses and can radiate radio frequency energy and, if not installed and used in accordance with the instructions, may cause harmful interference to radio communications.
Table of Contents Introduction.............................................................................................1 Packaging Contents.................................................................................................................................. 1 Installation...............................................................................................1 Hardware Installation.........................................................................................................
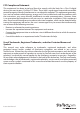
Introduction Packaging Contents • • • • 1U LCD Rack Console Drawer Console Cable Kit Mounting Rails - Set Power Adapter Installation Hardware Installation Hardware Kit Contents Screw kit Keys (2) Side Rails with front and rear brackets (2) (Used to attach Rail Mount to Console body) Mounting the console 1.
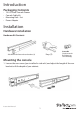
2. Install the rail into the cabinet: 3. Tighten the screws that were loosened in Step 1: 4. Install the remaining rail, repeating Steps 1-3. 5.
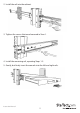
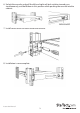
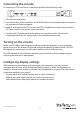
. Unlock the console, and pull the left and right rail-lock switches towards you simultaneously, and hold them in this position while pushing the console into the cabinet: 7. Install three screws on each side of the console: 8.
Connecting the console To connect an LCD console to a computer, perform the following steps: 1. Turn off your computer. 2. Insert the video (VGA) connector of the KVM cable into the video card connector on the rear panel of your computer. 3. Identify and connect the PS/2 mouse and PS/2 keyboard connector to the correct PS/2 ports on the rear panel of your computer. 4. Connect the AC power cord to the power inlet on the console. Connect the remaining end of the AC power cord to an available power outlet.
Each video card has several controls that allow you to adjust the display settings, however, the software and driver for each video card is unique. In most cases, you can adjust these settings using a program or utility provided by the manufacturer of the video card. Most video cards use the Windows Display Properties control panel to configure the display. To open the Windows Display Properties, click the right mouse button in a blank area of the Windows desktop and then select Properties.
Note:You can adjust the horizontal and vertical position, contrast, and brightness to better suit your video card and your personal preference. Before you begin, make sure that power to all of the devices you will be connecting to the console have been turned off. To prevent damage to your installation due to ground potential difference, make sure that all of the devices being installed are properly grounded. Once all peripherals have been connected, please power them on.
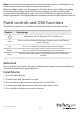
Brightness 1. Press the Menu button. 2. Use the Down and Up buttons to scroll to Brightness. 3. Press the Menu button to enter. 4. Use the Down and Up buttons to adjust the brightness of the display. 5. Press the Menu button to save your selection. Contrast 1. Press the Menu button. 2. Use the Down and Up buttons to scroll to Contrast. 3. Press the Menu button to enter. 4. Use the Down and Up buttons to adjust the contrast of the display. 5. Press the Menu button to save your selection. Color 1.
Position 1. Press the Menu button. 2. Use the Down and Up buttons to scroll. 3. Highlight Position and press the Menu button to enter, which will launch the following screen: Icon Image Pos OSD Pos Return Description To adjust the position of the image To adjust the position of the OSD To exit and return to the previous page 4. Use the Down and Up buttons to scroll. 5. Press the Menu button to save your selection. Language 1. Press the Menu button. 2. Use the Down and Up buttons to scroll. 3.
Recall 1. Press the Menu button. 2. Use the Down and Up buttons to scroll to Recall. Press the Menu button to enter, where you will be able to select Yes/No using the Down and Up buttons. Once you have done so, press the Menu button. Note: selecting Yes will return your settings to the factory default state. Select No if you do not wish to make this change. Exit To exit the menu, scroll to Exit and press the Menu button.
Specifications RACKCONS1501 RACKCONS1701 RACKCONS1901 Display Size 15” 17” 19” Panel Type Active Matrix TFT LCD Active Matrix TFT LCD Active Matrix TFT LCD 1024 x 768 (max.) 1024 x 768 (max.) 1024 x 768 (max.) Resolution Capabilities Back Light Dual lamps Four lamps Four lamps Supported 16M Colors 16.2M Colors 16.
Dimension Net Weight Chassis Construction Regulatory Certification Instruction Manual 447.5 x 482 x 44mm 447.5 x 482 x 44mm 447.5 x 482 x 44mm (17.6 x 19 x 1.7”) (17.6 x 19 x 1.7”) (17.6 x 19 x 1.7”) 11.8kg (26lbs) 13Kg (28.66lbs) 15Kg (33.
Technical Support StarTech.com’s lifetime technical support is an integral part of our commitment to provide industry-leading solutions. If you ever need help with your product, visit www.startech.com/support and access our comprehensive selection of online tools, documentation, and downloads. For the latest drivers/software, please visit www.startech.com/downloads Warranty Information This product is backed by a two year warranty. In addition, StarTech.
Hard-to-find made easy. At StarTech.com, that isn’t a slogan. It’s a promise. StarTech.com is your one-stop source for every connectivity part you need. From the latest technology to legacy products — and all the parts that bridge the old and new — we can help you find the parts that connect your solutions. We make it easy to locate the parts, and we quickly deliver them wherever they need to go. Just talk to one of our tech advisors or visit our website.