
Instruction manual


Instruction Manual
31
Cascade Conguration
You can connect a second level of KVMs to one or more of your Master Server Remote
Control’s PC x ports. The KVM switches connected to the Server Remote Control (the
“Master switch”) are known as Slaves. Once connected, the units will automatically
congure themselves as either Masters or Slaves. You can only connect an equal or
“smaller” KVM to the Master: a 16-port master Server Remote Control switch can have
both 16-port and 8-port KVM slaves, an 8 port Master Sever Remote Control switch can
have 8-port and 4-port Slaves, and so on.
For example, the 16-port unit can support 136 computers, with 8 16-port Slave KVMs,
each connected to 16 computers. The Slave KVMs must be connected to the PC 1~8
ports, not the PC A~H ports.
To cascade your KVMs, use a 3-in-1 PS/2 KVM cable to connect one of your Master
switch’s PC ports to the Slave switch’s PC 1~8 ports. When turning on your cascaded
switches, turn on the Slave switches prior to turning on the Master switch.
OSD Operations
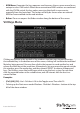
By hitting the left <CTRL> key twice within two seconds, you may see the ‘Hotkey
Menu’ if it is enabled (an OSD option). Or, by hitting the left <CTRL> key three times
within two seconds, you will see a KVM MENU screen (below) showing a list of the
computers with corresponding channel addresses, names and status.
• The port number (or channel address) of the currently selected • computer is
displayed in red in the top right of the screen.
• The device name is green if the device has power and is ready for • selection or white if
it has no power. The OSD menu automatically updates the color when it is activated.
• Use the <UP> and <DOWN> arrow keys to highlight a computer and • the <ENTER>
key to select it.
• Press <ESCAPE> to exit the OSD menu and remove the OSD menu • from the screen.
• A triangle mark on the right side of the screen indicates the port is • cascaded to a
Slave KVM; the number at the left of the triangle mark shows the number of ports
the Slave has. With that port highlighted, press <ENTER> to brings up a screen
listing the computers connected to that Slave. The name of the Slave KVM will be
shown at the upper right corner of the OSD menu.
• An eye mark on the right side of the screen indicates that the • computer has been
selected to be monitored in Scan mode. You can switch this mark on and o using
function key <F2>.
• Press <ESCAPE> to exit the OSD and to return to using the • selected computer. The
computer name is shown on the screen.