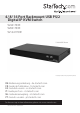
4/ 8/ 16 Port Rackmount USB PS/2 Digital IP KVM Switch SV441HDIE SV841HDIE SV1641HDIE *SV841HDIE Shown *actual product may vary from photos DE: Bedienungsanleitung - de.startech.com FR: Guide de l'utilisateur - fr.startech.com ES: Guía del usuario - es.startech.com IT: Guida per l'uso - it.startech.com NL: Gebruiksaanwijzing - nl.startech.com PT: Guia do usuário - pt.startech.com For the most up-to-date information, please visit: www.startech.
FCC Compliance Statement This equipment has been tested and found to comply with the limits for a Class B digital device, pursuant to part 15 of the FCC Rules. These limits are designed to provide reasonable protection against harmful interference in a residential installation. This equipment generates, uses and can radiate radio frequency energy and, if not installed and used in accordance with the instructions, may cause harmful interference to radio communications.
Table of Contents Introduction.............................................................................................1 Packaging Contents.................................................................................................................................. 1 System Requirements............................................................................................................................... 1 Required Cables and Hardware...........................................................
SSH Tunnel (with Native VNC client)................................................................................................... 21 Using the VNC Menu................................................................................................................................. 22 Bribar Feature.............................................................................................................................................. 22 Main Menu......................................................
Can I prevent the warning from occurring?..................................................................................... 46 Installing the New Certificate................................................................................................................ 47 Troubleshooting......................................................................................47 Forgotten Master Password..........................................................................................................
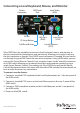
Introduction The SV841HDIE 8 Port Rack Mount USB PS/2 Digital IP KVM Switch offers cost-effective and secure, local and remote administration of up to 8 systems over a LAN or the Internet. Unlike software solutions that work through the operating system, this IP KVM Switch delivers BIOS level control, full boot processes interaction and control over a TCP/IP connection as if you are on site.
Required Cables and Hardware Depending on your needs, you may need one or more of the following cables: All applications • 1 x Straight-through Ethernet patch cable (to connect the unit to your LAN) StarTech.com part number: M45PATCHxx • StarTech.com PS/2 3-in-1 KVM Cables (1 for each PS/2 computer) StarTech.com part number: SVECONxx and/or • StarTech.com USB 2-in-1 KVM Cables (1 for each USB computer) StarTech.
Installation Local Connectors (Console) PC Connectors (Host) *SV841HDIE Shown Connecting to the Host Computers and Network 1. Power down the computer to which the KVM Remote Control will be connected (Host computer). 2. If present, disconnect the existing monitor and keyboard/mouse from the Host computer. 3. Using a StarTech.com integrated KVM cable (sold separately), locate the male VGA (monitor) connector and connect it to the VGA-out connector on the back of the Host computer’s video card. 4.
Connecting a Local Keyboard, Mouse, and Monitor Power Connector DB9 Serial Port R-Port IP Setup Button Local Video (VGA) LAN Port (RJ45) Local Video (VGA) Local Keyboard (PS/2) Soft Reset Button SVxx41HDIE has the capability to connect a local keyboard, mouse, and monitor to the host computer for maintenance and monitoring, allowing users to physically use the host computer as though SVxx41HDIE were transparent. If needed, the unit can be run through a typical KVM switch like any other computer.
Disabling Mouse Acceleration on the Host Computer NOTE: If you are using USB to connect KVM switch to the host computer, you will not be required to adjust the mouse settings on the host computer, as this device uses “Absolute” mode, which eliminates any problems you may otherwise experience with mouse synchronization or host mouse acceleration.
Configuring the SVxx41HDIE This IP KVM switch offers four distinct methods for configuring the unit for your network. Which method will work best will depend on your level of experience and your specific network configuration.
Web Configuration Using DHCP This method requires that your network implement DHCP (Dynamic Host Configuration Protocol), usually on a server or network access device such as a router that dynamically allows devices to join the network without pre-configuration. It also assumes that you will have easy access to your network’s DHCP log, since you will need to know the IP address of the unit to complete the configuration over your Web browser.
Web Configuration Using Static IP Since some networks rely on static IP addresses (every device has a pre-configured IP address that does not change), the DHCP access method described above is not applicable in those situations. To access the Web configuration for this product, you will need to configure the workstation you are using to the same subnet (255.255.255.0) and also assign it a valid IP address (i.e. 192.168.1.100).
Terminal Configuration Using a Serial Cable Configuring the IP KVM switch using a serial cable is the best choice if you need to preconfigure the unit before attaching it to a network, (i.e. when sending to a branch office, customer site, etc). In general, the Web configuration is preferable because of its intuitive interface and the fact that you do not have to be within close physical proximity to perform the configuration.
Using the Web Interface The Web interface is the most intuitive way to configure the IP KVM switch. Offering a Java-based VNC client that can be used to control the host computer from a remote location, as well as support for any industry-standard HTML Web browser. You can access the Web interface by opening your Web browser and entering the IP address of the IP KVM switch you wish to access/configure.
Web Interface Introduction After the initial login screen, the screen will be divided into several sections, four of which will remain on the screen at all times while viewing the Web Interface: Name: At the top of the screen, the name of the machine being controlled is displayed Tip Line: The area directly below the Name indicates what function each selection from the Main Menu performs.
Main Menu selections NOTE: Some of the following items may not be present, based on assigned user privileges (i.e. non-admin users will not see any items under the Admin category). Home The Home screen offers a Screen Thumbnail view of the controlled computer, as well as basic file transfer functions, Monitoring Information, System Identification and VNC Client options. Preferences The Preferences screen offers several configuration options, pertaining to the functionality of the IP KVM switch.
Dynamic Host Configuration Protocol (DHCP) Automatic network configuration using DHCP is: Enabled/Disabled. This feature applies only to the LAN port on the rear panel, and is enabled by default. When enabled, the unit will automatically configure itself with an IP address when a DHCP server is present. When disabled, the LAN port will use the values assigned to it on the IP Addresses and Routing table below. IP Addresses and Routing This table allows you to assign IP information for the LAN port.
Clicking the Commit button applies any changes made on this page, but leaves the old settings active until the next time the unit restarts. Clicking Make changes effective now applies the changes and restarts the IP KVM switch so the new settings take effect immediately. Ethernet Address (MAC Address) This is the Ethernet hardware address of this unit’s LAN port. It is set at the factory and cannot be changed. You may need this number to configure your DHCP server.
Machine Name This is a name that is used to uniquely identify this machine. You might want to create a DNS entry that matches this name. The name is provided as the Client Name for the DHCP server. It is also shown at the top of each page in the web browser interface and is the “desktop name” for VNC clients. Other identification details These values are for information purposes. They are visible from the VNC client and via SNMP (if enabled). Location This string is sent as the system.
SNMP The SNMP menu allows you to configure the IP KVM switch so it can be recognized and managed using industry-standard Simple Network Management Protocol software. RADIUS The RADIUS server requires the IP address, the UDP port number (1812 - default or 1645) and the shared secret. The shared secret is used to encrypt communications and corresponds to a shared password for the RADIUS server and the client machine. Two additional servers may be defined for backup purposes.
Serial Ports The Serial Ports menu allows you to manage and connect to devices connected to the unit using the R-Port on the IP KVM switch. Time/Date Date and time are stored without consideration for time zone. If you are controlling multiple sites in different time zones, we recommend you use UTC (Universal Coordinated Time, also sometimes called GMT or Zulu) for all machines.
Auto Self Upgrade Clicking the Upgrade to latest button will automatically download and install necessary revisions. To download upgrades for manual installation, please click on Get latest version. Purchase Options Certain firmware features may be offered separately from the base unit, in order to reduce the initial cost for the Server Remote Control unit. NOTE: If you wish to upgrade after the system is in operation, go to the Manage Firmware page and scroll down to the section entitled Purchase Options.
Using the Terminal Interface via Serial Port The terminal interface you can access via the serial port permits the configuration of the basic settings of the IP KVM switch. While not intended to be a substitute for the Web interface, it does allow you to configure some of the same functions. The menu list below describes the options that can be modified through the terminal interface. Note that you must use the ‘W’ option to confirm and apply any changes made before you exit the terminal session.
Accessing the VNC Interface There are three ways to communicate with the Server Remote Control unit in order to control the host computer: • Web interface: The integrated Web server includes a Java-based VNC client. This allows easy browser-based remote control. • Native VNC client: There are several third-party software programs that use the standard VNC protocol, available in open source and commercial VNC clients.
Native VNC Client This system implements the VNC protocol, so any off the shelf VNC client can be used. There are over 17 different VNC clients available and they should all work with this system. This system automatically detects and makes use of certain extensions to the basic RFB protocol that is provided by the leading VNC clients. Depending on your needs, there are several popular freeware, shareware, and commercial VNC clients available.
Using the VNC Menu One of the unique features of this product is the VNC menu system. Whenever you see a window with a dark blue background and grey edges, this window has been inserted into the VNC data stream so that it is effectively laid over the existing video. These menus allow you to control the many features of the IP KVM switch without using the web interface or a custom client.
USB: Resets the USB connection by simulating an unplug and replug. Forces operating system to recognize the USB keyboard, mouse and emulated disk drive. ÷4, ÷8: Switches to thumbnail mode, at indicated size (i.e. 1/8th, 1/4) Ctrl-Alt-Del: Sends this key sequence to the host. Works immediately. Alt-F4: Sends the key sequence to host (closes windows). KVM: Sends the KVM “hotkey” sequence. This function is only enabled when you have configured the unit to expect a particular brand of KVM downstream.
Main Menu To access the main menu, quickly press F7 twice quickly. You must press the key twice within one second. If you press it once or too slowly, then the F7 key(s) are sent to the host, just like any other key. This is the only way to get into the menu system, if the Bribar is disabled. Here is the main menu for a typical system: The main menu window may be moved by clicking and dragging on the title bar. It can be closed by pressing Escape, or by clicking on the red X in the top right corner.
• Identification: Fixed text label that is defined by the user in the Web interface. This does not affect the operation of the system and is intended to assist with administration. • Status: Current status of the attached system and the status of the unit. • B/W Min/Avg/Max/Auto: Bandwidth control. Current operation will be indicated with white highlighting. If you choose Min/Avg/Max then you will override the default, Auto.
• KVM Menu: Generates the key sequence used to access the on-screen menu for an enterprise-class KVM switch. When these conventional KVM switches are combined with the IP KVM switch, this key makes accessing their built-in menu easier, especially from the Java client. This button will only be shown when an external KVM has been enabled via the web interface. • Bribar: Closes or reopens the Bribar window along the bottom of the screen.
Video Tuning Menu Use the Auto Everything button to automatically fine-tune all three adjustments. If the test pattern for Color Offset calibration is not present on the screen, then the Color Offset adjustment is skipped. Changes/frame indicates the number of 16x16 blocks of video that are being sent, on average, for every frame of video. With a static image being displayed by the server, this number will be zero (shown as -nil-).
Pressing the Advanced button will open the Advanced Video Tuning menu. While the vast majority of users will not need to adjust these settings, it offers added control of the video settings of your VNC sessions. Sampling Phase does not normally need to be used since the IP KVM switch tunes the sampling phase whenever the video mode changes. This button does not require a test pattern, but will perform optimally when used with our standard test pattern.
Network Performance The IP KVM switch will always send as much data as it can, given what’s happening on the screen and the actual network performance. When nothing is changing on the video screen, zero bytes are sent over the network. If the whole screen is changing, then the unit will send as much data as your network connection and VNC client allow.
The section of the screen marked Current Values indicates the various video parameters that can be adjusted. For each parameter, there are a series of buttons: [, <<, -, Auto, +, >, ]. The ’[’ and ’]’ buttons set the parameter to its smallest or largest values, respectively. The ’<<’ and ’>>’ buttons decrease or increase the parameter by a large amount. In the case of phase, this is 4 units. For all the others, this is 10 units. The ’-’ and ’+’ buttons decrease or increase the parameter by one unit.
Cascade Configuration You can connect a second level of KVMs to one or more of your Master Server Remote Control’s PC x ports. The KVM switches connected to the Server Remote Control (the “Master switch”) are known as Slaves. Once connected, the units will automatically configure themselves as either Masters or Slaves.
OSD Function Keys You can use the function keys when the OSD menu is active. Function key Edits the name of a managed computer or a Slave KVM. First, use the and arrow keys to highlight a channel then press followed by name entry. Your name can be up to 14 characters long. Valid characters are A to Z, 0 to 9, and the dash character. Lowercase letters are converted to uppercase. Press to delete a letter one at a time.
Auto Scan In this mode, the KVM automatically switches from one powered computer to the next sequentially in a fixed interval. During Auto Scan mode, the OSD displays the name of the selected computer. When Auto Scan detects any keyboard or mouse activity, it suspends the scanning until activity stops; it then resumes with the next computer in sequence. To abort Auto Scan mode, press the left twice. Scan Type and Scan Rate set the scan pattern.
CH Display Auto Off: After you select a computer, the channel address and name of the computer will appear on the screen for 3 seconds then disappear automatically. Always On: The channel address and name of a selected computer and/or OSD status displayed on the screen all the time. The non-volatile memory stores the CH Display setting. Position You can choose where the selected computer name and/or OSD status is displayed on your screen during operation.
Auto Scan Auto Scan automatically scans through powered computers at a fixed interval: Left + Left + When Auto Scan detects any keyboard or mouse activity, it suspends the scanning until activity stops; it then resumes with the next computer in sequence. The length of the Auto Scan interval (Scan Rate) is adjustable (see Scan Rate on the following page). To abort the Auto Scan mode, press the left key twice.
Using the Modem Feature Background The modem feature allows the IP KVM switch to act as an Internet connection server for increased security and flexibility in connecting with the host computer. Unlike the TCP/ IP connection used with the standard Web configuration and VNC clients, the modem creates a one-to-one connection between the IP KVM switch and the computer you are using to manage the host computer that is essentially private, as it bypasses the public Internet completely.
Connecting a Modem The IP KVM switch will work with virtually any Hayes-compatible modem that recognizes the standard AT command set.
command set) that the IP KVM switch will send to the modem to activate it. The string included should work with the majority of modems and configures the following connection properties: answer incoming calls on the first ring, enable hardware flow control, and lock the connection speed. Your modem’s documentation will describe other potential init strings that you can use to alter the connection properties.
• PPP (Point-to-Point Protocol) must be used; no other authentication methods are supported. • TCP/IP must be installed/enabled on the computer making the connection, and must be used for the dial-up connection. • The connection must be configured to obtain a dynamic IP address. • The user name/password must match a user currently configured on the IP KVM switch. • For best performance and to simplify the troubleshooting process, firewall software should not be used with the dial-up connection.
Performance Notes • All images over the PPP connection will be gray scale to conserve • bandwidth. If other users are connected while a PPP session is active, their screens will be in gray scale as well. When PPP in inactive, color is automatically re-enabled. • Some areas of the screen may not be updated as frequently as • others, and animations or other auto-updating areas of the screen may appear out-of-focus or “blocky” as a result.
Troubleshooting Guide The following messages will appear in the system log on the Status screen in the Web interface and may help to diagnose problems with the modem configuration. Starting PPP (for auth) on port… Modem is connecting and the PPP login process is starting. Modem hang up. Resetting The connection has been closed or terminated unexpectedly. Timeout during login process.
Serial Remote Control Operation Background The IP KVM switch offers a unique way to expand the functionality of the base product. Using the integrated R-Port on the rear panel, you can manage up to 8 serial devices using a specialized daisy-chain technology. The IP KVM switch includes integrated control functionality that allows you to monitor and configure serial devices using the interactive Web interface.
Name/Description: An identifier for the R-Port module. Like the number assignment, it is for ease of administration only. Baud (bps): This is the communication speed for the device, and the setting here must match the setting on the module itself. All common baud rates between 300 and 115,200 bps are supported. Mode: Sets the character framing scheme that the IP KVM switch will use with the R-Port module.
Advanced Configuration Using the Integrated SSH Shell In most cases, configuring the IP KVM switch to the same settings as the R-Port devices you are connecting should allow the devices to work with a minimum amount of configuration. However, you can also change the default settings on each R-Port device to fit your preferences and the needs of your application. If you click the Connect… button next to the device you want to configure, two new windows will appear.
Remote Login via SSH You can also use a standard SSH client to access the R-Port options if you wish to avoid using the Java-based SSH client in the Web interface. Simply use your SSH client (several freeware packages are available for download, along with commercial applications) and connect to the IP address of the IP KVM switch using port 22 (default). Log in to the SSH session as admin using the same password as the Web interface.
About Security Certificate Warnings What is a security certificate? Sites that employ secure TCP/IP (Internet) connections include a certificate that confirms that users are connecting to a legitimate site and are not being redirected without their knowledge. Certificates are issued by trusted third parties called Certificate Authorities (CAs) and contain essential details about a site that must match the information supplied to your Web browser.
Installing the New Certificate The following instructions detail how to install the certificate from the IP KVM switch onto your local computer (in this case, when using Internet Explorer with Windows XP). 1. Open your Web browser and go to the IP KVM switch login screen. Click the Update security certificate link. 2. When prompted, choose Open. 3. A Window will appear that offers information about the certificate. Click Install Certificate. 4. The Certificate Import Wizard will appear.
Cannot Login Via SSH Remember to use either admin or a username created in the system as the user name you give your SSH client. If you see a warning about identity of host cannot be verified, and a question about saving the host’s fingerprint, this is normal for the first time you connect to any machine running SSH. You should answer yes so that your SSH client saves the public key of this host and doesn’t re-issue this warning. Certificate warning shown when connecting via HTTPS.
Supported Protocols Service Description Benefit SSH Secure Shell May be used to securely “tunnel” VNC and HTTP protocols. HTTP Web redirector (to HTTPS) Convenience server to redirect all web traffic to encrypted port. Clear-text HTTP is not supported SNMP SNMP agent (UDP) Allows integration with existing SNMP network management systems. HTTPS SSLTLS Encrypted web control Secure control and management of the device and attached system. Screen snapshots may be downloaded.
Specifications SV441HDIE Number of Ports 4 SV841HDIE SV1641HDIE 8 16 2 x PS/2 female 1 x DE-15 VGA female 1 x RJ45 1 x DB9 serial male 1 x DC power connector 1 x R-Port Console Connectors (Local) Host Connectors 1 x DE-15 female (Per Port) LEDs Sys OK, R-Port, LAN Maximum Number of Simultaneous Users 1 active plus 3 viewing 1600x1200 @ 85Hz (Remote) Maximum Video Resolution 1920x1440 (Local) Security 128-bit SSL Ethernet 10/100 BaseTX Cascadable Yes (Master only) Rack Mountable Yes Su
• Source code for the unit operating system is available upon request. Please contact us by phone, live chat, or email to make your request. This offer is valid for three years from the date of purchase and/or for as long as parts or customer support is offered for this product.
Technical Support StarTech.com’s lifetime technical support is an integral part of our commitment to provide industry-leading solutions. If you ever need help with your product, visit www.startech.com/support and access our comprehensive selection of online tools, documentation, and downloads. For the latest drivers/software, please visit www.startech.com/downloads Warranty Information This product is backed by a three year warranty. In addition, StarTech.
Hard-to-find made easy. At StarTech.com, that isn’t a slogan. It’s a promise. StarTech.com is your one-stop source for every connectivity part you need. From the latest technology to legacy products — and all the parts that bridge the old and new — we can help you find the parts that connect your solutions. We make it easy to locate the parts, and we quickly deliver them wherever they need to go. Just talk to one of our tech advisors or visit our website.