
Instructions / Assembly

OPERATION and MAINTENANCE
3
PREPARATION
1. Attach legs and secure locking nuts.
2. Place stove on a at, level surface.
3. Make sure the stove burner valves are in the OFF position.
4. Attach the propane hose to the brass stove inlet tting.
5. Make sure propane bulk tank valve is closed.
6. Attach the propane hose to the outlet of the propane tank.
7. Slow open propane tank valve and check for leaks by applying a small amount of liquid soap and looking
for bubbles to appear.
OPERATION
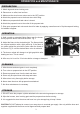
1. Hold a match or extended lighter ame near the burner.
Slowly open the burner valve on the stove. Fig. 1
2. Adjust the ame to the desired height. The ame should
be compact and blue with a light yellow tip. If the ame is
too yellow, adjust the air mixture valve under the throat of
the burner. Fig 2. until the desired ame color is achieved.
3. The burner outlets will change to a light gray/white after
heating and use. This is normal.
4. After use, let it cool for 15 minutes before storage or transport.
CLEANING
1. Allow burners and steel grate to cool completely.
2. Turn valve on propane tank to the OFF position.
3. Remove propane hose from the tank and stove.
4. Stove may be wiped down with soap and water.
5. Allow stove to dry thoroughly before storage.
6. Never store the stove with propane hose attached.
7. No other maintenance is necessary.
STORAGE
1. DO NOT leave the propane cylinder attached to the stove during transport or storage.
2. Wipe the burners, steel cooking grate and the propane hose before storing.
3. It is suggested to store the stove and hose in a nylon storage bag to keep it clean.
CAUTION: DO NOT attempt to connect your camp stove to a natural gas supply. Use only with the hose and
regulator supplied with the stove and an approved bulk propane tank.