
Installation Guide

12
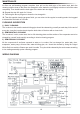
OPERATION
How to set the OFF-Timer: When the unit is working, press the “TIMER/CLEAN” button to set the OFF-
Timer. The TIMER OFF symbol will be on, the number “1” above the symbol will ash to display the setting
delay time. During the number ashing, press “+” “-” button to change the delay time of the timer, 1 hour
increasing or decreasing per each pressing of “+” or “-” button. Five seconds after setting, your desired
setting will be remembered.
How to cancel the OFF-Timer: Press the “TIMER” button, the number above the “ ”symbol will ash to
display the present delay time of your OFF-Timer, and press this button once again to cancel the Timer
setting, also the “ ” and the above number will disappear; And also the second easy way to cancel the
OFF-Timer is to press the “ON/OFF” button, it will cancel the ON-TIMER setting by force, also will turn off
the unit.
INTERNAL LED LIGHT OPERATION
When the unit is plugged on, press the “LIGHT” button on the operation panel once to lighten the LED light
inside the ice bin and the LIGHT BULB symbol on the LCD display window will also be on. Press this button
once again, the LED light and the LIGHT BULB symbol will be off at same time.
NOTE: If you press the “LIGHT” button for more than 5 seconds, the ambient can be changed between
Centigrade degree and Fahrenheit degree (between °C and °F)
ERROR CODE OF UNIT BREAKDOWN
When the unit is breakdown, the error code will display in the left side of LCD display window.
E1 means the sensor of ambient temperature is malfunction.
E2 means that ice making program is abnormal, including too big ice-cube,no ice-cube falling down, or not
making ice cube, etc.
NOTE: During the ice cube making process, press “ON/OFF” button for more than 5 seconds, the unit will
jump into the ice-harvest process. After the ice harvest process is completed, the uni will recover to ice
making process.
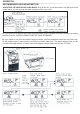
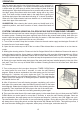
WATER DRAINAGE
Make sure the water drainage pipe has correctly connected at the unit back rst.
A. You can drain the water in ice storage bin through the white drainage pipe connected on the back
drainage port. Make sure not to set the white drainage pipe too high.
B. For the water in the water tank,you can pull out the silicone pipe on the right side of the water tank
indicating “H” in above illustration to drain out the cleaned water in the water tank, till the silicone pipe
extend completely, the water can ow out to ice bin. Then the water can be drained out through the water
drain port at unit back.
REMINDER: Clean the water tank frequently, it can improve the ice-cube quality and the unit and its water
circulation pump can work much longer.
C. For the water in water charging tank, pull out the silicone pipe on the right side of the water tank
indicating “H” in above illustration, then plug on the unit, let the unit run at ice-making program or self-
cleaning program, the water will ow into the water tank, again through the silicone pipe ow into the ice
bin, at last can be drained out the unit through the water drain port at unit back.
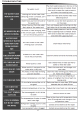
WATER DRAINAGE
Your new ice maker may make sounds that are not familiar to you. Most of the new sounds are normal.
Hard surfaces like the oor, walls and cabinets can make the sounds seem louder than they actually are.
The following describes the kinds of sounds that might be new to you and what may be making them.