AUTOMATIC ICE MAKER ITEM: 94022 OWNER’S MANUAL AND SAFETY INSTRUCTIONS SAVE THIS MANUAL: KEEP THIS MANUAL FOR SAFETY WARNINGS, PRECAUTIONS, ASSEMBLY, OPERATING, INSPECTION, MAINTENANCE AND CLEANING PROCEDURES. WRITE THE PRODUCT’S SERIAL NUMBER ON THE BACK OF THE MANUAL NEAR THE ASSEMBLY DIAGRAM (OR MONTH AND YEAR OF PURCHASE IF PRODUCT HAS NO NUMBER).
IMPORTANT SAFETY INFORMATION GENERAL SAFETY WARNINGS When using electrical appliances, basic safety precautions should be followed to reduce the risk of fire, electric shock, and injury to persons or property. Read all instructions before using any appliance. SAFETY The warnings, precautions, and instructions discussed in this instruction manual cannot cover all possible conditions and situations that may occur.
IMPORTANT SAFETY INFORMATION WARNING! DO NOT damage the refrigerant circuit. WARNING! Children should be supervised to ensure that they DO NOT play with the appliance. WARNING! This appliance must be earthed. And use the 110-120V/60Hz earthed power supply. DANGER! Risk Of Fire or Explosion. Flammable Refrigerant Used. DO NOT Use Mechanical Devices To Defrost Ice Maker. DO NOT Puncture Refrigerant Tubing. DANGER! Risk Of Fire Or Explosion. Flammable Refrigerant Used.
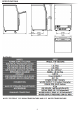
SPECIFICATIONS RATINGS NOTE: TESTED AT 70°F ROOM TEMPERATURE AND 50°F WATER TEMPERATURE.
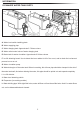
INFORMATION MAIN UNIT 1. Water filler cap on top 2. Top cover 3. Ice-making & its water tank assembly: Including ice-making evaporator, water tank, water charging tank,water control valve, water pump and some detecting parts 4. Door for ice taking 5. Operation panel 6. Air outlet: Must keep the air circulate smoothly, hot air will blow out when unit running. 7. Air inlet 8. Main Water supplying inlet: For connecting the main water supplying pipe 9. Water draining port. Normal plugged with the cap.
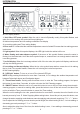
INFORMATION ICE-MAKER WATER TANK PARTS A. Water level switch installing plate B. Water supplying pipe C. Water charging tank: Approximate 3.5 litters volume D. Water outlet control valve of water charging tank E. Water tank for water circulation: Approximate 0.9 litters volume F. Ice full detecting board: Use to detect the inner cabinet is full of ice or not, and to check the ice-harvest process is over or not. G. Water circulation pump H. Water drain pipe of the water tank.
INFORMATION OPERATION PANEL A. LCD display window 1. Unit ON or OFF state symbol: When the unit is turned off(standby mode), this symbol flashes, and when the unit is working, the symbol will keep lighting on. 2. Ambient temperature and ice-making countdown time display 3. Ice-making setting and Timer setting display 4. Error code: E1 means that the ambient temperature sensor is faulted E2 means that ice-making process is abnormal. 5.
OPERATION UNPACKING YOUR ICE MAKER 1. Remove the exterior and interior packaging. Check if all the accessories, including instruction manual, ice scoop, white water supplying hose, 1/4 inches to 1/2 inches water quick connector and the water draining pipe, etc., are inside or not. If any parts are missing, please contact our customer service. 2. Remove the tapes for fixing the door and inner cabinet, ice scoop, etc.. Roughly clean the inner cabinet & ice scoop with wet cloth. 3.
OPERATION To ensure proper ventilation for your ice maker, the front of the unit must be completely unobstructed. Allow at least 6” clearance at rear, and 2” of two sides for proper air circulation. Allow about 20 inches high space at top to fill water freely from unit top when using manual water supply way and for proper air circulation. The installation should allow the ice maker to be pulled forward for servicing if necessary.
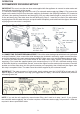
OPERATION RECOMMENDED GROUNDING METHOD IMPORTANT: Be sure to use the new hose-sets supplied with the appliance to connect to water mains and that old hose-sets should not be reused. 1. Connect the water supplying hose to the unit (For automatic water supplying).
OPERATION RECOMMENDED GROUNDING METHOD SELECTING THE WATER SUPPLYING MODE: Plug on the unit , press the button in the little hole of the control panel, you can change the water supplying mode of your unit. A. If you select to use the automatic water supplying mode, please complete the water connection according the above section “WATER CONNECTION FOR YOUR ICE-MAKER”. B.
OPERATION I: Manual water supplying symbol; O: Automatic water supplying symbol; Arrow of this symbol flashes, means the water is flowing into the water tank. If this whole symbol keeps displaying, means no main water supplying at present. Ice-cube symbol, when it rotate, means unit is making the ice cube; and it flashes, means the unit is in ice harvest process. F: Fahrenheit (ambient temperature) H: Unit of hour (setting the timer) M: unit of minute (ice-making setting and countdown time) 1.
OPERATION How to set the OFF-Timer: When the unit is working, press the “TIMER/CLEAN” button to set the OFFTimer. The TIMER OFF symbol will be on, the number “1” above the symbol will flash to display the setting delay time. During the number flashing, press “+” “-” button to change the delay time of the timer, 1 hour increasing or decreasing per each pressing of “+” or “-” button. Five seconds after setting, your desired setting will be remembered.
OPERATION • You will hear a swooshing sound when the control valve opens to let water flow into the water tank for each ice-making cycle. • Rattling noises may come from the flow of the refrigerant or the water line. Items stored on top of the ice maker can also make noises. • The high-efficiency compressor may make a pulsating or high-pitched sound. • Water running from the water tank to the evaporator plate may make a splashing sound.
MAINTENANCE Periodic cleaning and proper maintenance will ensure efficiency, top performance, hygienic, and long life. The maintenance intervals listed are based on normal conditions. You may want to shorten the intervals if you have pets, or the unit is used outdoors, or there are other special considerations. NEVER keep anything in the ice storage bin that is not ice: Objects like wine and beer bottles are not only unsanitary, but also it’s labels may slip off and obstruct the drain pipe.
OPERATION Also the water tank and the ice-full detecting plate is very important to keep your ice cube hygienic. Put mixture of neutral cleaner & water into a clean water jet, then spray to all the inner surface of tank & the ice detecting plate. Wipe these surfaces as far as possible with a clean cloth. And then, spray the surfaces with clean water, wiping with a dry clean cloth.
MAINTENANCE 9. After one self-cleaning program complete, then pull out the drain pipe of the water tank, drain the cleaning solution down to the lower ice storage bin, also shake the unit slightly to drain out all of the water completely. Then install back the drain pipe to the water tank slot tightly. 10. Repeat the step 8-9 again for 2 times. 11. Following the above program to clean the ice storage bin . 12. Then this special cleaning program finish, you can return to the regular ice making mode.
TROUBLESHOOTING 17
PARTS DIAGRAM 18
PARTS LIST 19
PLEASE READ THE FOLLOWING CAREFULLY THE MANUFACTURER AND/OR DISTRIBUTOR HAS PROVIDED THE PARTS LIST AND ASSEMBLY DIAGRAM IN THIS MANUAL AS A REFERENCE TOOL ONLY. NEITHER THE MANUFACTURER OR DISTRIBUTOR MAKES ANY REPRESENTATION OR WARRANTY OF ANY KIND TO THE BUYER THAT HE OR SHE IS QUALIFIED TO MAKE ANY REPAIRS TO THE PRODUCT, OR THAT HE OR SHE IS QUALIFIED TO REPLACE ANY PARTS OF THE PRODUCT.