22” 2.4HP 45CC WOOD CUTTING CHAINSAW ITEM: 82100 OWNER’S MANUAL AND SAFETY INSTRUCTIONS SAVE THIS MANUAL: KEEP THIS MANUAL FOR SAFETY WARNINGS, PRECAUTIONS, ASSEMBLY, OPERATING, INSPECTION, MAINTENANCE AND CLEANING PROCEDURES.
IMPORTANT SAFETY INFORMATION GENERAL SAFETY WARNINGS Read all safety warnings and instructions. Failure to follow the warnings and instructions may result in electric shock, fire and/or serious injury. Save all warnings and instructions for future reference. SAFETY The warnings, precautions, and instructions discussed in this instruction manual cannot cover all possible conditions and situations that may occur.
IMPORTANT SAFETY INFORMATION Make sure the area in which you are cutting is free from obstructions. DO NOT let the nose of the guide bar contact a log, branch, or any other obstruction while you are operating the saw. Only use replacement bars and chains specified by the manufacturer or the equivalent. Maintain a firm grip at all times, but do not squeeze the handles with constant, excessive pressures. Take frequent breaks. Warning: Always stop the engine before putting a chainsaw down or carrying it.
IMPORTANT SAFETY INFORMATION keep lit cigarettes away from the chainsaw at all times. Always If any fuel spillage occurs during refueling use a dry rag to wipe up spills before turning the engine on. After refueling, screw the furl cap back on tightly onto the fuel tank and the carry the product to an area that is approximately 10 feet away from where it was refueled before turning the engine on. Keep handles dry, clean and free of oil or fuel mixture. immediately after stopping the engine.
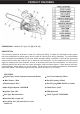
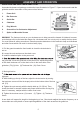
PRODUCT FEATURES DIMENSIONS L x W x H: 21” (L) x 13” (W) x 12” (H) DESCRIPTION This aluminum gasoline chainsaw is ideal for cutting and felling. It adopts the automatic brake system with wide designed front hand guard, which is able to reduce injury during operating. The anti-kickback chain decreases the probability of kick back, which increases safety. In addition, it also can be used under extreme environment with long life due to aluminum solid protection.
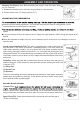
ASSEMBLY AND OPERATION GUIDE BAR AND SAW CHAIN PARTS LIST A standard chainsaw unit package contains the items illustration in Figure F1. Open the box and install the guide bar and the saw chain on the power unit as follows. 1. Power Unit 2. Bar Protector 3. Guide Bar 4. Chainsaw 5. Plug Wrench 6. Screwdriver for Carburetor Adjustment 7.
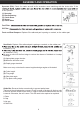
ASSEMBLY AND OPERATION FUEL AND CHAIN OIL Mix gasoline (leaded or unleaded, alcohol-free) and quality proven 2-stroke motor oil (FC grade) for air cooled 2-cycle engines. Most engine troubles are caused, directly or indirectly, by the fuel used on the machine. Take special care not to mix a motor oil for 4-cycle engines. Chain Oil: Use motor oil SAE#10W-30 all year round or SAE#30-#40 in colder temperatures STARTING THE ENGINE 1. Fill the fuel and chain oil tanks respectively and tighten the caps securely.
ASSEMBLY AND OPERATION (1) clutch side. Adjust according to your work conditions. (F13) NOTE every time when refueling the unit. ADJUSTING THE CARBURETOR due to changes in operating conditions. Before adjusting carburetor, make sure sure to adjust the carburetor with the bar chain attached. When adjusting, take the following steps: 1. Stop the engine and screw in both H and L needles until they stop. Never force them. Then set them back the initial number of turns as shown below.
ASSEMBLY AND OPERATION Stopping The Engine: Note: Before stopping the engine, keep the engine idling for 1 to 2 minutes. 1. Release the throttle lever to allow the engine idling for a few minutes. 2. Put the switch to the “O” (Stop) position (F17) ADJUSTING THE CARBURETOR Always follow the safety regultaions. The chainsaw must only be used for cutting wood. It is not recommended to cut other types of matierials. stands. It is not necessary to force the saw into the cut.
ASSEMBLY AND OPERATION Sprocket (F30): Check for cracks as well as for excessive wear interfering with the chain drive. If the a new sprocket. (1) Sprocket (2) Needle Bearing (3) Clutch Drum (4) Spacer (5) Clutch Shoe Fuel Filter: Oil Filter: Front and Rear Dampers: Replace if the adhered part is peeing or cracked, on the rubber part Saw Chain: Replace if the adhered part is peeing or cracked, on the rubber part illustrated. (F31) as illustrated.
MAINTENANCE AND CARE BREAK DOWN ANALYSIS GUIDE 10
MAINTENANCE AND CARE CARE AND MAINTENANCE 11
QUICK START GUIDE 1. Lay out your tools 2. Mix the oil 3. Check that the chain brake is in the unlocked position by pulling the front hand guard toward the front handle 4. Loosen and remove the bar nuts and the clutch cover from the saw 5. An adjusting pin and screw are used to adjust the tension of the chain. It is very important when assembling the bar that the adjusting pin aligns in a hole in the bar. Turning the screw will move the adjusting pin up and down the screw.
PARTS LIST 13
PARTS LIST 14
PARTS LIST 15
PARTS LIST 16
PARTS LIST 17
PARTS LIST 18
PARTS LIST 19
PARTS LIST 20
WARRANTY PLEASE READ THE FOLLOWING CAREFULLY THE MANUFACTURER AND/OR DISTRIBUTOR HAS PROVIDED THE PARTS LIST AND ASSEMBLY DIAGRAM IN THIS MANUAL AS A REFERENCE TOOL ONLY. NEITHER THE MANUFACTURER OR DISTRIBUTOR MAKES ANY REPRESENTATION OR WARRANTY OF ANY KIND TO THE BUYER THAT HE OR SHE IS QUALIFIED TO MAKE ANY REPAIRS TO THE PRODUCT, OR THAT HE OR SHE IS QUALIFIED TO REPLACE ANY PARTS OF THE PRODUCT.