
- STAR TRAC V-bike Spinner Spinner Pro Spinner Elite Spinner NXT OWNER'S GUIDE

Page 19 STAR TRAC GROUP CYCLES OWNER’S GUIDE
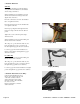
3. Tighten the two bolts that go through the frame, moving the flywheel forward
by turning clockwise, until there is approximately 3/16” of slack in the chain
(Diagram B).
4. Re-tighten the two bolts on the sides of the flywheel and replace the chain
shrouding.
NOTE: If the chain is too tight, typically the rider will feel a strong vibration
between 20 and 50 RPMs. If this happens, loosen the bolts 1/2” turn until the
vibration disappears, then tighten the lock nuts.
Diagram B
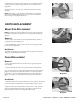
PARTS REPLACEMENT
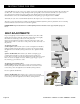
BRAKE PAD REPLACEMENT
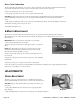
NOTE: The flywheel and crank assembly have been removed from Diagram C to
better illustrate the brake pad assembly. This is not required when replacing the
brake pad.
Removal
1. Remove tension from the brake pad by turning the Push Brake System knob
counterclockwise, until completely loose.
Diagram C
2. Using the Multi-Purpose Wrench, remove the two bolts supporting the brake
pad onto the frame (Diagram C).
Installation
1. Carefully re-install the two bolts through the brake pad bracket onto the frame.
Tighten by using the Multi-Purpose Wrench.
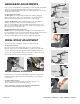
CHAIN REPLACEMENT
Removal
1. Using a 3mm Allen Wrench, remove the three screws supporting the plastic
chain shrouding.
2. Using the 5mm Allen Wrench, remove the flywheel axle bolts (Diagram D).
3. Loosen the chain tension bolts (Diagram E). Slide the flywheel off the frame by
pulling it toward the back of the bike. This will allow you to slide the flywheel
back and drop down, then carefully pull the flywheel out from the back frame
Diagram D
brackets. Next, gently remove the chain from the crank sprocket and flywheel
cog.
Installation
1. Install the new chain on the crank sprocket and on the cog attached to the flywheel.
2. Insert flywheel into the back brackets of the frame, sliding in, then up and in.
3. Tighten the chain tension bolts until chain has about 3/16” of slack. Verify the
flywheel is straight within the frame of the bike. Tighten lock nuts. Insert and
tighten flywheel axle bolts and re-install the plastic chain shroud.
Diagram E