
- STAR TRAC V-bike Spinner Spinner Pro Spinner Elite Spinner NXT OWNER'S GUIDE


Page 10 STAR TRAC GROUP CYCLES OWNER’S GUIDE
Pro & Elite Only
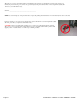
Using the 5mm hex wrench and a 13mm combination
wrench insert 2- M10X55mm flat head screws, nuts
and washers to secure the front leg assembly to the frame.
Tighten all screws/nuts securely using a torque wrench to 85 Inch Pounds
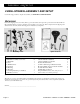
Step 2 (Pro/Elite)
Move the bike to a flat surface and adjust the four leveling feet so the bike is stable.
3. Install the Saddle and Seat Slider
Install the seat post into the frame and lower it to the lowest position and tighten the pop pin securely. Slide the seat slide into the top of the seat post
with the saddle pointed towards the front of the bike.
NXT Only
Rotate the seat slider lock knob as needed so that the slider
clamp is in alignment with the guide rail.
There is a locking pin under the saddle that has to be pulled
up as you move the slider into position. Release the pin
when the indicator is within the 0 to 9 range.
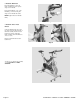
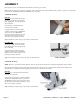
Step 3a (Pro/Elite) Step 3a (NXT)
Test the seat slide for proper operation and full travel.
Pro & Elite Only
Unscrew the seat slider pin far enough to allow the slider to
pass over the pin.
Tighten screw with the slider in the 0 to 10 range.
Test the seat slide for proper operation and full travel.
Step 3b (Pro/Elite) Step 3b (NXT)
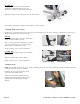
4. Install the Pedals
NOTE: The pedal shafts are marked “R” and “L”. Trying to install the pedals on the wrong side may damage the pedal and the crank arm take caution
to attach the pedals to the correct side of the bike.
Install the pedals on the pedal cranks using a 15mm
open-end wrench and tighten securely.
Turn the left pedal spindle counterclockwise when
threading into the left crank arm; turn the right pedal
spindle clockwise when threading into the right
crank arm.
Step 4