BROADBAND ROUTER 4 Port 10/100 Mbits/sec DSL/Cable router BR4100DC Instruction Guide * Actual product may vary from photo The Professionals’ Source For Hard-to-Find Computer Parts
FCC COMPLIANCE STATEMENT This equipment has been tested and found to comply with the limits for a Class B digital device, pursuant to part 15 of the FCC Rules. These limits are designed to provide reasonable protection against harmful interference in a residential installation. This equipment generates, uses and can radiate radio frequency energy and, if not installed and used in accordance with the instructions, may cause harmful interference to radio communications.
1 Table of Contents Chapter 1: Introduction . . . . . . . . . . . . . . . . . . . . . . . . . . . . . . . . . . . . . . . . . . . . . . 3 Features . . . . . . . . . . . . . . . . . . . . . . . . . . . . . . . . . . . . . . . . . . . . . . . . . . . . . . . . 3 Before You Begin . . . . . . . . . . . . . . . . . . . . . . . . . . . . . . . . . . . . . . . . . . . . . . . . 3 Minimum Requirements . . . . . . . . . . . . . . . . . . . . . . . . . . . . . . . . . . . . . . . . 3 Contents . . . . . . . . . . . .
2 Chapter 5: Tools . . . . . . . . . . . . . . . . . . . . . . . . . . . . . . . . . . . . . . . . . . . . . . . . . . . . 41 Configuration Tools . . . . . . . . . . . . . . . . . . . . . . . . . . . . . . . . . . . . . . . . . . . . . 41 Firmware Upgrade . . . . . . . . . . . . . . . . . . . . . . . . . . . . . . . . . . . . . . . . . . . . . . 42 Reset . . . . . . . . . . . . . . . . . . . . . . . . . . . . . . . . . . . . . . . . . . . . . . . . . . . . . . . . .
3 Chapter 1: Introduction Thank you for purchasing a StarTech.com four-port Ethernet broadband router. Now you can configure multiple users to share one high-speed xDSL or cable Internet connection. With 20 Mbits/sec LAN-to-WAN throughput and the ability to add hubs or switches to expand your network, this router is ideal for small or home offices (SOHOs) or mediumsized businesses.
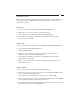
4 Contents This package should contain: • 1 x four-port Ethernet broadband router unit • 1 x straight-through UTP cable • 1 x power adapter • Wall-mount accessories Router Basics Back Panel The back panel is divided into three sections: LAN, WAN, and Reset. • The four Local Area Network (LAN) ports are where you connect your LAN computers, print servers, hubs/switches, etc. • The Wide Area Network (WAN) ports are where you connect your cable/xDSL modem. You will only use one WAN port at a time.
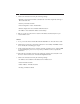
5 The Front Panel The front panel LEDs are your best indication of the router’s activities.
6 Getting Started NOTE: The information in the following section as well as the information in Chapter 2: Quick Setup is covered on the Quick Installation Guide that accompanies this manual. If you have already performed the steps in the Quick Installation Guide, you can proceed to Chapter 3: General Settings. Setting Up Your LAN Sample Network 1. Make sure all network devices are turned off. 2. Plug the power adapter into the 12VDC port on the back of the router.
7 Configuring Your PCs Each of your LAN PC clients must be set up to obtain IP addresses automatically. If you are running an OS that is different than those listed below, please consult your OS manufacturer for details. Windows XP a. From your Control Panel, double-click the Network Connections icon. b. Right-click on “Local Area Connection” and select Properties. c. Select “Internet Protocol [TCP/IP]” and click the Properties button. d.
8 f. Check each of the tabs and verify the following settings: • Bindings: Check “Client for Microsoft Networks” and “File and printer sharing for Microsoft Networks” • Gateway: All fields are blank • DNS Configuration: Select “Disable DNS” • WINS Configuration: Select “Disable WINS Resolution” • IP Address: Select “Obtain IP address automatically” g. Reboot your PC. Your PC will now obtain an IP address automatically from your router’s DHCP server. WinNT a.
9 Accessing the Router Home Page Once your PCs have been properly configured, the router’s DHCP server will automatically provide your LAN clients with an IP address. NOTE: Please make sure that the DHCP server on the router is the only DHCP server available on your LAN. If necessary, you can turn off the router’s DHCP server. See LAN on page 25 for details. 1. On one of your connected PCs, open your web browser. In the address field, enter the router’s default IP address (192.168.2.1) and press Enter.
10 Navigate the Router Management Interface To leave the router’s web-based management interface, use the Logout button at the top right of the screen. You can also use this shortcut bar to move between pages when configuring the router. When applicable, you can click on the question icon that appears to the right of the page heading for a further definition or description of the information on the page.
11 Chapter 2: Quick Setup The Quick Setup feature will allow you to start sharing your Internet connection as quickly as possible. Advanced features such as passwords or firewalls can not be configured through Quick Setup. BEFORE YOU BEGIN: Make sure that you know what type of Internet connection your ISP uses: Cable Modem, Fixed-IP xDSL, Point-To-Point Protocol over Ethernet (PPPoE), or Point-to-Point Tunneling Protocol (PPTP).
12 Broadband Type The Broadband Type page requires you to select the method your ISP uses to connect you to the Internet. For tips on where to find the information required by the router, see Appendix A. If you are unsure of what type of connection you are using or of where to find any of the information required by the router, contact your ISP. Select your connection type and proceed to the appropriate IP Address Info page.
13 Cable Modem If you are using a cable modem, your ISP will automatically provide you with an IP address. Some ISPs may require that you fill in additional information, such as the Host Name and MAC Address. If your ISP does not require this information, click OK to complete the configuration. Parameter Host Name Description Enter the Host Name (if required). MAC Address Your ISP may be expecting the MAC address of the adapter you were using when you initially signed up with them.
14 Fixed-IP xDSL If you are using a Fixed-IP xDSL connection, your ISP has provided you with a specific IP address for you to use. Your ISP can provide all the information required in this section. Parameter IP Description Enter your IP address. Gateway IP Enter your ISP’s gateway IP address. DNS Enter your ISP’s DNS (Domain Name System) server IP address. Subnet Mask Enter the subnet mask provided by your ISP. When you are satisfied with your IP address settings, click the OK button.
15 PPPoE If your ISP uses the Point-to-Point over Ethernet (PPPoE) protocol to connect you to the Internet, you will be required to fill in the information below. Parameter User Name Description Enter your user name. Password Enter your password. Please retype your password Enter your password again for confirmation. Service Name Enter the service name (if required). MTU As an option, you can specify the maximum size of your transmission packet to the Internet.
16 PPTP If your ISP uses the Point-to-Point Tunneling Protocol (PPTP) to connect to the Internet, you will be required to fill in the information below. Parameter IP Address Description Enter your IP address. Subnet Mask Enter the subnet mask. Default Gateway Enter the IP address of the ISP Gateway. User ID Enter your User ID (also known as a connection ID). Password Enter your password. PPTP Gateway If your LAN has a PPTP gateway, enter the gateway IP address here.
17 Chapter 3: General Settings The General Setup section contains advanced features that allow you to configure your router to meet your network’s needs. From here you can: assign passwords, set up remote management access, configure your LAN and WAN settings, or set up a firewall, DMZ, or many other functions. Remember, if you have already used the Quick Setup Wizard, you do not need to alter any of the General Settings in order to share the Internet. From the router homepage, click on General Setup.
18 System The system screen allows you to specify a time zone, change the system password, and specify a remote management user for the router. Time Zone The time zone screen lets you specify the time zone you are in, as well as choose if and when you want daylight savings enabled. To change the time zone, follow the procedure outlined in Quick Setup on page 11.
19 Password Settings The Password Settings screen allows you to change the password required to access the broadband router’s web-based management interface. By default, there is no password. It is recommended that you assign a password as soon as possible. Parameter Current Password Description Enter your router’s current password. (By default there is no password) New Password Enter your new password. Re-Enter Password... Enter your new password again for confirmation.
20 Remote Management The remote management function allows you to designate an Internet host who can access and configure the broadband router from a remote location. Parameter Host Address Description Enter the IP address of the host that will have remote management/configuration access. The person at this IP address will be able to configure the router from their remote location. Check the Enabled box to allow Remote Management. If you enter a host address of 0.0.0.
21 WAN Most of the WAN settings are identical to the Broadband Type selection process you went through in the Quick Setup Wizard. You also have the option of choosing your DNS server or setting the router to bridge mode. To change your WAN connection to Cable Modem, PPPoE, PPTP, or Fixed-IP xDSL, turn to Broadband Type on page 12.
22 DNS If there is a Domain Name System (DNS) server that you would prefer to use instead of the DNS server provided by your ISP, you can specify it here. Parameter Domain Name Server (DNS) Address Description Enter the IP address of the DNS server you wish to use. The default is your ISP’s DNS server. Secondary DNS Address As an option, you can enter the IP address of a second DNS server. If the primary DNS server fails, this secondary DNS server will be used.
23 Bridge From this screen you can set your broadband router to bridge mode and assign an IP address for management purposes. When bridge mode is selected, the router essentially connects and enables packet forwarding between homogenous networks. When the router is in bridge mode, the original WAN MAC address is ignored and the original LAN MAC address will be used as the MAC address. These values will be restored when you set the device to any mode other than bridge mode.
24 Example: Bridge Mode In this example of a bridged network, a computer on Network A is able to communicate with a computer on Network B by sending a message to IP address 192.168.2.1, which in turns sends a message to 172.25.3.14, which in turn sends the message to the computer on Network B.
25 LAN The LAN port settings page allows you to specify a private IP address for your router’s LAN port and specify a range of IP addresses for your DHCP server to issue to your LAN clients. Parameter IP Address IP Subnet Mask DHCP Server Default 192.168.2.1 255.255.255.0 Enabled Description This is the router’s LAN port IP address. (Your LAN clients’ default gateway IP address.) Enter the subnet mask for your LAN segment.
26 NAT Network Address Translation (NAT) helps you conserve IP addresses by allowing many multiple local users to access the Internet through far fewer public IP addresses. NAT also provides firewall protection from hacker attacks and allows you to map private IP addresses to public IP addresses for key services such as websites or FTP. Address Mapping Address Mapping allows you to map or translate your private LAN IP addresses to different public IP addresses used for the Internet.
27 Virtual Server Use the Virtual Server function when you want different servers/clients in your LAN to handle specific applications (e.g., email, FTP, web server). Using different port numbers, computers can recognize a particular application process or network service. The Virtual Server function allows you to re-direct a remote request to a particular LAN private IP address. Parameter Private IP Description Enter the private LAN client/host IP address that the packet will be sent to.
28 Example: Virtual Server The diagram below demonstrates one of the ways you can use the Virtual Server. Private IP: 192.168.2.2 Private Port: 80 (HTTP) Type: TCP Public Port: 80 (HTTP) 192.168.2.2 In this example, the user wants the web server on their private LAN to be accessible to Internet users. Any request from the Internet to access the web server is forwarded to the LAN’s web server.
29 Special Applications Some applications (like Internet games, video conferencing, Internet telephony and others) require multiple connections. The Special Applications function allows you to configure the router to support multiple connections for these types of applications. Parameter Trigger Port Description Enter the outgoing (Outbound) port number for this particular application. The Trigger Port range is between 0 and 65535. Trigger Type Select whether the Outbound port protocol is TCP or UDP.
30 Example: Special Applications To run special applications, you need to know the port (outbound) information associated with that application. In the example on the previous page, there are three special application rules enabled. The first rule states that when a user triggers port number 28800 (outbound), the router will open ports 2300-2400 and 47624 to allow incoming packets to be directed to the user.
31 Firewall The router can provide extensive firewall protection. You can restrict certain users/hosts from using certain applications, block common hacker attacks, and be informed by email if an attack on your network occurs. You can also configure a specific client/server as a DMZ (Demilitarized Zone) for applications that require unrestricted access to the Internet. To enable the firewall settings, check the Enable box and click Apply.
32 Access Control The Access Control feature allows you to restrict users from accessing specific Internet applications and services (e.g., email, FTP, Internet websites). You can also set time restrictions on users and applications so that certain users can only access certain applications during specified times. Parameter Enable Client Filtering Description Select Yes to enable client filtering. If you select No, none of the filters you enter below will be applied.
33 Example: Access Control In the screen shot on the previous page, there are two access control restrictions in place. The client at IP address 192.168.2.1 is restricted from using port 80 (HTTP) at all times. The clients with IP addresses between 192.168.2.10 and 192.168.2.15 are restricted from using any activity that requires ports 80 through 999 between Monday at 7:00AM to Friday at 5:00PM.
34 Hacker Prevention The router’s firewall can block common hacker attacks (including Denial of Service, Ping of Death, and RIP defect) and can alert you by email if your network is under attack. Parameter DoS Protection Description Check this box to protect your network from Denial of Service (DoS) attacks. Discard Ping from WAN Check this box and the router’s WAN port will not respond to any ping requests, protecting your network from Ping of Death attacks.
35 DMZ The DMZ (DeMilitarized Zone) feature allows a LAN client to have unrestricted twoway access to the Internet by bypassing the router’s firewall. Useful for applications like Internet gaming, video conferencing, or VPN connections, a DMZ will redirect all packets going to your WAN port IP address to a specific LAN client/server while allowing the rest of your network to remain protected. Parameter Enable DMZ Description Select Yes to enable your DMZ.
36 Chapter 4: Status The Status section allows you to monitor the status of your router. From the Status page you can view your router’s system information, Internet connection status, configuration settings, any illegal attempts to enter your network, and information on all DHCP client PCs currently connected to the network. From the router homepage, click on Status.
37 Internet Connection You can view your current Internet connection status and related information. Parameter Cable/DSL Description Displays whether the router’s WAN port is connected to a Cable/DSL modem. WAN IP Displays the router’s WAN IP address. Subnet Mask Displays the router’s Subnet Mask. Gateway Displays your gateway IP address. Primary DNS Displays your primary Domain Name System server’s IP address.
38 Device Status The Device Status page shows you the router’s current configuration settings. Parameter IP Address Description Displays your router’s LAN IP address. Subnet Mask Displays your router’s LAN subnet mask. DHCP Server Shows whether the router’s DHCP server is enabled or disabled. Firewall Shows whether the firewall is enabled or disabled. Note: If you enabled the Firewall but did not configure any settings, this setting will still be shown as enabled (See page 31).
39 Security Log This security log shows any attempts to gain illegal access to your network. Parameter Security Log Description The log lists information about all illegal attempts to access your network. Click the Save button to save the log to a local file for further processing. Click Clear to clear the security log. Click Refresh to get the most updated version of the log. Note: When the system is powered down, the security log will disappear if it has not been saved.
40 DHCP Client Log You can view information on the LAN clients that are currently linked to the router’s DHCP server. Parameter DHCP Client Log Description This page shows all the DHCP LAN clients that are currently connected to your network. The DHCP client log displays the number of clients linked to the router’s DHCP server, as well as their IP addresses and MAC addresses. Click the Refresh button to get the most updated information.
41 Chapter 5: Tools From the Tools page, you can save or restore configuration settings, upgrade the system firmware, or reset the router. From the router homepage, click on Tools. You have three options: • Configuration Tools: You can save the router’s current configuration, restore the router’s saved configuration files, or restore the router’s factory default settings. • Firmware Upgrade: You can upgrade the router’s firmware. • Reset: You can reset the router in case of problems.
42 Firmware Upgrade StarTech.com may periodically offer firmware upgrades as a download on our website. Visit www.startech.com and click on the Downloads link to check for possible firmware upgrades for this product. If there is an upgrade available, download the file according to instructions on the website and then proceed with the following steps: Parameter Firmware Upgrade Description Browse to the location of the firmware upgrade and click the Apply button.
43 Reset You can reset the router if you are experiencing any problems. Remember, performing this step will delete all your configurations and requires you to re-configure the router, beginning with the Quick Install. Click on the Apply button to reset the router. You will be asked to confirm your decision. The reset will be complete when the Power LED stops blinking. Once the reset process is complete, you can start using the router again.
44 Appendix A Find and record your computer’s IP configuration settings Note: The following instructions are valid for Windows 95/98/Me/2000/XP only. If you are using a different OS, consult your OS manufacturer for details. If after completing this procedure you are still unsure of where to find some of the required information, contact your ISP for details. 1. Click on Start then Run. 2. Type “cmd” (or “command”) in the field and click OK. 3. At the command prompt, type “ipconfig /all” and press Enter.
45 Appendix B Popular Port Numbers For online games, check with the game manufacturer for details on the specific ports or port ranges need to be opened. Note: The following list contains a selection of some of the most popular port numbers. A more complete list of port numbers is available on the Internet Assigned Numbers Authority (IANA) website at: http://www.iana.org/assignments/port-numbers.
46 Appendix C Setting a Static IP Address By default, the router uses its DHCP server to automatically assign your LAN clients a dynamic IP address in the range of 192.168.2.100 to 192.168.2.199 (You can edit this range. See page 25 for details). To use certain router functions such as address mapping or virtual server, you may need to assign a PC a static/fixed IP address.
47 Windows Me/98/95 1. From your Control Panel, double-click on the Network icon. 2. Under the Protocols tab, highlight TCP/IP and click the Properties button. 3. Select the IP address tab, and select “Specify an IP address”. Enter a unique IP address that is not used by any other computer on the network connected to the router. Make sure that each IP address is unique for each PC or network device. Make sure that the IP address you select is NOT in the range specified for the router’s DHCP server. 4.
48 Troubleshooting If you are experiencing connection difficulties, first check your cables: • Make sure that all cables are in their proper ports and firmly seated. • Make sure that cables connected to PCs/LAN clients are not plugged into the WAN port and that the cable from the modem is plugged into the WAN port. • Make sure that your modem is connected to the proper WAN port. If the WAN LNK/ACT LED is lit, you are using the correct WAN port.
49 Test your Internet connection. You can try to pin down the location of the problem by completing the following steps: • Ping your router. 1. Click on Start then Run. 2. Type “cmd”(or “command”) in the field and click Run. 3. Type “ping 192.168.2.1” (the router’s default IP address) and press Enter. If you see four “Reply from 192.168.2.1” messages, the connection is successful. If you see four “Request timed out” or “Destination host unreachable” messages, there is a problem with your router connection.
50 Online Gaming Problems • Some online games require certain ports to be opened in order to function properly. See Special Applications on page 29 in the manual for details on how to open ports. Check with the game manufacturer’s technical support for details on which specific ports need to be opened. • Multiple gamers on the LAN may not be able to get on a game server and play simultaneously with only one public IP.
51 Glossary Bridge: An intelligent, internetworking device that forwards or filters packets between different networks based on data link layer (MAC) address information. Broadband: A method of communication where a wide band of frequencies is available to transmit voice, data, and video signals over a single medium. Information can be sent on many different channels, allowing more information to be sent in a given period of time (the same way multiple lanes allow more cars on the road).
52 Ethernet: A popular network standard of communication using either twisted pair or coaxial cables. The most widely used LAN access method, Ethernet networks are connected by special cables and hubs, and can transfer data at speeds up to 10 or 100 million bits per second (Mbits/sec). Also known as IEEE 802.3. Firewall: A configurable program or hardware device that filters information coming to your private network or computer from the Internet.
53 Port: A number used to identify a specific process or application (such as HTTP or SMTP) to which an Internet or other network message is to be forwarded. If you are operating behind a firewall, you may need to open specific ports to allow users to access these applications. PPPoE (Point-to-Point Protocol over Ethernet): A communications specification for connecting multiple users on an Ethernet LAN to the Internet through a common broadband medium, such as a single DSL line.
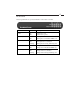
54 WAN (Wide Area Network): A communications network that covers a wide geographic area (different buildings, cities, countries). The Internet is an example of a WAN. xDSL: All types of DSL modems (ADSL, SDSL, HDSL, etc.). Technical Specifications LAN Ports 4 x 10/100 BaseT (RJ-45) WAN Ports 2 x 10/100 BaseT (RJ-45, xDSL or Cable) LEDs 1 x Power 1 x WAN 10/100M 1 x WAN Link/Activity 4 x LAN 10/100M 4 x LAN Link/Activity Power 12V DC (500mA) Dimensions 1.18 x 7.36 x 3.94 in.
55 Technical Support The following technical resources are available for this StarTech.com product: On-line help: We are constantly adding new information to the Tech Support section of our web site. To access this page, click the Tech support link on our homepage, www.startech.com. In the tech support section there are a number of options that can provide assistance with this card.
Revised: February 20, 2003