2 Port USB 3.0 Dual System KVM Swap Adapter with File Transfer SVUSB3DSA *actual product may vary from photos DE: Bedienungsanleitung - de.startech.com FR: Guide de l'utilisateur - fr.startech.com ES: Guía del usuario - es.startech.com IT: Guida per l'uso - it.startech.com NL: Gebruiksaanwijzing - nl.startech.com PT: Guia do usuário - pt.startech.com For the most up-to-date information, please visit: www.startech.
FCC Compliance Statement This equipment has been tested and found to comply with the limits for a Class B digital device, pursuant to part 15 of the FCC Rules. These limits are designed to provide reasonable protection against harmful interference in a residential installation. This equipment generates, uses and can radiate radio frequency energy and, if not installed and used in accordance with the instructions, may cause harmful interference to radio communications.
Table of Contents Introduction.............................................................................................2 Packaging Contents.................................................................................................................................. 2 System Requirements............................................................................................................................... 2 Installation .........................................................................
Introduction Packaging Contents • 1x USB 3.0 Dual System Swap Adapter • 1x Driver CD • 1x Instruction Manual System Requirements • Available USB 2.0/3.0 port (USB 3.0 recommended) • CPU: Intel Core i3 2.8GHz or higher • RAM: 2GB memory or higher • Windows® 8 / 8.1 (32/64bit), 7 (32/64), Vista(32/64), XP(32/64) Installation Notes: • The adapter should not be connected to either system until the software is installed and the system has been restarted. • It is not recommended to connect the USB 3.
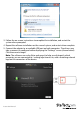
3. Follow the on-screen instructions to complete the installation, and restart the system when prompted. 4. Repeat the software installation on the second system, and restart when complete. 5. Connect the adapter to an available USB port on both computers. The drivers may take a moment to configure before displaying the “Settings” screen (shown below). Click the arrow to begin.
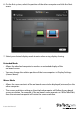
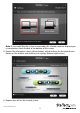
. On the first system, select the position of the other computer and click the Next arrow. 7. Select your desired display mode to enter when using display sharing: Extended Mode • Allows the attached computer to work as an extended display of the on-board screen. • You may change the relative position of the two computers in Display Settings (shown above). Mirror Mode • Allows the same contents of the on-board screen to be displayed (mirrored) on the other computer.
Note: If you would like the system to remember this selection and not display upon re-connection, check the box at the bottom of this screen. 8. Review the information screen (shown below), which outlines the function of each button on the toolbar, and confirm your settings (bottom right corner). 9. Repeat steps 6-8 on the second system.
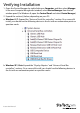
Verifying Installation 1. Open the Device Manager by right-clicking on Computer, and then select Manage. In the new Computer Management window, select Device Manager from the left window panel (For Windows 8, open the Control Panel and select Device Manager). 2. Expand the section(s) below, depending on your OS: a. Windows 8 / 7: Expand the “Universal Serial Bus controllers” section. On a successful install, you should see the following devices in the list with no exclamation points or question marks. b.
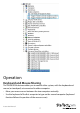
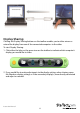
Operation Keyboard and Mouse Sharing The SVUSB3DSA device enables you to control either system, with the keyboard and mouse (or touchpad) set connected to either computer. • Move your mouse cursor between the two computers naturally. • Use the keyboard of the first computer to type on the second computer (keyboard function follows the position of the mouse cursor).
Display Sharing Clicking the Display Sharing buttons on the toolbar enables you to either mirror or extend the display from one of the connected computers to the other. To start Display Sharing: 1. Click either the blue, or the green icon on the toolbar to indicate which computer’s display you would like to share. 2. If you would like to make adjustments to the display settings when sharing, open the Windows display settings as if the secondary display(s) were directly connected and adjust as needed.
3. To stop Display Sharing, click the stop button on the toolbar Note: Touch Screen Control (for Windows 8 or above) - If the computer has a touch screen, you can use the touch screen to control the computer being mirrored or extended.
File Transfer Clicking the file sharing button on the toolbar opens a file transfer screen, which enables you to transfer data to / from your other system using one of the following methods: • Drag-and-Drop • Copy / Paste (files) • Clipboard Sharing: Copy your selected text from the 1st computer and paste it on the 2nd computer Note: The device simultaneously supports the File Transfer and Display Sharing.
Hiding / Re-Opening the Toolbar The toolbar can be closed using the ‘x’ button in the top right corner: To restore the toolbar, click on the icon in the system tray and select the Toolbar Dialog option: Instruction Manual 11
Specifications Number of Ports 2 Connectors 2 x USB 3.0 Type A Male LEDs 2 x Link Switching Methods Mouse Movement, Toolbar Chipset ID MCT – WH90 Operating Temperature 0°C to 50°C (32°F to 122°F) Storage Temperature -10°C to 75°C (14°F to 167°F) Humidity 0~85% RH (Non-Condensing) Cable Length 1.5m (5ft) Weight 36g Supported Operating Systems Windows® 8 / 8.
Technical Support StarTech.com’s lifetime technical support is an integral part of our commitment to provide industry-leading solutions. If you ever need help with your product, visit www.startech.com/support and access our comprehensive selection of online tools, documentation, and downloads. For the latest drivers/software, please visit www.startech.com/downloads Warranty Information This product is backed by a two year warranty. In addition, StarTech.
Hard-to-find made easy. At StarTech.com, that isn’t a slogan. It’s a promise. StarTech.com is your one-stop source for every connectivity part you need. From the latest technology to legacy products — and all the parts that bridge the old and new — we can help you find the parts that connect your solutions. We make it easy to locate the parts, and we quickly deliver them wherever they need to go. Just talk to one of our tech advisors or visit our website.