THERMAL RE-WRITABLE CARD READER /WRITER TCP400 SERIES User ’s Manual Manuel d ’utilisation Benutzerhandbuch Manuale dell ’utente Manual del usuario
Federal Communications Commission Radio Frequency Interference Statement This equipment has been tested and found to comply with the limits for a Class A digital device, pursuant to Part 15 of the FCC Rules. These limits are designed to provide reasonable protection against harmful interference when the equipment is operated in a commercial environment.
1. Precautions for Safe Use.............................................................1 2. Unpacking ...................................................................................3 3. External Appearance and Part Names .......................................3 4. Connecting to External Devices . ................................................4 5. Connecting the Power Cord.........................................................5 6. Setting Fonts Using the Font Setting Card ...........................
1. Precautions for Safe Use Always observe the following items. Carefully read and obey the following items to prevent injury to yourself or to others and to prevent damaging property. 1-1. Precautions for Reader/Writer Setup 1. Setup the reader/writer in a solid, and level location. 2. Do not use or place the reader/writer in areas exposed to direct sunlight, or near heat sources. 3. Avoid using or storing the reader/writer in areas of high humidity.
8. Do not obstruct the insertion or discharge path of the cards. 9. Do not cut the power while a card is being processed. 10. In case of reader/writer error (abnormal sounds, abnormal odors, smoke, fire) turn off the reader/writer immediately and unplug it from the power outlet. 11. Always hold the plug to unplug the power cord from its outlet. Pulling on the cord will damage the cord. 12. When disconnecting use for prolonged periods, always remove the power plug from the outlet. 13.
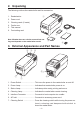
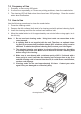
2. Unpacking The following outlines the reader/writer and its accessories. 1 1. Reader/writer 2. Power cord 3. Cleaning cards (2 cards) 4. Ferrite core 5. This manual 6. Font setting card 2 6 Note :Whether there are a ferrite core and font setting card depends on the reader/writer model. 5 3 4 3. External Appearance and Part Names 2 3 4 5 7 6 1 1. Power Switch............................. This turns the power to the reader/writer on and off. 2. Power Lamp . ............................
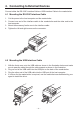
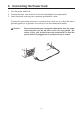
4. Connecting to External Devices Connect either the RS-232C interface Cable or USB interface Cable to the reader/writer. 4-1 Mounting the RS-232C Interface Cable 1. Cut the power to the host computer and the reader/writer. 2. Connect one end of the interface cable to the reader/writer and the other end to the host computer. 3. Mount the accessory ferrite core to the interface cable. 4. Tighten the left and right screws on the connector. 4-2 Mounting the USB Interface Cable 1.
5. Connecting the Power Cord 1. Turn the power switch off. 2. Connect the powr cord to the AC inlet on the backside of the reader/writer. 3. Insert the power cord plug into a properly grounded AC outlet. Connect the grounding terminal to a metal portion (such as an outlet that has a grounding point) on a ground in the vicinity to use this reader/writer safely. Caution: We recommend that you unplug the reader/writer from the power outlet whenever you do not plan to use it for long period.
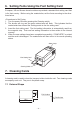
6. Setting Fonts Using the Font Setting Card European, US and Korean bound models are provided a standard font setting card that is for their country. Before using the reader/writer, set the fonts according to the directions below. 1. Turn the power ON while pressing the Cleaning switch. 2. The buzzer will ring and the green status lamp will flash. This indicates that the reader/writer has entered the “setting mode to use the setting card.” 3. Insert the font setting card.
7-2 Frequency of Use 1. Everyday, or once every 300 prints. 2. If errors occur repeatedly, or if there are printing problems, clean the reader/writer. 3. The cleaning LED will flash when there have been 300 printings. Clean the reader/ writer when this flashes. 7-3 How to Use Use the following procedures to clean the reader/writer. 1. Press the cleaning switch. 2. Dampen the felt surfaces (both side) of a cleaning card with optional cleaning liquid. 3.
8. Troubleshooting 8-1. Trouble when Turning on the Power Symptom Possible Cause The power lamp does not light. The power lamp lights. Won’t accept cards. The power cord is not correctly connected. Broken wire in power cord. Broken wire in fuse. Accepts cards. Display LED burned out. Won’t accept Reader/writer error. cards. Accepts cards Bad Card but reader/ Card damaged, bent, writer data erased on card, operating or other user card. incorrectly. Head is dirty.
8-3. Removing Jammed Cards 1. Turn off the power and unplug the reader/writer. 2. Press the cover opener. 3. Lift the upper cover while the cover is open. Upper cover Cover Opener 4. While pulling the mechanism’s snap lever (green), lift the mechanism. Note: Do not touch the thermal head or erasing head. There is the danger of getting burned. Thermal head Erase head Snap lever 5. Remove the card while the cover is open.
1. 2. 3. 4. 5. 6. Précautions pour une utilisation en toute sécurité..................... 11 Déballage..................................................................................13 Aspect extérieur et noms des éléments ...................................13 Connexion à des périphériques externes..................................14 Connexion du câble d’alimentation...........................................15 Paramétrage des polices à l’aide de la carte de paramétrage des polices.......................
1. Précautions pour une utilisation en toute sécurité Conformez-vous toujours aux points suivants. Lisez attentivement les points suivants et respectez-les afin d’éviter tout dommage, corporel ou matériel. 1-1. Précautions relatives à l’installation du lecteur/graveur 1. Installez le lecteur/graveur sur une surface stable et de niveau. 2. N’utilisez pas et ne placez pas le lecteur/graveur à un endroit directement exposé aux rayons du soleil ou proche d’une source de chaleur. 3.
7. N’insérez aucun autre objet que les cartes appropriées dans le lecteur/graveur. 8. N’obstruez pas la fente d’insertion ou de libération des cartes. 9. Ne coupez pas l’alimentation lorsqu’une carte est en cours de traitement. 10. En cas de problème au niveau du lecteur/graveur (odeurs ou bruits anormaux, fumée, feu), mettez-le immédiatement hors tension et débranchez-le. 11. Tenez toujours la fiche lorsque vous retirez le câble d’alimentation de la prise.
2. Déballage Les points suivants décrivent brièvement le lecteur/graveur et ses accessoires. 1 1. Lecteur/graveur 2. Câble d’alimentation 3. Cartes de nettoyage (2) 4. Tore magnétique 2 5. Le présent manuel 6 6. Carte de paramétrage des polices 5 Remarque : la présence d’un tore magnétique et d’une carte de paramétrage des polices dépend du modèle du lecteur/graveur. 3 4 3. Aspect extérieur et noms des éléments 2 3 4 5 7 1 1. Commutateur d’alimentation 2. Témoin alternatif 3. Témoin état 4.
4. Connexion à des périphériques externes Connectez le câble d’interface RS-232C ou le câble d’interface USB au lecteur/graveur. 4-1 Installation du câble d’interface RS-232C 1. Coupez l’alimentation de l’ordinateur hôte et du lecteur/graveur. 2. Connectez l’une des extrémités du câble d’interface au lecteur/graveur et l’autre à l’ ordinateur hôte. 3. Installez le tore magnétique sur le câble d’interface. 4. Serrez les vis gauche et droite du connecteur. 4-2 Installation du câble d’interface USB 1.
5. Connexion du câble d’alimentation 1. Mettez l’appareil hors tension. 2. Connectez le câble d’alimentation à l’entrée secteur située à l’arrière du lecteur/graveur. 3. Insérez la fiche du câble d’alimentation dans une prise secteur reliée à la terre. Reliez la borne de mise à la terre à un élément métallique (tel qu’une prise disposant d’une prise de masse) mis à la terre à proximité afin d’utiliser le lecteur/graveur en toute sécurité.
6. Paramétrage des polices à l’aide de la carte de paramétrage des polices Les modèles européens, américains et coréens proposent une carte de paramétrage des polices standard propre à leur pays. Avant d’utiliser le lecteur/graveur, paramétrez les polices en respectant les instructions ci-dessous. 1. Mettez l’appareil sous tension tout en appuyant sur le commutateur de nettoyage. 2. L’avertisseur sonore retentit alors et le témoin d’état vert clignote.
7-2 Fréquence d’utilisation 1. Quotidienne ou toutes les 300 impressions. 2. Si des erreurs ou des problèmes d’impression surviennent de manière récurrente, nettoyez le lecteur/graveur. 3. Le voyant de nettoyage clignote lorsque les 300 impressions sont atteintes. Nettoyez le lecteur/graveur à ce moment. 7-3 Procédure de nettoyage Respectez les procédures suivantes pour nettoyer le lecteur/graveur. 1. Appuyez sur le commutateur de nettoyage. 2.
8. Dépannage 8-1. Problème lors de la mise sous tension Symptôme Le témoin d’alimentation ne s’allume pas. Le témoin d’alimentation s’allume. Cause possible Action N’acceptera Le Câble d’alimentation n’est Corrigez la connexion pas les cartes. pas connecté correctement. de câble d’alimentation. Fil rompu au câble d’alimentation. Fil rompu du fusible. Contactez votre revendeur. Accepte les Voyant d’affichage grillé. cartes. N’acceptera Erreur de lecteur/graveur. pas les cartes.
8-3. Retrait des cartes coincées 1. Mettez le lecteur/graveur hors tension et débranchez-le. 2. Appuyez sur le mécanisme d’ouverture du capot. 3. Soulevez le capot supérieur une fois ouvert. Capot supérieur Mécanisme d’ouverture du capot 4. Tout en tirant sur le levier de sécurité (vert), soulevez le mécanisme. Remarque : Ne touchez ni la tête thermique ni la tête d’effacement. Vous pourriez vous brûler. Tête thermique Tête d’effacement Levier de sécurité 5.
1. Sicherheitsvorkehrungen...........................................................21 2. Auspacken.................................................................................23 3. Äußere Merkmale und Bezeichnungen der Teil .......................23 4. Anschluss externer Geräte........................................................24 5. Anschließen des Netzkabels.....................................................25 6. Font-Einstellung mit der Font-Einstellkarte ..............................26 7.
1. Sicherheitsvorkehrungen Beachten Sie stets die folgenden Punkte. Lesen Sie die folgenden Anweisungen sorgfältig durch, um Verletzungen an sich selbst und anderen Personen sowie Sachschäden zu vermeiden. 1-1. Sicherheitsvorkehrungen für die Installation des Lese-SchreibGeräts 1. Stellen Sie das Lese-Schreib-Gerät auf eine feste, ebene Oberfläche. 2. Setzen Sie das Lese-Schreib-Gerät keiner direkten Sonneneinstrahlung und keinen hohen Temperaturen aus (z.B.
6. 7. 8. 9. 10. 11. 12. 13. 14. 15. 16. 17. 18. 19. Stecken Sie die Karten nur in der angegebenen Richtung in das Gerät ein. Stecken Sie niemals andere Gegenstände als geeignete Karten in das Gerät ein. Behindern Sie nicht den Einführungs- oder Ausgabeweg der Karten. Unterbrechen Sie während der Verarbeitung einer Karte nicht die Stromversorgung. Bei Fehlern des Lese-Schreib-Geräts (abnormale Geräusche oder Gerüche, Rauch, Feuer) sofort das Lese-Schreib-Gerät ausschalten und den Netzstecker ziehen.
2. Auspacken Nachstehend finden Sie eine Übersicht über den Lieferumfang des Lese-Schreib-Geräts und des Zubehörs. 1 1. Lese-Schreib-Gerät 2. Netzkabel 3. Reinigungskarten (2 Stück) 2 4. Ferritkern 6 5. Benutzerhandbuch 5 6. Karte zur Font-Einstellung 3 4 Hinweis: Ob Ferritkern und Font-Einstellkarte vorhanden sind, ist abhängig vom Modell des LeseSchreib-Geräts. 3. Äußere Merkmale und Bezeichnungen der Teil 2 3 4 5 7 6 1 1. Netzschalter...................................
4. Anschluss externer Geräte Verbinden Sie entweder das RS-232C-Schnittstellenkabel oder das USB-Schnittstellenkabel mit dem Lese-Schreib-Gerät. 4-1 Anschließen des RS-232C-Schnittstellenkabels 1. Trennen Sie die Stromversorgung des Host-Computers und des Lese-SchreibGeräts. 2. Schließen Sie das eine Ende des Schnittstellenkabels an das Lese-Schreib-Gerät und das andere Ende an den Host-Computer an. 3. Befestigen Sie den mitgelieferten Ferritkern am Schnittstellenkabel. 4.
5. Anschließen des Netzkabels 1. Bringen Sie den Netzschalter in die „Aus“-Position. 2. Verbinden Sie das Netzkabel mit der Anschlussbuchse auf der Rückseite des LeseSchreib-Geräts. 3. Stecken Sie den Netzstecker in eine korrekt geerdete Wechselstrom-Steckdose. Verbinden Sie den Erdungsanschluss mit einem Metallteil (z.B. einer Steckdose mit Erdungspunkt) an einer Erdung in der näheren Umgebung, um den sicheren Betrieb des Lese-Schreib-Geräts zu gewährleisten.
6. Font-Einstellung mit der Font-Einstellkarte Modellen für den Markt in Europa, USA und Korea liegt eine Karte zur Einstellung der Standard-Fonts für das betreffende Land bei. Bevor Sie das Lese-Schreib-Gerät verwenden, stellen Sie die Fonts entsprechend der nachfolgenden Anleitung ein. 1. Halten Sie während des Einschaltens die Reinigungstaste gedrückt. 2. Der Summer ertönt und die grüne Statusanzeige blinkt.
7-2 Häufigkeit der Benutzung 1. Täglich oder nach jeweils 300 Druckvorgängen. 2. Reinigen Sie das Lese-Schreib-Gerät, wenn häufig Fehler auftreten oder wenn Druckprobleme vorliegen. 3. Nach 300 Druckvorgängen leuchtet automatisch das Reinigungslämpchen auf. Reinigen Sie das Lese-Schreib-Gerät, wenn das Licht blinkt. 7-3 Vorgehensweise So reinigen Sie das Lese-Schreib-Gerät: 1. Drücken Sie die Reinigungstaste. 2.
8. Fehlerbehebung 8-1. Probleme beim Einschalten Symptom Mögliche Ursache Netzkontrollleuchte Karten werden Netzkabel ist nicht leuchtet nicht. nicht richtig eingesteckt. angenommen. Leitungsunterbrechung im Netzkabel. Sicherung durchgebrannt. Karten werden Kontrollleuchte ist defekt. angenommen. Fehler des Lese-SchreibNetzkontrollleuchte Karten werden nicht angenommen. Geräts. leuchtet.
8-3. Entfernen von verklemmten Karten 1. Schalten Sie das Gerät aus und ziehen Sie den Netzstecker. 2. Drücken Sie die Abdeckungsöffnertaste. 3. Klappen Sie die Abdeckung nach oben. Obere Abdeckung Abdeckungsöffnertaste 4. Ziehen Sie an dem Verriegelungshebel (grün) und heben Sie dabei den Mechanismus an. Hinweis: Berühren Sie niemals den Thermokopf oder den Löschkopf. Dies kann zu Verbrennungen führen. Thermokopf Löschkopf Verriegelungshebel 5. Entnehmen Sie die Karte bei geöffneter Abdeckung.
SOMMARIO Precauzioni per l’utilizzo sicuro.................................................31 Apertura della confezione..........................................................33 Aspetto esterno e nomi dei componenti....................................33 Connessione a dispositivi esterni..............................................34 Collegamento del cavo di alimentazione...................................35 Impostazione dei caratteri mediante la scheda di impostazione caratteri...........................
1. Precauzioni per l’utilizzo sicuro Tenere sempre presente le indicazioni seguenti. Leggere attentamente e seguire le indicazioni fornite di seguito per evitare danni alle persone o alle cose. 1-1. Precauzioni per l’installazione del dispositivo di lettura/scrittura 1. Collocare il dispositivo di lettura/scrittura in un luogo solido e piano. 2. Non utilizzare il dispositivo in aree esposte alla luce solare diretta o vicino a fonti di calore. 3. Non collocare il dispositivo in aree ad elevata umidità.
9. Non interrompere l’alimentazione durante l’elaborazione delle schede. 10. In caso di anomalia del dispositivo di lettura/scrittura (rumori, odori anomali, fumo, fuoco) spegnere subito il dispositivo e scollegarlo dalla presa di alimentazione. 11. Staccare il cavo di alimentazione tenendo la spina con la mano e mai tirando il cavo, poiché quest’ultimo potrebbe danneggiarsi. 12. Se il dispositivo non viene utilizzato per un lungo periodo di tempo, staccare sempre la spina dalla presa di alimentazione. 13.
2. Apertura della confezione Di seguito vengono presentati il dispositivo di lettura/scrittura e gli accessori. 1 1. Dispositivo di lettura/scrittura 2. Cavo di alimentazione 3. Schede per la pulizia (2 schede) 4. Nucleo di ferrite 2 5. Il presente manuale 6 6. Scheda impostazione caratteri 5 3 Nota: la presenza di nucleo di ferrite e scheda di impostazione dei caratteri dipende dal modello del dispositivo di lettura/scrittura. 4 3. Aspetto esterno e nomi dei componenti 2 3 4 5 7 1.
4. Connessione a dispositivi esterni Collegare il cavo di interfaccia RS-232C o USB al dispositivo di lettura/scrittura. 4-1 Montaggio del cavo di interfaccia RS-232C 1. Disattivare l’alimentazione del computer host e del dispositivo di lettura/scrittura. 2. Collegare un’estremità del cavo di interfaccia al dispositivo di lettura/scrittura e l’ altra al computer host. 3. Montare il nucleo di ferrite al cavo di interfaccia. 4. Serrare le viti a destra e sinistra sul connettore.
5. Collegamento del cavo di alimentazione 1. Posizionare l’interruttore di alimentazione su Off. 2. Collegare il cavo di alimentazione all’ingresso CA nel retro del dispositivo di lettura/ scrittura. 3. Inserire la spina del cavo di alimentazione in una presa CA collegata a terra. Collegare il terminale di messa a terra a una parte metallica (ad esempio una presa con punto di messa a terra) in un punto di messa a terra in prossimità per utilizzare in sicurezza il dispositivo.
6. Impostazione dei caratteri mediante la scheda di impostazione caratteri I modelli per l’Europa, gli USA e la Corea sono forniti di una scheda di impostazione caratteri per la relativa area geografica. Prima di utilizzare il dispositivo di lettura/scrittura, impostare i caratteri in base alle istruzioni seguenti. 1. Accendere il dispositivo premendo contemporaneamente l’interruttore di pulizia. 2.
7-2 Frequenza di utilizzo 1. Tutti i giorni o una volta ogni 300 stampe. 2. Se si verificano spesso errori, oppure problemi di stampa, pulire il dispositivo di lettura/scrittura. 3. Il LED di pulizia lampeggia dopo l’esecuzione di 300 stampe. Pulire il dispositivo quando la spia lampeggia. 7-3 Modalità di utilizzo Seguire le procedure indicate per pulire il dispositivo di lettura/scrittura. 1. Premere l’interruttore di pulizia. 2.
8. Risoluzione dei problemi 8-1. Problemi all’accensione Sintomo La spia di alimentazione non si accende. La spia di alimentazione si accende. Causa possibile Soluzione Non vengono Il cavo di alimentazione non Collegare il cavo di accettate è collegato correttamente. alimentazione. schede. Filo rotto nel cavo di alimentazione. Filo rotto nel fusibile. Rivolgersi al fornitore. Vengono accettate Il LED è bruciato. le schede. Non vengono Errore del dispositivo accettate schede. di lettura/scrittura.
8-3. Rimozione delle schede inceppate 1. Spegnere il dispositivo di lettura/scrittura e scollegare il cavo di alimentazione. 2. Premere il dispositivo di apertura coperchio. 3. Tenere aperto il coperchio superiore. Coperchio superiore Dispositivo di apertura coperchio 4. Mentre si tira la leva di blocco del meccanismo (verde), sollevare il meccanismo. Nota: non toccare la testina termica o la testina di cancellazione. Rischio di ustioni. Testina termica Testina di cancellazione Leva di blocco 5.
CONTENIDO Precauciones de uso.................................................................41 Desembalaje.............................................................................43 Aspecto exterior y nombres de las piezas.................................43 Conexión a un dispositivo externo............................................44 Conexión del cable de alimentación..........................................45 Configuración de las fuentes con la tarjeta de configuración de fuentes..................
1. Precauciones de uso Cumpla siempre estas recomendaciones. Lea atentamente y cumpla las siguientes recomendaciones. Evitará posibles lesiones a otras personas o a usted mismo, así como daños a materiales. 1-1. Precauciones para la instalación de la impresora/lectora 1. Coloque la impresora/lectora en un lugar estable y nivelado. 2. No utilice ni coloque la impresora/lectora en zonas expuestas a la luz solar directa, ni cerca de fuentes de calor. 3.
jetas adecuadas. 8. No obstruya el conducto de entrada ni de salida de las tarjetas. 9. No corte el suministro eléctrico si hay una tarjeta en proceso. 10. En caso de error (sonidos u olores anormales, humo, fuego, etc.), apague la impresora/lectora inmediatamente y desconéctela de la toma de corriente. 11. Para la conexión o desconexión de la toma de corriente, sujete siempre el enchufe, no el cable: de lo contrario, podría dañarlo. 12.
2. Desembalaje A continuación se detallan la impresora/lectora y sus accesorios: 1 1. Impresora/lectora 2. Cable de alimentación 3. Tarjetas limpiadoras (2) 4. Núcleo de ferrita 2 5. Este manual 6 6. Tarjeta de configuración de fuentes Nota: según el modelo, la unidad de lectura/escritura estará provista de un núcleo de ferrita y una tarjeta de tipos de letra. 5 3 4 3. Aspecto exterior y nombres de las piezas 2 3 4 5 7 6 1 1. Interruptor general 2. Luz de encendido 3. Luz de estado 4.
4. Conexión a un dispositivo externo Conecte el cable de interconexión RS-232C o el cable de interconexión USB a la impresora/lectora. 4-1 Colocación del cable de interconexión RS-232C 1. Desconecte el ordenador y la impresora/lectora de la corriente. 2. Conecte un extremo del cable de interconexión a la impresora/lectora y el otro al ordenador. 3. Fije el núcleo de ferrita al cable de interconexión. 4. Apriete los tornillos laterales del conector. 4-2 Colocación del cable de interconexión USB 1.
5. Conexión del cable de alimentación 1. Apague el interruptor general. 2. Conecte el cable de alimentación a la entrada de corriente alterna ubicada en la parte posterior de la impresora/lectora. 3. Enchufe el cable de alimentación a una toma de corriente conectada a tierra correctamente. Para utilizar la impresora/lectora con seguridad, conecte el borne de tierra a un elemento metálico con conexión a masa (por ejemplo, un enchufe que tenga conexión a tierra).
6. Configuración de las fuentes con la tarjeta de configuración de fuentes Los modelos destinados a Europa, EE. UU. y Corea disponen de una tarjeta de configuración de fuentes estándar para cada país. Antes de utilizar la impresora/lectora, configure las fuentes siguiendo estas instrucciones. 1. Encienda la impresora mientras mantiene pulsado el interruptor de limpieza. 2.
7-2 Frecuencia de uso 1. Todos los días o cada 300 impresiones. 2. Limpie la impresora/lectora si se producen errores repetidamente o si surgen problemas de impresión. 3. El testigo de limpieza parpadea cuando se hayan producido 300 impresiones. Limpie la impresora/lectora cuando esto ocurra. 7-3 Instrucciones de uso Limpie la impresora/lectora siguiendo estos procedimientos. 1. Pulse el interruptor de limpieza. 2.
8. Solución de problemas 8-1. Problemas al encender el aparato Síntoma No se enciende la luz de encendido. Se enciende la luz de encendido. Posible causa Qué hacer No se aceptan las tarjetas. El cable de alimentación Conecte correctamente el cable de alimentación. está mal conectado. Hay un cable roto en el cable de alimentación. Se ha roto el hilo del fusible. Contacte con su proveedor. Se aceptan Testigo fundido. las tarjetas. No se aceptan Error en la impresora/ las tarjetas. lectora.
8-3. Cómo retirar tarjetas atascadas 1. Apague la impresora/lectora y desconéctela de la toma de corriente. 2. Pulse la palanca de apertura de la tapa. 3. Con la tapa superior abierta, levante la tapa superior. Tapa superior Palanca de apertura de la tapa 4. Levante el mecanismo mientras tira de la palanca del mecanismo (verde). Nota: No toque el cabezal térmico ni el de borrado: podría quemarse. Cabezal térmico Cabezal de borrado Palanca 5. Con la tapa abierta, retire la tarjeta.
Appendix A: Connection Settings A-1. RS-232C Interface < RS-232C Serial Interface Specifications > 1 2 3 4. 5. 6. Connectors Compatible Connectors Connector Pins I/O Circuit Level Cable D-Sub 9PIN (Male) * Reader/Writer Side D-Sub 9PIN (Female) * Cable Side See Table Below See Table Below RS-232C Cross (Reverse) Cable Pin No.
To change the DIP switch settings, do the following. 1. Check that the power is turned off for both the reader/writer and the host computer. 2. Remove the two screws. 3. Pull out the interface card to remove it. 4. Change the DIP switch settings on the interface card. 5. Push in the interface card to mount it. 6. Tighten the two screws. 7. Turn on the power for both the reader/writer and the host computer.
Appendix B: Removing / Installing Interface Board B-1. Removing 1. Turn off the power switch. Then, unplug the power cord from the outlet. 2. Remove the two screws as shown in the figure below. 3. Pull the interface board in the direction of the arrow to remove it. B-2. Installing 1. Insert the interface board to the reader/writer. Note: Firmly insert so that the reader/writer connector and the interface board connector are securely connected. 2.
Appendix C: Optional Ethernet Interface IFBD-HE05 LED Push switch Push switch To initialize the setting information, set the push switch as described below. Push the switch for 1 to 5 seconds while the unit is operating in the normal mode. The green and red LEDs will flash with a regular pattern. In this state, momentarily push the switch once again to turn OFF both the green and red LEDs. This will revert the interface board to its factory settings.
Appendix D: General Specifications Item Specifications Card Specification Card Transport Unit Transport Method Card Insertion Direction Card Travel Speed Plastic card (JIS X6301 / ISO 7810:type ID-1) Rollers One Direction 300 mm/s (at high speed: When reading) 30 mm/s (at slow speed: when erasing/printing) Magnetic Stripe Functions JISII type (1 track) read/write (TCP400) ISO type (3 tracks) read/write (TCP410) Print Unit Number of Print Characters Printing Character Types Max.
– 54 –
– 54 –
ELECTRONIC PRODUCTS DIVISION STAR MICRONICS CO., LTD. OVERSEAS SUBSIDIARY COMPANIES STAR MICRONICS AMERICA, INC. Please access the following URL http://www.star-m.jp/eng/dl/dl03.htm for the lastest revision of the manual STAR MICRONICS EUROPE LTD. 536 Nanatsusinya, Shimizu-ku, Shizuoka, 424-0066 Japan Tel: 054-347-0122, Fax: 054-347-0409 1150 King Georges Post Road, Edison, NJ 08837-3729 U.S.A. Tel: 732-623-5555, Fax: 732-623-5590 http://www.starmicronics.