
Operation Manual

6
77-132 / 77-133
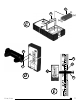
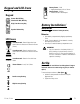
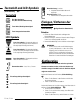
To mount clamp onto measuring rod, pole, or similar object
(See fi gure
E
) :
• Loosen tightening knob.
• Place onto measuring rod, pole, or similar object.
• Tighten knob to secure the clamp.
• When locating reference level loosen clamp to allow for
up / down positioning.
• When reference level is found, tighten knob again to
secure.
Operation
(See Keypad and LCD Descriptions for indications during
operation)
Power
• Press
to turn detector ON.
• When powered ON, the entire LCD will momentarily
display all icons (this allows a check to ensure that LCD
is functioning correctly).
• Press and hold
for ≥ 3 seconds to turn detector
OFF.
NOTE:
• The detector will automatically power OFF after 10 minutes
of not detecting a laser beam to conserve battery. To power
ON again, press
.
Illuminate LCD
• When detector is ON, press
to turn ON / OFF LCD
illumination.
NOTE:
The illumination will automatically turn OFF after 60 seconds of
not detecting a laser beam or having a key pressed.
Accuracy
• When powered ON, press
to toggle accuracy
setting between HIGH and LOW.
• When powered ON, the default accuracy setting is set
to HIGH.
NOTE:
• Only select LOW accuracy setting in times where HIGH
accuracy is not needed and / or when a stable reference
level cannot be obtained due to slight vibrations at or near
the work site.
• If the point to be measured is at a longer distance the LOW
accuracy setting may be necessary due to heat waves or
slight vibrations that may interfere with obtaining a stable
reference level.
Speaker Volume
• When powered ON,
press to toggle through the
volume settings (LOUD / SOFT / MUTE).
• When powered ON, the default volume setting is set
to LOUD.
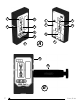
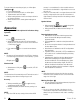
Detecting Reference Level
• With detector ON, position within the general area
where the laser beam being referenced is being
projected towards.
• Use the bubble vial to maintain a level plane with the
detector.
• Be sure laser reception window is facing the direction of
the laser beam source.
• Move detector as indicated on the LCD to align datum
with laser beam.
• If speaker volume is ON (LOUD / SOFT), an audible tone
will sound to assist in communicating the positioning
of the detector.
• A beeping tone signals that the laser beam has been
detected. A fast beeping tone signals the detector
must be moved down. A slower beeping tone signals
the detector must be moved up. Again, the LCD also
indicates the direction the detector must be moved.
• A steady tone indicates that the laser beam is aligned
with the datum line on detector.
NOTE:
• When detecting the reference level the laser reception
window must face towards the laser source within a 40°
range from left to right.
Marking (See fi gure
E
)
• Once the reference level has been detected, the position
can be marked at the datum line.
NOTE:
• Be sure to reference the back of the detector for the
measurement compensation value (distance from top to
datum) if the top of the detector was used as a marking
location.