
User Manual


Installation Instructions for Stanley Omnilock 9KOM Cylindrical Locks
Stanley Omnilock
a Product Group of Stanley Security Solutions, Inc.
11
Installation Instructions for Stanley Omnilock 9KOM Cylindrical Locks
Installing the lock
Removing the levers (when needed)
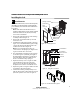
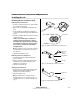
Removing the IC outside lever
1 Insert the control key into the core and rotate the
key 15 degrees to the right.
2 Remove the core and throw member from the
lever.
3 Insert a flat blade screwdriver into the figure-8
core hole and against the trapezoid-shaped lever
keeper.
4 Push the screwdriver blade in the direction of the
arrow in Figure 18.
Caution: Use the flat of the screwdriver to
push the lever keeper sideways. Using the
screwdriver tip to pry the keeper at an angle
may result in unseating the retaining spring.
For assistance, contact your local Stanley
Omnilock dealer.
M
Note: You will not be able to remove the lever if the
screwdriver blade is inserted past the keeper into
the center hole.
5 Slide the lever from the sleeve.
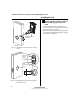
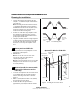
Removing the non-IC outside lever
1 Insert the key into the cylinder and turn it 45
degrees clockwise.
2 Depress the lever catch through the hole in the
outside lever by using the push pin or other
suitable tool. See Figure 19.
3 Slide the outside lever off.
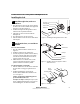
Removing the inside lever
1 Depress the lever catch through the hole in the
inside lever by using the push pin or other
suitable tool as shown in Figure 20.
2 Slide the inside lever off.
Note: Reinstall lever(s) according to “Install
through-bolts, inside rose and lever” on page 9, or
“Install outside lever, core and throw member” on
page 9
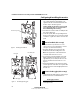
Figure 18 Push the lever keeper to remove the lever
Lever keeper
Figure 19 Removing the outside non-IC lever
Push pin
Outside lever
Turn key 45
degrees
clockwise
Figure 20 Removing the inside lever
Push pin
Inside lever